Pre-requisite: Docker
Docker is an open-source software that is used to containerize applications. Containerization makes the deployment of applications easy. Today we will deploy a SteamCMD game server using docker. Deploying game servers using docker will make it easy to deploy our game servers on a new server which may be present anywhere around the world.
Here, we will use a droplet rented from the digital ocean for hosting our SteamCMD game server. Using a cloud provider for hosting purposes is relatively easier and cheaper than hosting anything on your own PC. Hence, you are recommended to use a cloud provider for hosting this game server. These are the recommended specifications for hosting a CS: GO game server (this may vary from game to game):
Required Specifications
|
RAM
|
2GB or more
|
|
Processor Clock
|
2ghz or more
|
|
Storage
|
40GB+ recommended ( 35 GB minimum )
|
Steps To Deploy CS: GO Server Using Docker
We will be using Ubuntu as a base image for our container. But you can also use other distros for your docker container.
Step 1. So the first step is definitely to install and set up docker on your actual host machine. You may use the following website for help, to install and setup docker on the host machine- Installdocke.
Step 2. Now, create an empty directory called game_server and cd into it.
Command:
mkdir game_server
cd game_server
Step 3. After that, create a Dockerfile by:
Command:
touch Dockerfile
Step 4. After the Dockerfile is created, edit the Dockerfile using any editor of your choice. dockerfile. You can also use Vim, edit, or any other editor.
Command:
nano Dockerfile
Step 5. Now the approach is, we need to download and configure steamCMD at the build time, and download the game files using steamcmd at the runtime. We will download the game files, and configure the game server using a shell script inside the docker container.
Dockerfile
# Using the latest ubuntu image
FROM ubuntu:latest
RUN apt update

# Setting /home as our working directory
WORKDIR /home

# Download and install all the necessary dependencies for steamcmd
RUN dpkg --add-architecture i386 \
 && apt-get update -y && apt install wget lib32gcc-s1 lib32stdc++6 \
 curl libstdc++6:i386 lib32z1 -y

# Presetting Values for liscence agreement keys using debconf-set-selections
RUN echo steam steam/question select "I AGREE" |  debconf-set-selections
RUN echo steam steam/license note '' | debconf-set-selections

# Installing SteamCMD
RUN mkdir steamcmd && mkdir game_files && apt-get install -y --no-install-recommends steamcmd

# Create symlink for executable in /bin
RUN ln -s /usr/games/steamcmd /usr/bin/steamcmd

RUN steamcmd +quit


# Copy our shell script to docker container.
# This shell script will be used to download gamefiles
# and configure our gameserver.
# Description for this file is given later

COPY download_and_run_gameserver.sh /home/entrypoint.sh

# Copy server configuration to container ( Counter Strike specific )
COPY *.cfg /home/

# Set executable permissions for our shell script
RUN chmod +x /home/entrypoint.sh

# Set our shell script as entrypoint for our container
# So that it gets executed when we RUN the container
ENTRYPOINT [ "/home/entrypoint.sh"]
The explanation for the specifications of this Docker file is given at the end.
Step 6. After we have edited the Dockerfile, let’s edit our shell script.
Shell Script
#!/bin/bash

# Download game files using SteamCMD to the specified volume
# The volume needs to be mounted when running the container

# Run SteamCMD to download the game files using app ID - 740 ( CSGO server )
steamcmd +force_install_dir /home/game_files +login anonymous +app_update 740 validate +quit


#Copying server configuration files ( for CSGO )

cp *.cfg game_files/csgo/cfg/


# Start the game server using the downloaded game files
cd game_files

# Fix for a small bug in CSGO server
sed -i 's|export LD_LIBRARY_PATH="${SRCDS_DIR}:${SRCDS_DIR}/bin:${LD_LIBRARY_PATH}"|export LD_LIBRARY_PATH="/home/game_files/bin"|'srcds_run
mv bin/libgcc_s.so.1 bin/libgcc_s.so.1.old

# Finally start the game server
./srcds_run -game csgo -console -usercon +game_type 0 +game_mode 1 +mapgroup mg_active +map de_dust2
Note: This shell script we are creating, totally depends on game to game. Here we are demonstrating for CS: GO specifically, hence this file will be different for every different game.
Step 7. After the shell script has been made, we get all the files ( shell script, Dockerfile, server configuration files ), which are specified to be copied inside the Dockerfile in the same directory.
Step 8. Now, we start building the image for our game server using the following command
Command:
docker build -t game_server .
Step 9. If everything is in place then the image will be successfully built. Finally, we will run the docker image using the following command:
Command:
docker run -p 27015:27015/udp --mount type=bind,src=<absolute_path_for_volume_to_be_mounted>,dst=/home/game_files -d game_server
Explanation of the above run command
- -p flag: In the above command, the -p flag was used to map the 27015 port inside the container to the 27015 port on the real machine. /udp needs to be specified explicitly as most of the games (including CSGO) use UDP instead of TCP.
- –mount: –mount was used to mount our external volume ( present outside the container ) to the /home/game_files which is present inside the container. This is super important as you won’t be able to download game files inside the container and you would get an error ( 0X202 ) to be precise.
- -d: Here, everything is fit and fine, hence we are directly starting our container in -d (detached) mode, which will cause it to run in the background even after we close the terminal. Initially, you should run the container in -it (interactive, attach tty) mode, which will help you to see everything happening inside the container when it is running. Once you have fully configured the container, and made sure that there are not any errors, you can stop using -it mode and use it in detached ( -d ) mode.
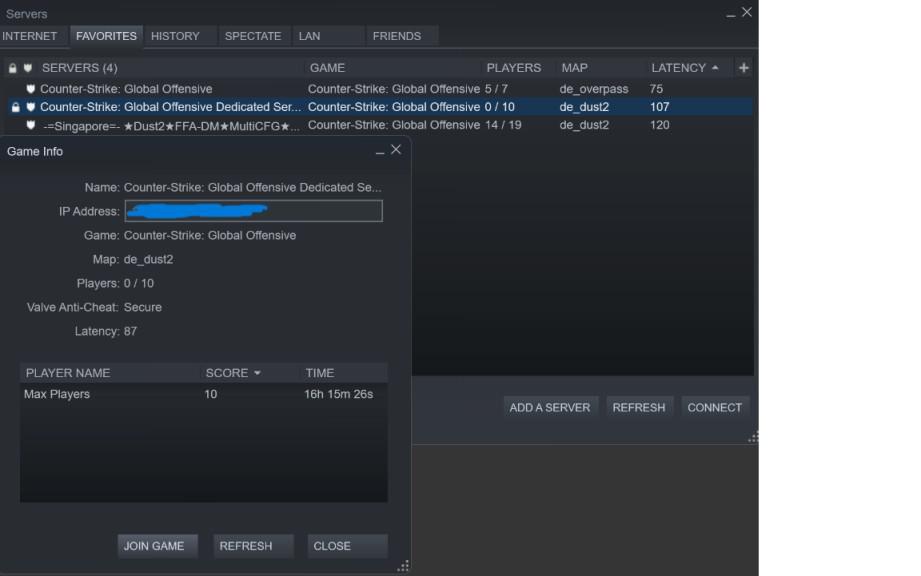
Step 10: After that, open up the Steam client on your PC, click on View> Servers,entry point and then search for your server using the public IP address with port (27015). Example – 128.123.90.12:27015. If everything is fine, then surely it will be visible in the server list.
Important Steps
- For the entry point.sh file, whatever steps are specified there in this particular article is for CSGO. Other than that, the files that Dockerfile copies inside the container from the host machine also depend on the game. For whichever game you are deploying the game server, first try to do it manually without docker. If you are successful in doing that, then start doing it with docker.
- In CSGO, with other Counter-Strike game server configurations, you will need a special key called sv_setsteamaccount, which you will enter in Autoexec. cfg config file of the Counter-Strike game server. This file may be different for other games, but the key is super important, otherwise, your server will not be available publically and will only be available on LAN. You can check out how to generate this key for your game server on steam help.
Features Of The SteamCMD Docker Container
- The Docker container in this particular article, that we created was by using a Dockerfile. The Docker container can grow up to a limit of a maximum of 10 GB and not more than that. Hence, it is really important to set up a secondary volume for the game files separately, as we did in this tutorial.
- It is better not to increase the default size limit of a container as this will create larger-sized images that will be really difficult to manage. Other than that, the image will take a lot of network bandwidth each time you shift it to a new server. However, if you still want to increase the default size of each docker image you make, you can follow the steps at the end of this article.
- We set/home steam cmdsteamcmd directory and inside it, the SteamCMD files will be downloaded. The entrypoint.sh will download and configure SteamCMD as well as start our game server.
- debconf-set-selections was used to set values for the steamCMD user agreement.
- The installed steamcmd binary was symlinked to /usr/bin so that it could be executed and is available systemwide.
SteamCMD application
SteamCMD is a command-line version of Steam created by Valve Corporation. It was created to do server sided tasks like hosting game servers as servers usually don’t have a GUI. These are the things you can do in SteamCMD:
1. Setting a particular directory for game server application files
You can set up a particular directory for downloading game files in SteamCMD. This way, multiple game server files are put in one common place. You can do this by using the following command in SteamCMD without logging in:
force_install_dir /path/to/intended/dir
The above command won’t work if you have logged in to steamCMD. Hence you need to log out of steamCMD to execute this command.
2. Logging in
You can log in to SteamCMD either anonymously or with your Steam account. A Steam account is required in those scenarios when the game server you are trying to install is a paid application. Below is the command for logging in SteamCMD:
login <username>
To log in anonymously, you can do the following:
login anonymous
3. Downloading game files to the required directory
You can download game files of the required game by using app_id. App_id is a unique id used by each game on SteamCMD to differentiate between them. Given below is the command for downloading game files of a game in SteamCMD:
app_update <app_id> validate
This command not only downloads game server files for the first time but can also update them if required.
Steps To Installation SteamCMD On Linux
SteamCMD can be installed on Linux in the following ways:
Step 1: By using package managers
SteamCMD can be installed by using the package manager of your Linux distribution if it’s available in the official repositories of your Linux distro. Here is how you can do this on RedHat/CentOS and Ubuntu/Debian:
Ubuntu:
sudo apt-get install steamcmd
RedHat/CentOS:
yum install steamcmd
Step 2: Manually download and execute it from a script file
To manually download and execute steamCMD on your Linux distro, you can execute the following command
Command:
mkdir steamcmd && cd steamcmd
curl -sqL "https://steamcdn-a.akamaihd.net/client/installer/steamcmd_linux.tar.gz" | tar zxvf -
This will create a steamcmd directory and download the steamcmd shell script inside it. You can then execute that shell script like – ./steamcmd.sh
You can learn more about Steam cmd from here – https://developer.valvesoftware.com/wiki/SteamCMD
Steps To Installation Of SteamCMD On Windows
Step 1. You can download SteamCMD on Windows by this link – https://steamcdn-a.akamaihd.net/client/installer/steamcmd.zip
Step 2. You can execute steamcmd.exe using Windows Command Prompt like –
./steamcmd.exe
Conclusion
So this was how to install any game server using SteamCMD Dockerimage. As we know that Docker is an open-source platform used for containerization. Hence, regardless of whichever OS you are using, you can simply install Docker and follow this tutorial to install your favorite game server using Docker and SteamCMD. This means you can follow the above tutorial for Windows, Linux as well as macOS and host a SteamCMD game server on a Windows machine as well as a MacBook, without downloading binaries/executables for Windows/macOS.
Share your thoughts in the comments
Please Login to comment...