How To Stop Pod In Kubernetes ?
Last Updated :
26 Mar, 2024
In the Kubernetes cluster stopping a pod is typically deleting the pod. Pods are meant to be ephemeral, meaning they can be created, destroyed, and replaced dynamically as needed. When the pod is deleted in Kubernetes the resources associated with the pod will be released.
What Is Kubernetes Pod?
In Kubernetes, a pod is the smallest element that can be created or managed by the Kubernetes. In a single Kubernetes pod, you can manage one or more applications in the form of containerization. Multiple containers can reside within a Pod, but they are always closely related and share the same local storage, namespace, and network namespace. They can use localhost to communicate with one another.
Complete Guide To Stop and Pause The Kubernetes Pod Inside the Kubernetes Cluster
Follow the steps mentioned below to stop and Pause the Kubernetes pods inside the Kubernetes cluster.
1. Steps To Stop The Kubernetes Running Pod
In Kubernetes you will not stop the pod instead you will delete the pod.
Step 1: list all the pods that are currently running in the Kubernetes pod for that you can use the following command.
kubectl get pods
Step 2: Select the pod that you want to stop.
Step 3: Use the following command to stop the running pod in Kubernetes.
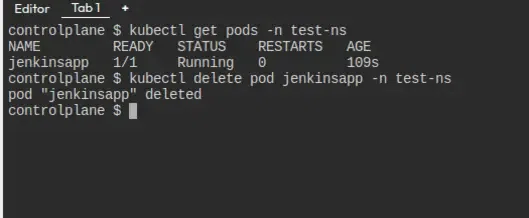
kubectl delete pod <Name Of The Pod>
Forceful Termination Of Kubernetes Pod
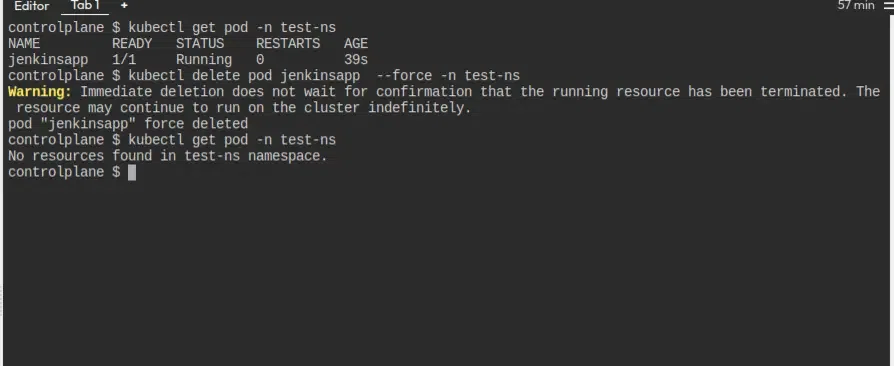
If you want to force delete the running Kubernetes pod you can use the “-f” in the above command.
kubectl delete pod <pod-name> --force
2. Pause The Kubernetes Pod
Pausing a pod is not a concept in Kubernetes. Designed to be either terminated or functioning, pods are independent units.However, you can Pause the Node while we go over this in more depth below, step by step.
Pausing The Node In Kubernetes
To pause a node, simply follow the instructions listed below to prevent Kubernetes from scheduling a new pod in that specific node.
List the available nodes in the Kubernetes cluster before continuing with further processing.Use the command below to get a list of all the cluster nodes. 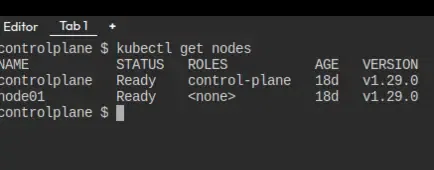
You can see the above image there are two nodes in the cluster one if controlplane and node01.
Step 1: Establish a test pod within the Kubernetes cluster. As you can see below, I’m now building the Jenkins pod in the test-ns namespace.
Creating Kubernetes namespace
apiVersion: v1
kind: Namespace
metadata:
  name: test-ns
  labels:
    team: testingteam
Creating Jenkins pod yaml
apiVersion: v1
kind: Pod
metadata:
  name: jenkinsapp
  namespace: test-ns
  labels:
    app: jenkinsapp
spec:
  containers:
  - name: jenkins
    image: jenkins/jenkins:latest  # Corrected image tag
    ports:
    - containerPort: 8080
---
apiVersion: v1
kind: Service
metadata:
  name: jenkinsappsvc
  namespace: test-ns
spec:
  type: NodePort
  selector:
    app: jenkinsapp
  ports:
  - port: 80
    targetPort: 8080
After running the above pod know
Step 2: Add a taint to the node where the pod is running, so new pods won’t be scheduled on that node. Existing pods will continue to run.
kubectl taint nodes control-plane pause=true:NoSchedule
<controlplane> replace it with your node name.
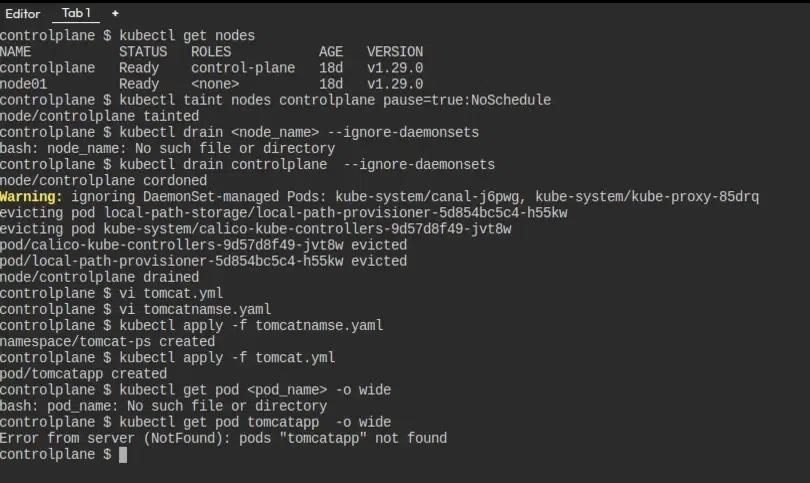
In the place of the control-plane replace it with your node name.
Step 3: Drain the node which will evict all the pods from the all the pods from the node.
kubectl drain <node_name> --ignore-daemonsets
Step 4: Know test try to schedule the pod it will automatically creates in new node to check that you can use the following command.
kubectl get pod <pod_name> -o wide
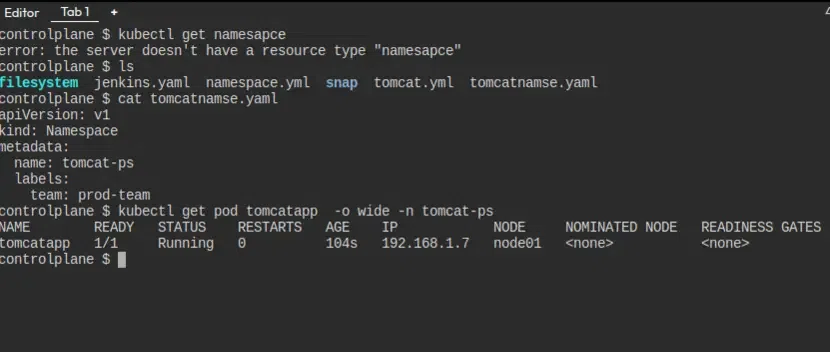
In the figure above, you can see that the pod was formed in node01, the second node, instead of the control plane.
How To Remove Taint To The Node
To resume the pod, you need to remove the taint from the node:
kubectl taint nodes <node_name> pause:NoSchedule-
Replace <node_name> with the name of the node where the pod is paused.Keep in mind that this approach is more of a workaround, and Kubernetes doesn’t have a built-in “pause” functionality for individual pods.
What Is Pod Selector & Labels?
In Kubernetes, Labels and Selectors are mentioned on the configuration file of the deployments and services. They are used to connect kubernetes services with a kubernetes pod.Labels are any key-value pairs that are used to identify that pod. The pod gets its label through the deployment which is like a blueprint for the pod before the pod is created. The Selector matches the label. Labels and selectors are required, to make connections between deployment, pods, and services.
Read the Kubernetes – Labels & Selectors
How To Stop Pod In Kubernetes – FAQ’s
How do you terminate pods in Kubernetes?
In Kubernetes, terminating pods is typically done by deleting them. Deleting a pod tells Kubernetes to gracefully terminate the pod’s containers and release associated resources.
kubectl delete pod <pod_name>
How do you restart a pod?
In Kubernetes, pods are designed to be immutable, meaning you typically don’t “restart” a pod in the traditional sense. Instead, if you need to update or restart the application running in a pod, you typically update the pod’s associated deployment, statefulset, or replica set.
Share your thoughts in the comments
Please Login to comment...