How to Set z-index Value in React JS ?
Last Updated :
17 Dec, 2023
This article explores setting the z-index attribute in React, a CSS property influencing the stacking order of HTML elements for visibility control. In React, adjusting the z-index attribute enables effective management of stacking contexts within the application.
We will discuss the following two approaches to set z-index values in React.
Prerequisites:
Syntax:
element {
    z-index: value;
};
Property Value:
- element: The HTML element to which you want to apply the z-index.
- value: An integer value that determines the stacking order. Higher values bring elements to the front.
Steps to Create the React Application And Installing Module:
Step 1: Create a react application by using this command
npx create-react-app <<My-Project>>
Step 2: After creating your project folder, i.e. reactProject-app, use the following command to navigate to it:
cd <<My-Project>>
Project Structure:
The updated dependencies in package.json file will look like:
"dependencies": {
    "react": "^18.2.0",
    "react-dom": "^18.2.0",
    "react-scripts": "5.0.1",
    "web-vitals": "^2.1.4",
  }
Approach 1: Inline Style
In this approach, we employ inline styles in React to directly configure the z-index property within a component. The process entails creating a JavaScript object that holds the desired z-index value and subsequently applying it as a style attribute to the relevant component.
Example: In this example we are using the above-explained approach.
Javascript
import React from 'react';
function App() {
const containerStyle = {
position: 'relative',
textAlign: 'center',
fontFamily: 'Arial, sans-serif',
left: '30%',
top: "30%",
position: "absolute",
};
const imgStyle = {
position: 'absolute',
left: '0',
top: '0',
zIndex: -1,
boxShadow: '0px 0px 10px 0px black',
borderRadius: "10px",
width: 400,
height: 400,
};
const headingStyle = {
zIndex: 1,
padding: '10px',
borderRadius: '5px',
margin: '0',
textShadow: '2px 2px 4px white',
};
const textStyle = {
margin: '10px',
textShadow: '2px 2px 4px white',
};
return (
<div style={containerStyle}>
<h1 style={headingStyle}>
The z-index Property
</h1>
<img
src=
width="100"
height="140"
style={imgStyle}
alt="Image"
/>
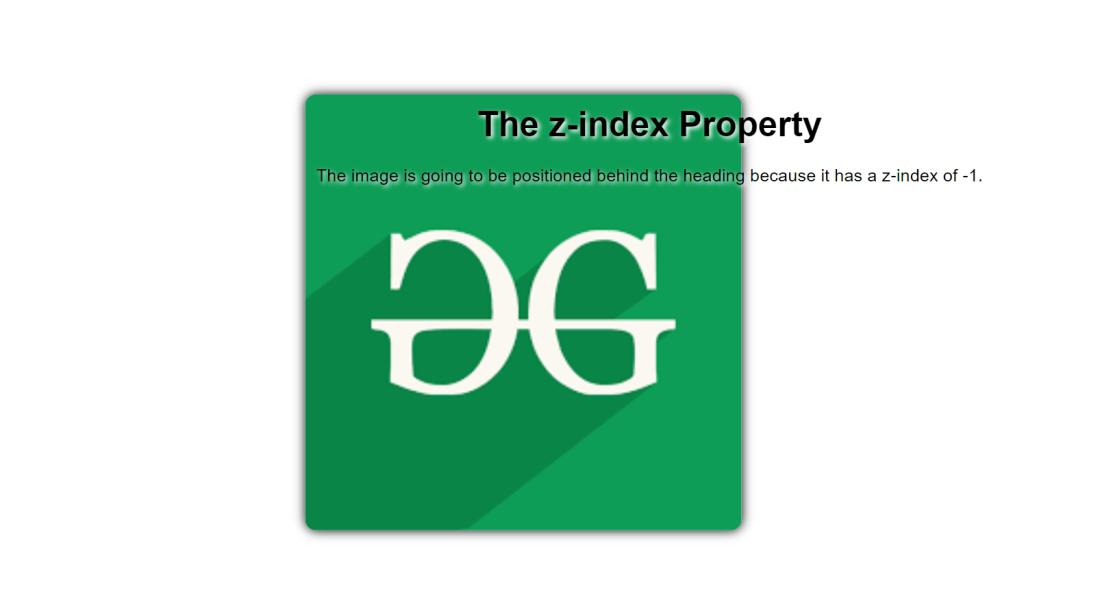
<p style={textStyle}>
The image is going to be positioned
behind the heading because it has
a z-index of -1.
</p>
</div>
);
}
export default App;
|
Step to run the application:Open the terminal and type the following command.
npm start
Output:
Approach 2: CSS Modules
This method involves using CSS Modules to separate component styles from logic. Styles are defined in dedicated CSS files, and React components import and apply them using dynamically generated class names, promoting modularity and preventing conflicts with global CSS for improved maintainability.
Example: In this example we are using the above-explained apporach.
Javascript
import React from 'react';
import styles from './MyComponent.module.css';
function App() {
return (
<div className={styles.container}>
<h1 className={styles.heading}>
The z-index Property
</h1>
<img
src=
className={styles.image}
alt="Image"
/>
<p className={styles.text}>
The image is positioned behind
the heading because it has a
z-index of -1.
</p>
</div>
);
}
export default App;
|
CSS
.container {
position: absolute;
text-align: center;
font-family: 'Arial, sans-serif';
left: 30%;
top: 30%;
}
.image {
position: absolute;
left: 0;
top: 0;
z-index: -1;
width: 410px;
height: 400px;
}
.heading {
z-index: 1;
padding: 20px;
border-radius: 5px;
margin: 0;
text-shadow: 2px 2px 4px white;
color: white;
}
.text {
margin: 10px;
text-shadow: 2px 2px 4px white;
color: red;
padding: 20px;
font-size: 20px;
}
|
Output:

Share your thoughts in the comments
Please Login to comment...