How to Use Z-Index In React Native ?
Last Updated :
09 Oct, 2023
The CSS property called z-Index allows us to control the stacking order of elements on a web page. This concept works similarly in React Native, where the z-Index attribute enables the specification of element display order on the screen. By assigning a higher value to an element’s z-index, Elements with a higher z-index value appear on top of elements with lower values. In this article, we will see the working of the Z-index attribute in React Native.
Syntax
<Component style={{ zIndex: value }} />
Here, the Component is the component you want to apply the zIndex to, and the value is the integer representing the stacking order.
Pre-requisites
Steps to Create a React Native Application
Step 1: Create a react native application by using this command
npx create-expo-app <Project-Name>
Step 2: After creating your project folder, i.e. zindexApp, use the following command to navigate to it:
cd <Project-Name>
Project Structure
The project structure will look like this:
.png)
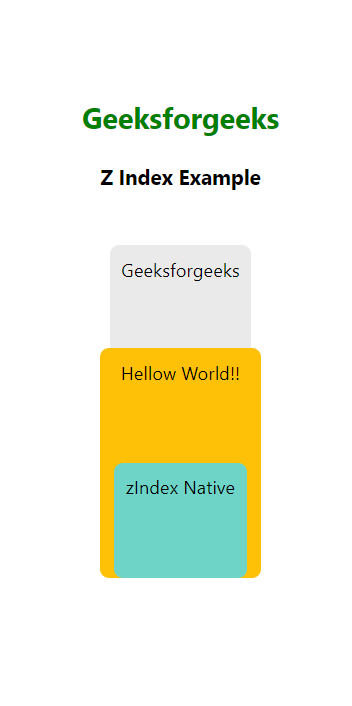
In this approach, The app showcases a title (“Geeksforgeeks”), a paragraph describing the purpose (“Z Index Example”), and three styled cards. Each card has its own unique background color and text content. To control the stacking order of these cards, the z-Index property is applied, assigning the lowest value to the first card and increase it up to the highest value for the third card.
Example: Suppose in this code if we change the z-Index value to 5 then the card one (Which has the background white) will overlay one card two and card three.
Javascript
import React from "react";
import { View, Text, StyleSheet } from "react-native";
export default function App() {
return (
<View style={styles.container}>
<Text style={styles.heading}>
Geeksforgeeks
</Text>
<Text style={styles.paragraph}>
Z Index Example
</Text>
<View style={styles.card}>
<Text style={styles.cardText}>
Geeksforgeeks
</Text>
</View>
<View style={styles.card2}>
<Text style={styles.cardText}>
Hellow World!!
</Text>
</View>
<View style={styles.card3}>
<Text style={styles.cardText}>
zIndex Native
</Text>
</View>
</View>
);
}
const styles = StyleSheet.create({
container: {
flex: 1,
justifyContent: "center",
alignItems: "center",
},
heading: {
fontSize: 25,
color: "green",
fontWeight: "bold",
textAlign: "center",
},
paragraph: {
margin: 24,
fontSize: 18,
fontWeight: "bold",
textAlign: "center",
},
card: {
backgroundColor: "#EAEAEA",
margin: 24,
marginBottom: 0,
height: 240,
borderRadius: 8,
zIndex: 1,
},
card2: {
backgroundColor: "#FFC107",
margin: 24,
marginBottom: 0,
height: 200,
width: 140,
marginTop: -150,
borderRadius: 8,
zIndex: 2,
},
card3: {
backgroundColor: "#6ED4C8",
margin: 24,
marginBottom: 12,
height: 100,
marginTop: -100,
borderRadius: 8,
zIndex: 3,
},
cardText: {
fontSize: 16,
padding: 10,
textAlign: "center",
},
});
|
Step 3: To run the React native application, open the command prompt or terminal and enter the command listed below.
npx expo start
npx react-native run-android
npx react-native run-ios
Output:
The “z-index Property” heading is displayed on top of an image by utilizing its higher zIndex value (1), while the image is positioned bottom the heading with a lower zIndex value (-1).
Example: This example shows the use of the above-explained approach.
Javascript
import React from "react";
import { View, Text, Image,StyleSheet} from "react-native";
function App() {
return (
<View style={styles.container}>
<Text style={styles.heading}>
The z-index Property
</Text>
<Image
source={{
uri:
}}
style={styles.img}
/>
</View>
);
}
const styles = StyleSheet.create({
container: {
flex: 1,
justifyContent: "center",
alignItems: "center",
position: "absolute",
margin: 40,
},
heading: {
zIndex: 1,
padding: 10,
borderRadius: 5,
fontSize: 20,
margin: 0,
color: "crimson",
fontWeight: "bold",
},
img: {
position: "absolute",
left: 0,
top: 0,
zIndex: -1,
width: 200,
height: 200,
borderRadius: 10,
},
});
export default App;
|
Output:

Share your thoughts in the comments
Please Login to comment...