How to set authorization headers in Postman?
Last Updated :
25 Dec, 2023
Web application security is vital, and JSON Web Tokens (JWT) play a key role in authentication and route protection. In this article we will learn how to create a secure backend with Node and Express using JWT, and then we will demonstrate how to set authorization headers in Postman for effective API testing.
Note: We will first create a backend server so that in the latter steps we will know how to set “Authorization header” in Postman.
Prerequisites:
- Basic knowledge of Node and Express.
- Node.js and npm installed on your machine.
- Familiarity with JWT (JSON Web Tokens) concepts.
- Basic Postman skills (creating collections and making new requests).
Steps to create Backend with Node and Express:
Step 1: Create a project directory and initialize it:
mkdir jwt-auth-example
Step 2: Change the directory to jwt-auth-example:
cd jwt-auth-example
Step 3: Initialize the npm:
npm init -y
Step 4: Install Dependencies Express.js and jsonwebtoken:
npm install express jsonwebtoken
Step 5: Implement JWT Authentication by Creating a file named `app.js` and implement the code below:
Javascript
const express = require("express");
const jwt = require("jsonwebtoken");
const bodyParser = require("body-parser");
const app = express();
const PORT = 3000;
const SECRET_KEY = "your_secret_key";
app.use(bodyParser.json());
const users = [{ id: 1, username: "john_doe", password: "password123" }];
const verifyToken = (req, res, next) => {
const token = req.header("Authorization");
if (!token) {
return res
.status(401)
.json({ message: "Access denied. Token missing." });
}
try {
const decoded = jwt.verify(token, SECRET_KEY);
req.user = decoded;
next();
} catch (error) {
res.status(401).json({ message: "Invalid token" });
}
};
app.get("/protected", verifyToken, (req, res) => {
res.json({ message: "This is a protected route!", user: req.user });
});
app.post("/login", (req, res) => {
const { username, password } = req.body;
const user = users.find(
(u) => u.username === username && u.password === password
);
if (!user) {
return res.status(401).json({ message: "Invalid credentials" });
}
const token = jwt.sign(
{ userId: user.id, username: user.username },
SECRET_KEY
);
res.json({ token });
});
app.listen(PORT, () => {
console.log(`Server is running on port ${PORT}`);
});
|
Step 6: Start the server
node app.js
Steps to Hit Endpoints Using Postman:
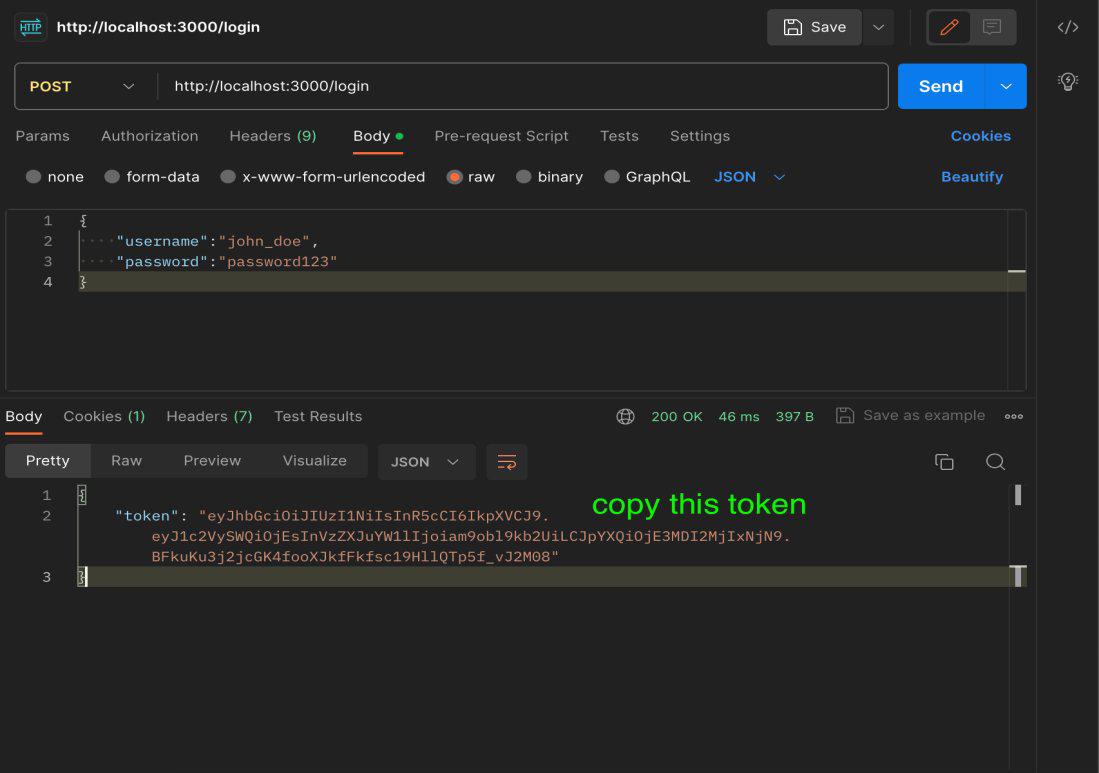
Step 1: Login Endpoint:
- Make a POST request to the `/login` endpoint to obtain a JWT token.
- Set the request type to “POST” and enter the URL for the login endpoint (e.g., `http://localhost:3000/login`).
- Add the necessary request body with valid credentials (username and password).
use the below credentials:
{
    "username":"john_doe",
    "password":"password123"
}
-(1).jpg)
Step 2. Copy Token:
- If successfully and get the response ( 200 ok )
- Copy the JWT token from the response.
Step 3. Authorization in Postman:
- Go to the headers tab in postman
- Dropdown and add a key :” Authorization “ and token that you have copied as value
Key: Authorization
Value: your_token_here
.jpg)
Step 4: Hit Protected Endpoint:
- Send the request again to the protected endpoint (`http://localhost:3000/protected`) and observe the response.
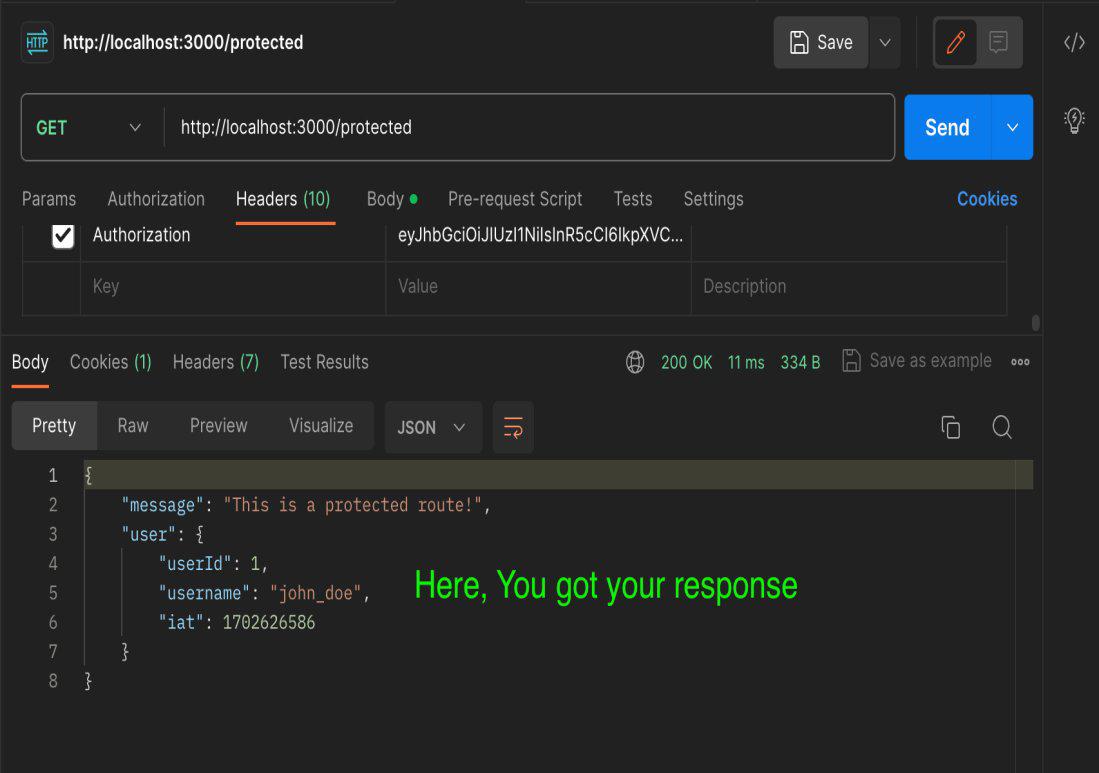
Output:
.gif)
Share your thoughts in the comments
Please Login to comment...