How to import Swagger APIs into Postman?
Last Updated :
13 Mar, 2024
Swagger is a powerful tool for designing, documenting, and testing APIs, while Postman is a popular API development platform. By importing Swagger APIs into Postman, developers can leverage the capabilities of both tools to streamline their workflow and enhance collaboration.
In this article, we’ll explore how to import Swagger APIs into Postman effectively.
Swagger: OpenAI specification:
Swagger, now known as OpenAPI Specification (OAS), provides a standardized format for describing RESTful APIs. This format includes details such as endpoints, request parameters, response schemas, and authentication methods. Postman, on the other hand, offers a user-friendly interface for working with APIs, including features for sending requests, managing environments, and testing endpoints. By importing Swagger APIs into Postman, developers can quickly generate collections and environments based on the API specifications, making it easier to work with and test the APIs.
Importance of Swagger API in Postman:
- Importing: Use the import functionality in Postman to upload the Swagger JSON or YAML file.
- Generating Collections: Postman will parse the Swagger file and generate a collection containing all the API endpoints described in the specification.
- Creating Environments: Optionally, you can create environments in Postman based on the variables defined in the Swagger file. This allows you to easily switch between different environments (e.g., development, staging, production) when testing the API.
Key Features of Swagger API:
- Automatic Generation: Postman imports Swagger APIs and automatically creates collections, saving time and effort.
- Consistency: Direct mapping between Swagger documentation and Postman collections ensures accuracy and reduces errors.
- Environments: Postman supports different configurations (e.g., development, staging) for comprehensive testing.
- Collaboration: Easy sharing and editing of collections in Postman facilitate efficient teamwork and knowledge sharing.
Steps to Import Swagger APIs into Postman:
Step 1: First, obtain the Swagger JSON or YAML file that describes the API you want to import. This file should contain all the necessary information about the API endpoints, request parameters, and responses.
For example you can use https://petstore.swagger.io/ for testing.

Step 2: Open the Postman application on your computer. If you don’t have Postman installed, you can download it for free from the Postman website.

Step 3: In Postman, navigate to the “Import” button located in the top left corner of the application window. Click on “Import” and select the option to import a file. Choose the Swagger JSON or YAML file from your local system. Postman will prompt you to select the type of file you’re importing. Choose “Swagger / OpenAPI” from the list of options. Click on the “Import” button to proceed. Postman will start parsing the Swagger file and generating collections based on the API specification.

Step 4: Once the import process is complete, you should see the imported collections listed in the sidebar of the Postman application. Each collection corresponds to a set of API endpoints described in the Swagger file.
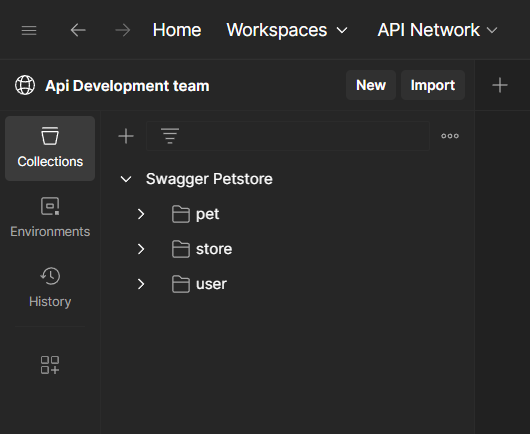
Step 5: Click on the imported collection to expand it and view the individual requests corresponding to each API endpoint. Explore the requests within the collection to familiarize yourself with the available endpoints, request parameters, and response schemas.
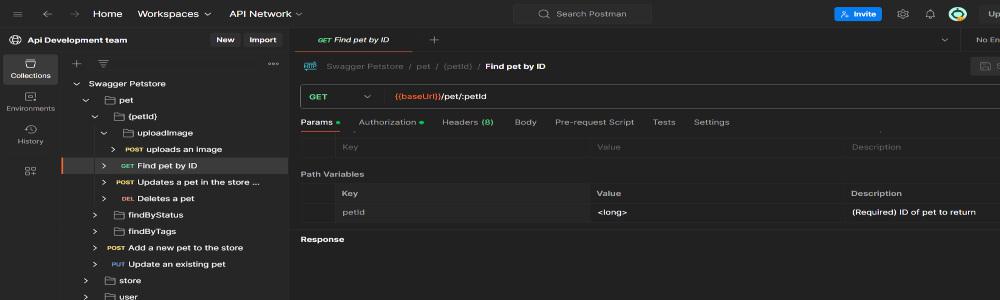
Step 6: Select a request from the imported collection that you want to test. Click on the request to open it in the request builder. Review the details of the request, such as the HTTP method, endpoint URL, headers, and request body (if applicable). Click on the “Send” button to send the request to the API server. Review the response returned by the server to verify that the API endpoint is functioning as expected.
copy the below given json entry to test the POST request:
{
  "id": 0,
  "category": {
    "id": 0,
    "name": "string"
  },
  "name": "doggie",
  "photoUrls": [
    "string"
  ],
  "tags": [
    {
      "id": 0,
      "name": "string"
    }
  ],
  "status": "available"
}

Share your thoughts in the comments
Please Login to comment...