SSH, also known as Secure Shell, is a commonly used method for securely sending commands to a computer network over an unsecured computer network. It uses a cryptographic network protocol for authenticating and encrypting connections between devices. SSH allows for tunneling, or port forwarding, which allows the transfer of data packets across networks. It was developed as a replacement for other unsecured and vulnerable protocols like telnet for seamless solutions for remote access, file transfer, and command-line execution.
SSH operates generally on a client-server architecture, in which a server program accepts or rejects incoming connections, and a client program requests the server for information. Typically, the default port of SSH is 22.
SSH uses public key cryptography to authenticate the remote computer, or, if necessary, allows it to authenticate the server. When a public-private key is generated by the user, authentication is performed when the key pair is generated, and the session will be opened with any password input from the client.
Pre-Requisites
SSH Client Software:
Ensure an SSH client is installed on your client system. The most popular and commonly used SSH clients are OpenSSH (for UNIX-based systems) and PuTTY (for Windows-based systems), along with various third-party clients available to select from.
SSH Server Software:
Ensure the remote server must have Server SSH software installed and running, most popular commonly used SSH Server Software is OpenSSH.
Network Access:
Ensure that there is network connectivity between local client machine and remote server .
Authentication:
Valid access credentials for connection between remote server are needed.
Firewall Configuration:
Check and ensure proper firewall configuration for connection between users is present both in remote server and local client.
Basic Workflow of SSH Connection
Basic workflow of SSH connection uses various techniques and algorithms to provide a secure and reliable connection between local client and remote server. SSH protocol uses symmetric encryption, asymmetric encryption and hashing in order to secure transmission of information. Basic fundamental workflow of SSH connection can be described below:
1. Initiation of connection from the client:
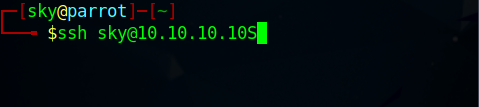
Connection starts when user initiated a SSH connection from the client side. The user specifies the username, host name ( or IP address) of the remote server from the SSH client. Example of the initiation of connection on a command line interface is given.
ssh username@hostname
2. Server listens of connection:
The remote server listening for the incoming connection initiation from the SSH server software is configured to listen to a specific port. Typically, the default port for SSH is 22 and can also be configured to used different port for various security reasons.
The port number for such cases need to specified during the connection initiation process. Typical example of such cases is:
ssh username@hostname -p port_number
3. Verification of server:
Once, the client initiates a SSH connection with the server. Server listens to a default port 22 or any other ports. At that stage, the server identity is verified and SSH client provides two cases:
- If the client is accessing the server for the first time, client is usually asked to authenticate server manually by verifying the public key of the server.Once the key is verified, the server is added in known_hosts file in ~/.ssh directory on client machine. The known_hosts file contains the information about all the verified servers by the client.
- If the client is not accessing the server for the first time, the server’s identity is matched with previously recorded information in known_hosts file for verification.
4. Key Generation and Exchange:
- Upon successful authentication, a key generation process happens between the client and the server. This process establishes both the parties negotiate a session key using a version of the Diffie-Hellman algorithm. This algorithm is designed in such a way that both the parties contribute equally in generation of session key. The generated session key is shared symmetric key i.e. the same key is used for encryption and decryption.
5. File Transfer:
Once the key exchange process is completed, the user can executes command on the remote server terminal or perform file transfer using protocols like SCP (Secure Copy Protocol) or SFPT ( Secure File Transfer Protocol).
6. Session Closure:
Once the transfer of data and other information completes and the user is done with the SSH session, they can close the terminal which ensures no sensitive data is left vulnerable.
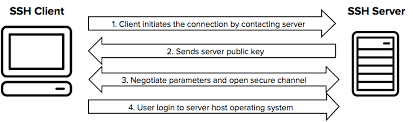
Example image of SSH connection
Solutions to SSH Failed Permission Denied
Step 1: Diagnosing the Issue:
Use the Verbose mode of your SSH Client for proper and Detailed Error Message. It can be achieved by using -v or –v flags with your initial SSH command in your terminal. The message should look like this:
ssh -v username@hostname
 For server-side error check the server error log for relevant error and entries for your connection error. You can check it by using a simple command on Debian Based System given below:
cd /
cd  /var/log/auth.log
Step 2: Checking for client-side Errors:
- Ensure that the user connecting to the remote server has proper and necessary permissions to access the server.
- Ensure proper Access Credentials for the SSH connection and cross verify it to be sure.
- Ensure that you have the latest SSH client installed in your system. On Debian based Systems, the command format should look like this for Debian Based Systems:
sudo apt update
sudo apt upgrade
After updating the SSH, restart it to apply the changes:
sudo systemctl restart ssh
Method 1: Enabling Password Authentication:
For accessing the SSH server, password authentication is a crucial step. A solution for fixing the permission denied error is to enable password login in the sshd_config file on Linux systems.
A Step-by-step process for it is:
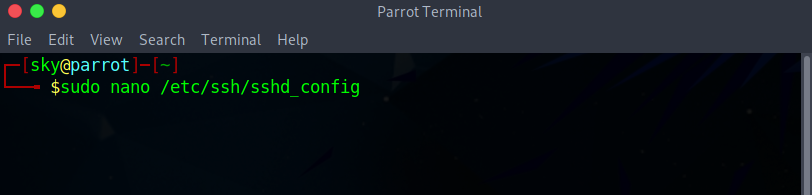
Step 1:
Open the sshd_config file in a text editor, popular and common text editor includes vi, vim etc. for linux based systems. An example of opening the file is given below.
sudo nano /etc/ssh/sshd_config
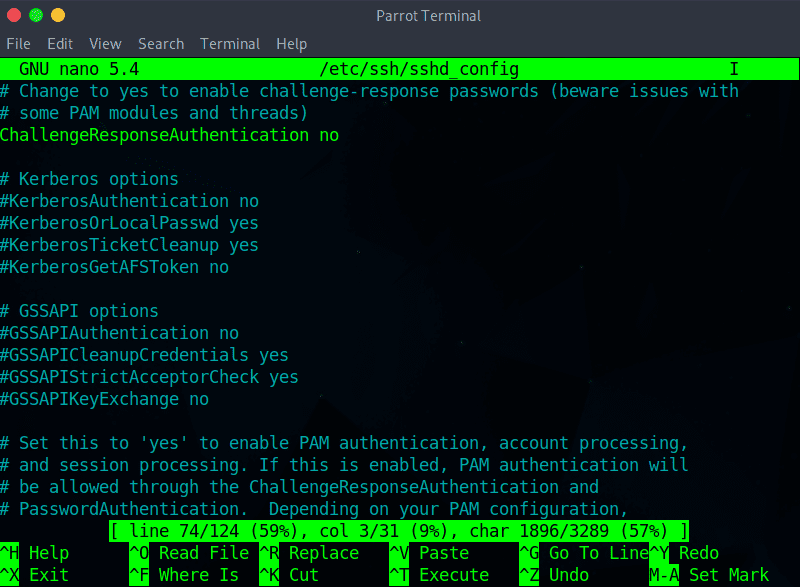
Step 2: After opening the file, find the “PasswordAuthentication” line in the text editor and ensure that the the line ends with yes. Shown in Screenshot below.
Step 3:
Also in the file, check for “ChallengeResponseAuthentication” and disable it with writing no.
If lines are commented out, remove the hash sign # to uncomment them.
.png)
Visual representation of above steps
Step 4: Save the file and exit. In case of using Nano type Ctrl+S and Ctrl+X to save and exit.
Step 5: Restart the SSH service by typing the following command:
sudo systemctl restart sshd

Method 2: Changing the File System Permission:
Using the password-based login as the SSH authentication method is not recommended due to security concerns. Therefore, the following solution may be preferable since it troubleshoots the public key authentication method. So, to change the following permission. Step-by-step details are given below:
Step 1: Firstly, open the sshd_config file using a text editor:
sudo nano /etc/ssh/sshd_config
Step 2: In the file, make sure the following options are set as follows:
PermitRootLogin no
PubkeyAuthentication yes
You can check the Screenshot given below for refenrence
.png)
Visual Representation of the Example
Step 3: Comment out the GSSAPI-related options by adding the hash sign at the beginning of the line:
#GSSAPIAuthentication yes
#GSSAPICleanupCredentials no
Example of the action is given below in the screenshot.
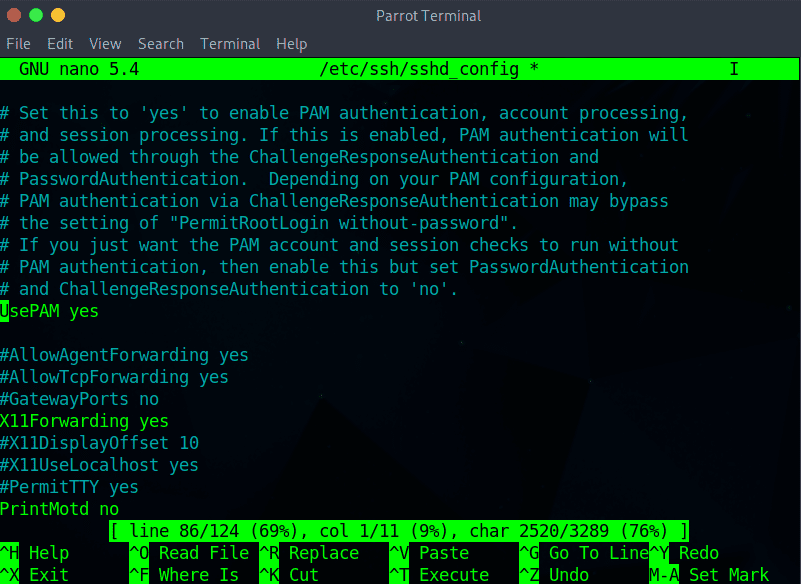
Step 5:Ensure that UsePAM line is set to yes:
UsePAM yes
Example of the action:
Step 6: Save the file and restart the sshd service:
sudo systemctl restart sshd
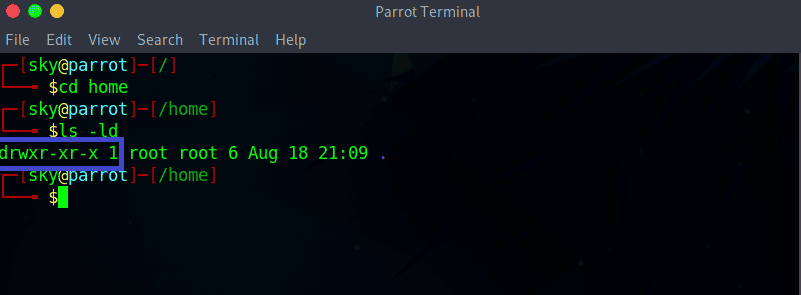
Now navigate to your home folder and check the permissions:
cd home
ls -ld
Example of the action:
Step 7: If your owner permissions are not set to read, write, and execute (drwx——), use the chmod command to change them:
chmod 0700 /home/[your-username]
Now go to the .ssh folder and recheck the permissions:
cd .ssh
ls -ld
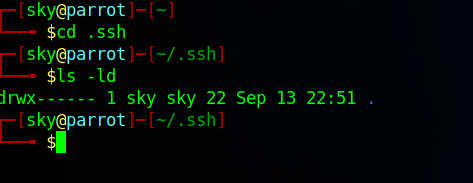
- This directory should also have read, write, and execute permissions for the file owner. To enforce them, use chmod again:
chmod 0700 /home/your_home/.ssh
Conclusion
In conclusion, solving SSH permission denied errors is important for maintaining and securing seamless remote access to the server. Various solutions are listed above for common problems relating to the ssh permission denied error. Make sure to use the verbose flag in the SSH command and check the server error log for more detailed error information to diagnose and repair the error and research it. This article helps to solve common errors.
If the error still persists, research many other resources, like documentation, online communities, and forums, to seek more help in solving this error.
Share your thoughts in the comments
Please Login to comment...