How to Ban an Android Device from Login to Your App?
Last Updated :
26 Nov, 2023
First of let’s understand what is device ban feature device ban feature in Android allows administrators/developers to restrict specific devices from accessing an application or service. This is crucial for maintaining security and enforcing policies.
Why Device Bans are Important?
Let’s take an example you have created a social media application and you have so many users that are using your app and a user named “abc123” has been consistently engaging in abusive behavior. He has been using offensive language, making derogatory comments, and harassing other users on various posts and discussions. So this behavior violates the platform’s community guidelines and poses a threat to the overall experience of the user who is using your app implementing a device ban could be a great idea so that the person can’t able to create a new account forever from his device.
What things are unique in Android Devices?
1. IMEI (International Mobile Equipment Identity)
It is a 15-digit unique code assigned to every mobile phone. It identifies the device on a cellular network. IMEI is used for tracking lost or stolen phones as well as for authenticating devices on mobile networks.it can be used to configure device ban becaue IMEI Number is unique for all the devices but when you try to access IMEI Number android studio will give a Error that only system apps can access IMEI.
2. Build Information
Details about the device hardware and software including the model, manufacturer, Android version. This information can be used for troubleshooting and compatibility checks and it can also be used to implement the device ban feature in android apps.
3. Google Advertising ID (GAID)
User-specific resettable ID for advertising purposes. It allows advertisers to track user activity for targeted advertising while giving users the ability to reset or opt out of personalized ads main disadvantage of using that is it can be resettable from settings.
4. IP Address (Internet Protocol Address)
It is essential identifier IP address is a numerical label assigned to each device on a network enabling communication over the internet. It’s valuable for geolocation, network troubleshooting, security analysis, even though it may change dynamically on mobile networks and it also can be used as a device ban.
5. Android ID
It is a 64-bit number that is generated and stored when the device is first booted. It is used to uniquely identify an Android device for Google services and third-party applications and we will be using that only to configure device ban.
A sample video is given below to get an idea about what we are going to do in this article.
Step By Step Implementation
Step 1: Create a New Project in Android Studio
To create a new project in Android Studio please refer to How to Create/Start a New Project in Android Studio. Note that select Kotlin as the programming language.
Step 2: Setting Up Firebase
First Open Firebase Console and Create New Project in that console after that from top Left side click on Files > Tools then a lot of options will be displayed like below from that Select Firebase
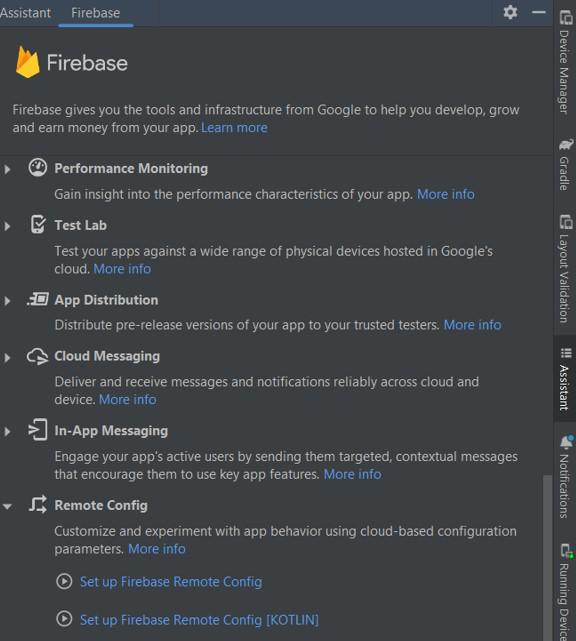
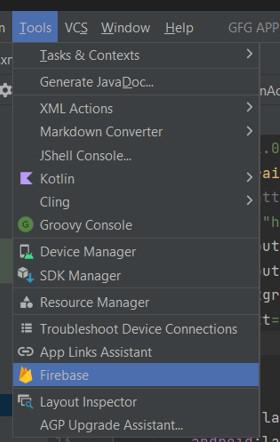 After Selecting Firebase a lot of options will be displayed like that
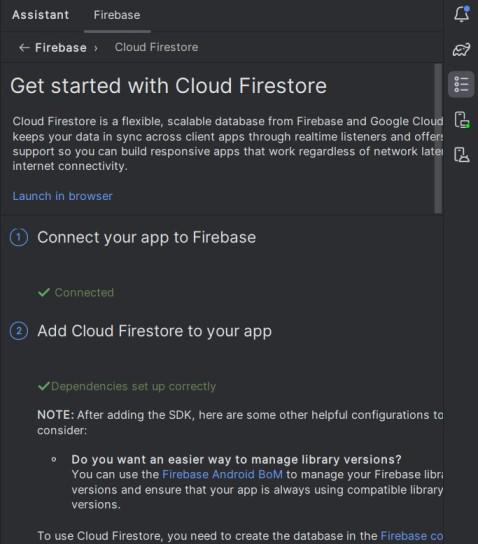
Scroll Up and Select Cloud Firestore and Click on Get Started With Cloud Firestore Now Connect Your App to Firebase Project and add the dependencies after doing all it should look like this
Step 3: Working on AndroidMainfest File
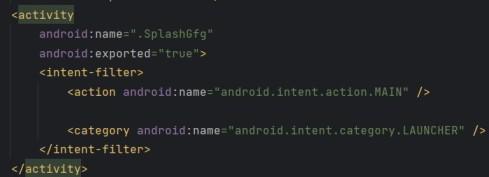
Now we are doing everything on Launcher activity launcher activity means when user first time opens the app the first activity displayed will be laucher activity so we can handle ban check at that moment only, so we have created one new Activity and moved intent filter Laucher to my activity named SplashGfg and it looks like this.
 After that in Same Mainfest File add Internet Permission so that we can interact with Firebase
<uses-permission android:name="android.permission.INTERNET" />
Step 4:
Now we have created another Two Activity One is When User is not Banned then it will redirect to activity named Test With one Text View as Geeks For Geeks and one Another Activity named BannedActivity with one Text View as You have been banned.
Step 5:
We have created one basic Splash Screen With One ImageView and one ProgressBar
activity_splash_gfg.xml:
XML
<?xml version="1.0" encoding="utf-8"?>
<androidx.constraintlayout.widget.ConstraintLayout
android:layout_width="match_parent"
android:layout_height="match_parent"
android:background="@color/white"
tools:context=".SplashGfg">
<ImageView
android:id="@+id/gfgBanner"
android:layout_width="250dp"
android:layout_height="250dp"
android:src="@drawable/gfg"
app:layout_constraintStart_toStartOf="parent"
app:layout_constraintEnd_toEndOf="parent"
app:layout_constraintTop_toTopOf="parent"
app:layout_constraintBottom_toBottomOf="parent"
/>
<ProgressBar
android:id="@+id/progressBar"
android:layout_width="wrap_content"
android:layout_height="wrap_content"
app:layout_constraintStart_toStartOf="parent"
app:layout_constraintEnd_toEndOf="parent"
app:layout_constraintTop_toBottomOf="@+id/gfgBanner"
android:visibility="gone"/>
</androidx.constraintlayout.widget.ConstraintLayout>
|
Step 6: Working on Kotlin File
Now When Users First Time opens the app i am storing android id of users with one field in it that is is_banned also making sure that if android id is already added it should not be added multiple times and opening the activity based on the is_banned field.
SplashGfg.kt
Kotlin
package com.ayush.gfgapp
import android.annotation.SuppressLint
import android.content.Intent
import android.os.Bundle
import android.os.Handler
import android.os.Looper
import android.widget.ProgressBar
import android.widget.Toast
import androidx.appcompat.app.AppCompatActivity
import com.google.firebase.firestore.FirebaseFirestore
class SplashGfg : AppCompatActivity() {
private lateinit var progressBar: ProgressBar
private lateinit var firestore: FirebaseFirestore
override fun onCreate(savedInstanceState: Bundle?) {
super.onCreate(savedInstanceState)
setContentView(R.layout.activity_splash_gfg)
progressBar = findViewById(R.id.progressBar)
firestore = FirebaseFirestore.getInstance()
progressBar.visibility = ProgressBar.VISIBLE
val androidId = getAndroidId()
firestore.collection("users")
.document(androidId)
.get()
.addOnCompleteListener { task ->
if (task.isSuccessful) {
val document = task.result
if (document != null && document.exists()) {
val isBanned = document.getBoolean("is_banned")
checkBan(isBanned)
} else {
val user = hashMapOf(
"is_banned" to false
)
firestore.collection("users")
.document(androidId)
.set(user)
checkBan(false)
}
} else {
Toast.makeText(this, "Error Occured", Toast.LENGTH_SHORT).show()
}
progressBar.visibility = ProgressBar.GONE
}
}
@SuppressLint("HardwareIds")
private fun getAndroidId(): String {
return android.provider.Settings.Secure.getString(
applicationContext.contentResolver,
android.provider.Settings.Secure.ANDROID_ID
)
}
private fun checkBan(isBanned: Boolean?) {
if (isBanned == true) {
val bannedIntent = Intent(this, BannedActivity::class.java)
startActivity(bannedIntent)
finish()
} else {
val handler = Handler(Looper.getMainLooper())
handler.postDelayed({
val intent = Intent(this, Test::class.java)
startActivity(intent)
finish()
}, 4000)
}
}
}
|
Output:
Share your thoughts in the comments
Please Login to comment...