Java For Android – Building Your First Android App
Last Updated :
21 Mar, 2024
Android app development can play a major role in writing the app functionalities using Java programming. Every activity can be designed with Java programming. Android apps are developed using the Android Studio IDE, which provides the environment for Java development for Android programming.
Prerequisites
- Java Programming
- Android Studio in your system
- Emulator for testing app
- Basics of Android
- Basics of XML for UI design
Key Terminologies
- Activity: Activity can represent the Android screens with a user interface; by default, create the MainActivity, which is the parent activity of the Android app.
- Layouts: This layer can represent the user interface structure using XML. By default, the activity_main layout can be created for the MainActivity screen of the Android app.
- Manifest File: This is the information file of the Android app, containing the essential information about the Android app.
- Resources: This folder contains the Android resource files, which include images, strings, and other assets used in the Android app.
- Intent: It can send messages that allow components to request functionality from others.
- Views: Views can be defined as the UI elements of the screen, such as buttons, text fields, images, etc.; they can be displayed in the activity layout.
Step by Step Implementation
We can develop the first simple Android app using Java. In this application, the user gives the details of their name and education. After that, clicking submit shows the user’s details for another activity.
Step 1: If you want to build the Android app using Java,. First, install Android Studio on your system. Refer to this link to install android studio installation.
Step 2: Once you have installed Android Studio, open it and create your first new Android project. For a better understanding, refer to the below image.
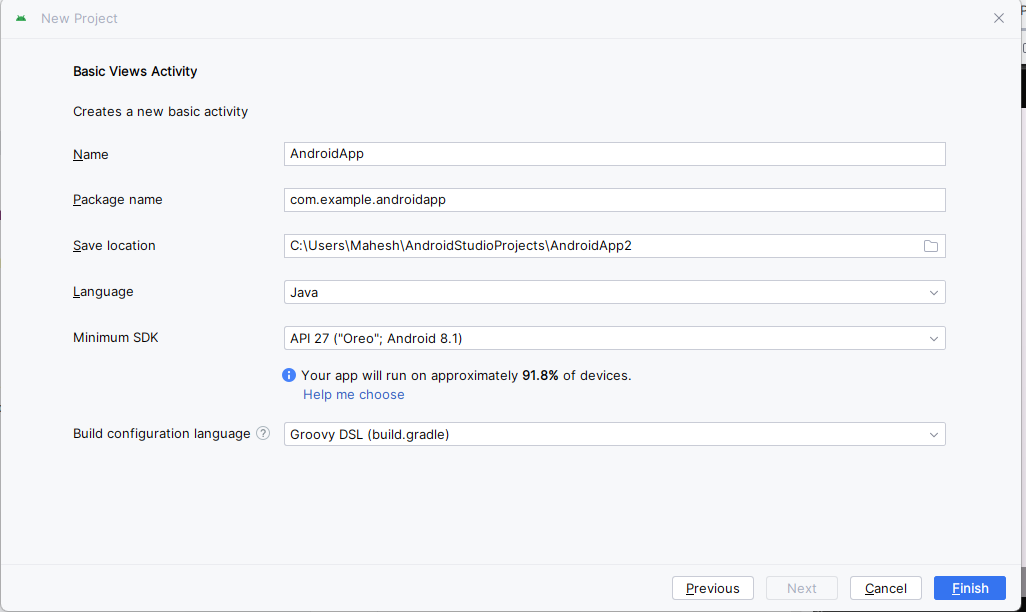
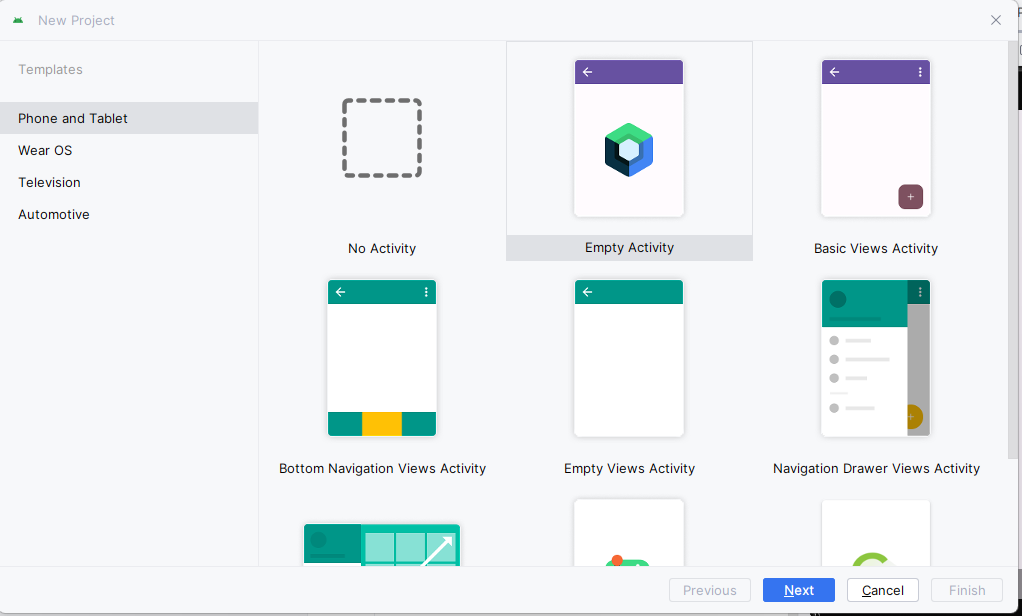
Step 3: Once you fill in the details of the project, click on the finish button. After that, select the activity for use in your app. In our case, we can use an empty activity. Once you select the activity, click on Next. Refer to the below image.
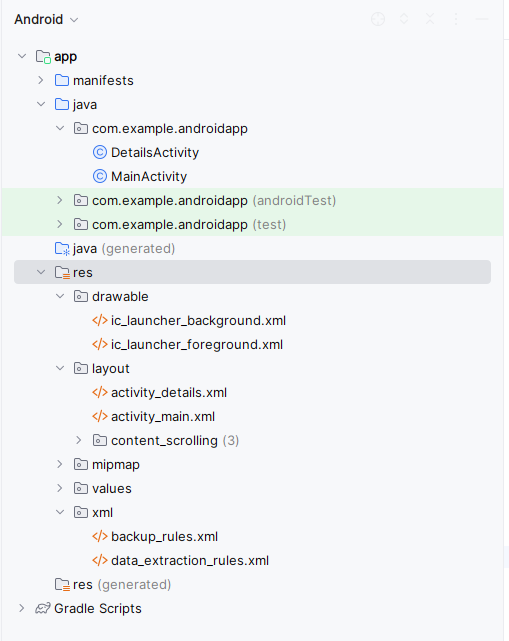
Step 4: Once the project is completed, the file structure looks like the below image. Now we are working on creating the first android app using java programming
Step 5: Open activity_main.xml for UI design; it will be located in the layout folder of your project. In this file, we can design the edit texts and one button for submit.
Go to app > layouts > activity_main.xml and enter the below code.
XML
<?xml version="1.0" encoding="utf-8"?>
<RelativeLayout xmlns:android="http://schemas.android.com/apk/res/android"
    xmlns:tools="http://schemas.android.com/tools"
    android:layout_width="match_parent"
    android:layout_height="match_parent"
    tools:context=".MainActivity">

    <EditText
        android:id="@+id/editTextName"
        android:layout_width="match_parent"
        android:layout_height="wrap_content"
        android:hint="Enter Name"
        android:layout_margin="16dp"/>

    <EditText
        android:id="@+id/editTextEducation"
        android:layout_width="match_parent"
        android:layout_height="wrap_content"
        android:hint="Enter Education"
        android:layout_below="@id/editTextName"
        android:layout_margin="16dp"/>

    <Button
        android:id="@+id/buttonSubmit"
        android:layout_width="wrap_content"
        android:layout_height="wrap_content"
        android:text="Submit"
        android:layout_below="@id/editTextEducation"
        android:layout_centerHorizontal="true"
        android:layout_marginTop="32dp"/>

</RelativeLayout>
Step 6: In the same folder, create activity_details.xml for the UI design for displaying the user data.It will be located in the layout folder of your project. In this file, we can design a single text view.
Go to app > layouts > activity_details.xml and enter the below code.
XML
<?xml version="1.0" encoding="utf-8"?>
<RelativeLayout xmlns:android="http://schemas.android.com/apk/res/android"
    xmlns:tools="http://schemas.android.com/tools"
    android:layout_width="match_parent"
    android:layout_height="match_parent"
    tools:context=".DetailsActivity">

    <TextView
        android:id="@+id/textViewDetails"
        android:layout_width="wrap_content"
        android:layout_height="wrap_content"
        android:textSize="18sp"
        android:layout_centerInParent="true"/>

</RelativeLayout>
<?xml version="1.0" encoding="utf-8"?>
<manifest xmlns:android="http://schemas.android.com/apk/res/android"
    xmlns:tools="http://schemas.android.com/tools">

    <application
        android:allowBackup="true"
        android:dataExtractionRules="@xml/data_extraction_rules"
        android:fullBackupContent="@xml/backup_rules"
        android:icon="@mipmap/ic_launcher"
        android:label="@string/app_name"
        android:roundIcon="@mipmap/ic_launcher_round"
        android:supportsRtl="true"
        android:theme="@style/Theme.AndroidApp"
        tools:targetApi="31">
        <activity
            android:name=".DetailsActivity"
            android:exported="false"
            android:label="@string/title_activity_details"
            android:theme="@style/Theme.AndroidApp.NoActionBar" />
        <activity
            android:name=".MainActivity"
            android:exported="true"
            android:label="@string/app_name"
            android:theme="@style/Theme.AndroidApp">
            <intent-filter>
                <action android:name="android.intent.action.MAIN" />

                <category android:name="android.intent.category.LAUNCHER" />
            </intent-filter>
        </activity>
    </application>

</manifest>
Step 7: Now we create the functionalities of the Android app using Java programming. Open the MainActivity.java file in the com.example.androidapp package.
Go to app > java > com.example.androidapp > MainActivity.java and put the below code.
Java
package com.example.androidapp;

import android.content.Intent;
import android.os.Bundle;

import com.google.android.material.snackbar.Snackbar;

import androidx.appcompat.app.AppCompatActivity;

import android.view.View;

import androidx.core.view.WindowCompat;
import androidx.navigation.NavController;
import androidx.navigation.Navigation;
import androidx.navigation.ui.AppBarConfiguration;
import androidx.navigation.ui.NavigationUI;

import com.example.androidapp.databinding.ActivityMainBinding;

import android.view.Menu;
import android.view.MenuItem;
import android.widget.Button;
import android.widget.EditText;

public class MainActivity extends AppCompatActivity {

    private EditText editTextName;
    private EditText editTextEducation;
    private Button buttonSubmit;

    @Override
    protected void onCreate(Bundle savedInstanceState) {
        super.onCreate(savedInstanceState);
        setContentView(R.layout.activity_main);

        editTextName = findViewById(R.id.editTextName);
        editTextEducation = findViewById(R.id.editTextEducation);
        buttonSubmit = findViewById(R.id.buttonSubmit);

        buttonSubmit.setOnClickListener(new View.OnClickListener() {
            @Override
            public void onClick(View view) {
                String name = editTextName.getText().toString();
                String education = editTextEducation.getText().toString();

                Intent intent = new Intent(MainActivity.this, DetailsActivity.class);
                intent.putExtra("name", name);
                intent.putExtra("education", education);
                startActivity(intent);
            }
        });


    }

}
Step 8: In this same package, we can create one more activity to display the user data and write the functionalities of the Android app using Java programming. Create the DetailsActivity.java file in the com.example.androidapp package and open it.
Go to app > java > com.example.androidapp > DetailsActivity.java and enter the below code.
Java
package com.example.androidapp;

import android.os.Bundle;

import com.google.android.material.appbar.CollapsingToolbarLayout;
import com.google.android.material.floatingactionbutton.FloatingActionButton;
import com.google.android.material.snackbar.Snackbar;

import androidx.appcompat.app.AppCompatActivity;
import androidx.appcompat.widget.Toolbar;

import android.view.View;
import android.widget.TextView;

import com.example.androidapp.databinding.ActivityDetailsBinding;

public class DetailsActivity extends AppCompatActivity {
    private TextView textViewDetails;

    @Override
    protected void onCreate(Bundle savedInstanceState) {
        super.onCreate(savedInstanceState);
        setContentView(R.layout.activity_details);
        textViewDetails = findViewById(R.id.textViewDetails);

        // Get data passed from MainActivity
        Bundle extras = getIntent().getExtras();
        if (extras != null) {
            String name = extras.getString("name");
            String education = extras.getString("education");
            textViewDetails.setText("Name: " + name + "\nEducation: " + education);
        }


    }
}
Step 9: Once you have successfully built your first Android app, you can run into the Android Studio. Once successfully built, the Android app shows the output. For better understanding, refer to the below image.

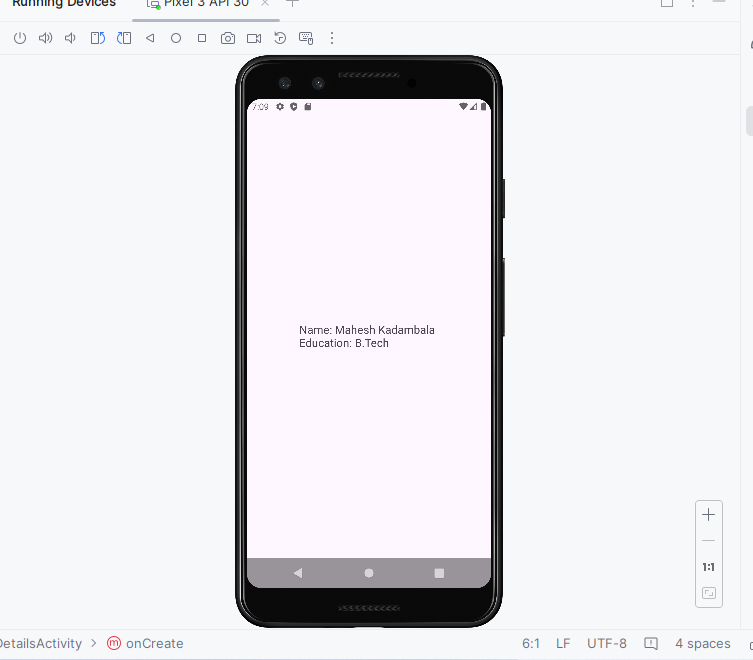
Step 10: Once runs(refer Android app run) your app is successful. After that, your app can be opened in the emulator. Finally, you can build your first Android app using Java. Your app looks like the below image.
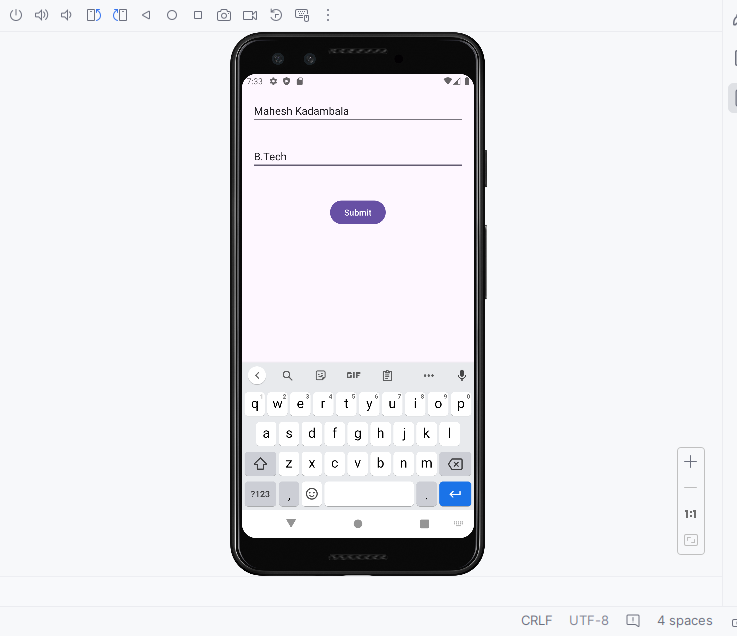
Note: Once you enter the data, click on the submit button. After that, open another activity and display your entered data.
By following the procedure above, step-by-step, you can successfully build and run your first Android app using Java programming.
Output Video:
Share your thoughts in the comments
Please Login to comment...