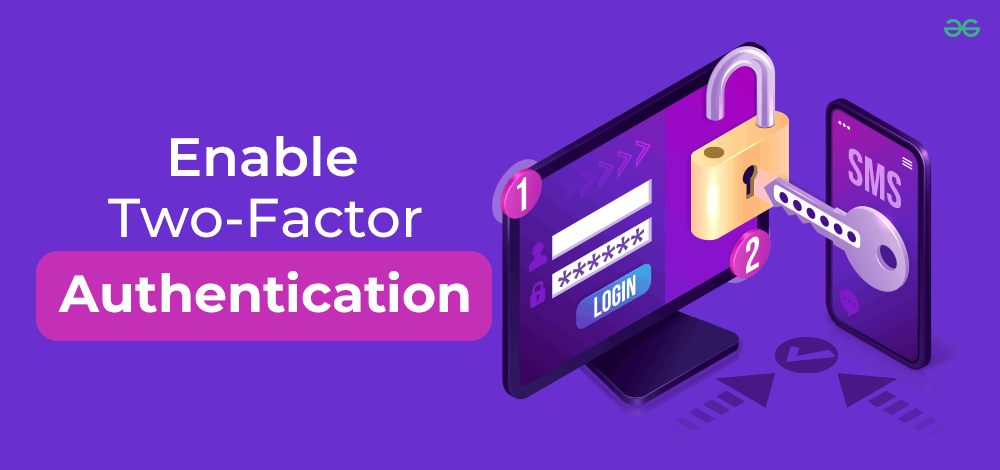
Two-factor authentication is an extra layer of protection for your devices that requires an extra step to login. After entering a password to log in, you’ll be requested to offer a security key that may take the form of a numerical code, barcode, QR code, or other piece of information. Once you provide the right data, you will be granted access to the account.
If a password is stolen or leaked online by a hacker and someone else is making an attempt to log in to your account, they won’t be able to do so without two-factor authentication. Read below this comprehensive article to find out how to enable two-factor authentication on Android.
How to Enable Two-Factor Authentication on an Android Device?
Google lets you use a lot of two-factor authentication methods, but the default (and simplest) one is Google Prompt. When you log into your Google account on an unknown device, you will get a prompt on a phone or tablet that you’re already logged in to. Tap that prompt to confirm that you are trying to sign in, and you’ll be granted access.
Google recommends using this two-factor method. This is how you can enable it on your Android device:
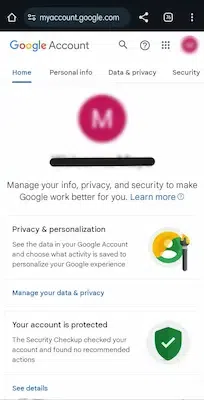
Step 1: Log in to your Google account at myaccount.google.com on your Android phone.
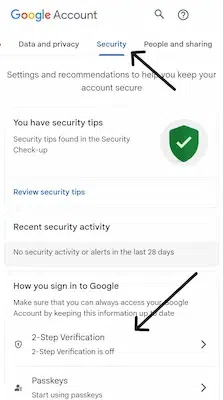
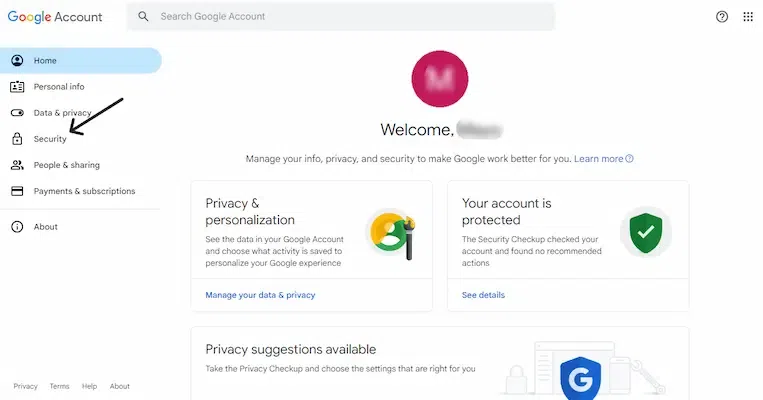
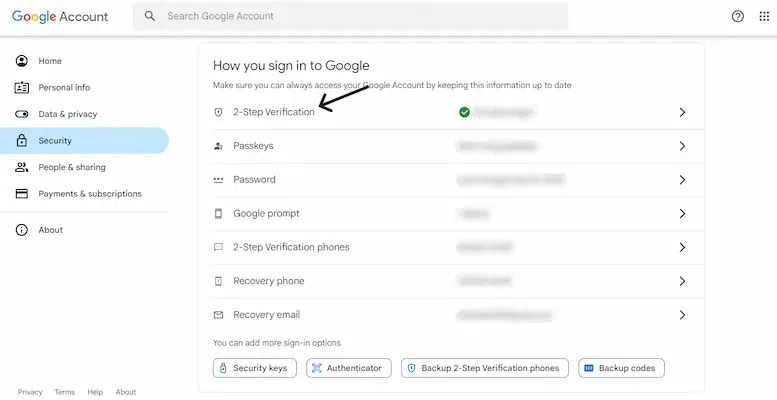
Step 2: Click the Security tab.
Step 3: Click 2-Step Verification.
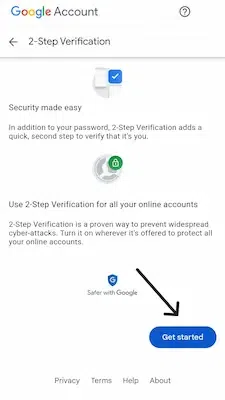
Step 4: Click ‘Get Started’.
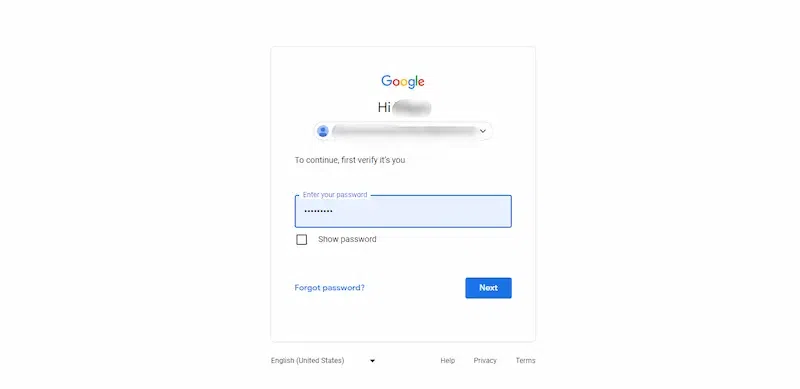
Step 5: Enter your Google password to confirm it is you.
Step 6: Click ‘Try It Now’.
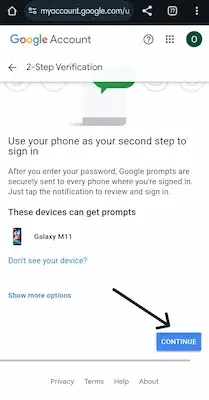
Step 7: Tap ‘Continue‘ on the next page that appears on your smartphone or tablet.
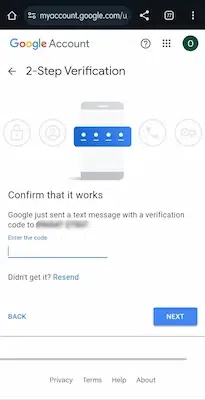
Step 8: Confirm your phone number as a backup alternative in case Google Prompt does not work.
Step 9: Enter the code that is texted to your number and click on ‘Next’.
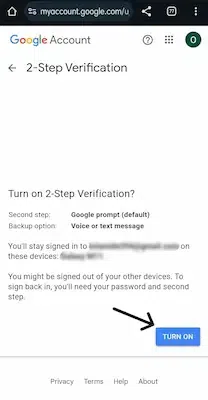
Step 10: Click ‘Turn On’ to allow two-factor authentication.
Once you have followed all the steps above, your Google account is now safe and secured with this extra layer of protection.
How to Skip the Second Step on Trusted Devices?
When you make your laptop a trusted device, you won’t have to enter a security code every time you try to access sensitive data, like credit card information or any other personal information.
Setting your PC to be a trusted device may be useful if you use it frequently when you have two-step verification enabled.
Here’s the way to do it:
Step 1: You need to set this device as a trusted device. In order to do that, simply visit the security settings page and sign in to your Google account.
Step 2: You will be asked to verify that it’s you. Choose the platform through which you want to receive the code; it can be via email, text, or phone call. Once you have received the code, type it in the text box.
Step 3: Select the check box for ‘Don’t question me again on this device’.
Step 4: Click on ‘Verify’.
Step 5: You can now sign in and edit your information on this device whenever you want without entering the security code.
How to Update Your Google Account With A Trusted Device
In your trusted devices, make sure to add only devices that you own. You shouldn’t make other devices your trusted devices. The device’s location must also be safe against physical theft. Your devices need to fulfil those conditions. After that, follow these instructions to add a trusted device to the following devices:
On a Desktop
Follow the steps below to add your laptop or computer to your list of trusted devices on your Google account:
Step 1: Open the Google Accounts web page in a web browser and sign in with your account information.

Step 2: On the following window for 2-Step Verification, tick the box beside ‘Don’t ask again on this device.’
Step 3: Check your phone for the Google prompt or the code sent to your preferred two-factor authentication method to complete the verification.
On an iPhone
Follow the steps below to add your iPhone to your list of trusted devices on your Google account:
Step 1: Open the Google Accounts website in a web browser on your iPhone and attempt to sign in.
Step 2: Check the box next to “Do not ask again on this device” on the next 2-Step Verification window.
Step 3: Check your phone for the Google activation or the code sent to your chosen two-factor authentication method and type it into the browser.
Step 4: Click Next to save your changes.
On an Android
Follow the steps below to add your Android telephone to your list of trusted devices in your Google account:
Step 1: Visit the Google Accounts page in a mobile internet browser and check in with your account information.
Step 2: On the following window for Two-Step Verification, tick the container beside ‘Don’t ask again on this device.’
Step 3: Check your phone for the Google prompt or the code sent to your chosen two-factor authentication method, and type it into the browser.
Step 4: To save your changes, tap Next.
How to Deactivate a Trusted Device in Your Google Account
To get rid of a device from your Google account’s trusted list, two-factor authentication tactics ought to be achieved. Here are the steps to observe to remove a device:
On a desktop
Follow the steps below to remove your computer or computing device from your list of trusted gadgets for your Google account:
Step 1: In a browser, go to the Google Accounts page and sign in with your account information.
Step 2: Click Security on the left side of the Google Account window.
Step 3: Scroll all the way down to ‘Sign in to Google’ and pick ‘2-Step Verification.’
Step 4: Provide your password to confirm your identity and click on ‘Next’.
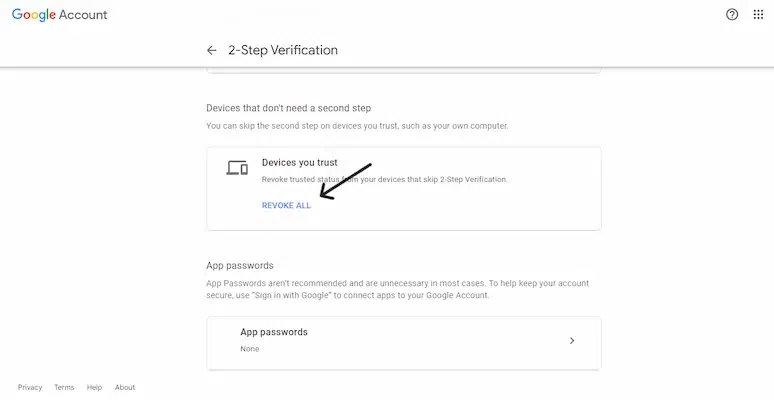
Step 5: Go to the section labeled “Devices that don’t need a second step” at the bottom of the website.
Step 6: Under “Devices you trust,” select the option to ‘Revoke All’.
On an iPhone
Follow the steps below to remove your iPhone from your list of trusted devices on your Google account:
Step 1: Open the Google Accounts web page in a mobile web browser on your iPhone and try to sign in.
Step 2: Swipe the options at the top of the page to select security.
Step 3: On the “Signing in to Google” window, scroll down and select “2-Step Verification.”
Step 4: Enter your password to confirm your identity, then press the Next button.
Step 5: Go to “Devices that do not need a second step” at the bottom of the website.
Step 6: Under ‘Devices you trust’, click on ‘Revoke All’.
On an Android
Follow the steps below to remove your Android phone from your list of trusted devices on your Google account:
Step 1: Visit the Google Accounts page in a web browser on your Android phone and sign up with your account details.
Step 2: Swipe the options at the top of the page and select Security.
Step 3: Open the “Signing in to Google” window by scrolling down and selecting “2-Step Verification.”
Step 4: Click Next after entering your password to confirm your identity.
Step 5: Locate “Devices that do not need a second step” by scrolling all the way down to the bottom of the page.
Step 6: Under ‘Devices you trust’, click on ‘Revoke All’.
How to Disable Two-Factor Authentication on an Android Device?
Risks of Two-factor Authentication
While the advantages of enabling two-factor authentication are emphasised, the risks are not. These are some dangers you may face if you enable two-factor authentication in your Google account:
- If you leave your second factor (backup email, phone number, and many others) unattended for a long time, a hacker may be able to get access to your password.
- If you do not have access to your second factor, you might lose access to your Google account.
- If you use a USB security key, you open up a new opportunity for hackers to steal and update it with a replica. They can get access to your account and steal sensitive records before you find out what’s wrong.
How to Turn Off Two-factor Authentication on Your Google Account on Android?
Step 1: Log in to your Google account at myaccount.google.com on your Android phone.
Step 2: Click the Security tab.
Step 3: Click 2-Step Verification.
Step 4: In the redirected browser window, sign in to your Google account.
Step 5: Tap ‘Turn off’, then confirm by clicking ‘Turn off’ again.
Conclusion
In a world that is constantly becoming more related to new security and privacy problems popping up just about every day, it’s essential that everybody takes the essential precautions to shield their online information as much as possible.
Two-factor authentication is not 100% effective; however, it provides a better protection layer that can keep unwanted eyes and fingers off your data. And when you use a password manager with two-factor authentication, you’ve got a higher chance of catching anybody getting a hold of your important data.
How to Enable Two-Factor Authentication on Android – FAQs
1. Why should I set up 2-step verification?
Answer:
You should set up 2-step verification because doing so makes it very tough for anyone to take over your email account remotely. Without setting up 2-step verification, hackers may want to get into your account if they discover your password. With 2-step verification enabled, they would need the password and your smartphone or your real laptop.
2. Why does Google ask for verification every time I log in, despite the fact that I checked the box to ask every 30 days?
Answer:
You most likely need to enable cookies in your browser, or your browser is set to automatically clear its cache on exit.
3. How does two-factor authentication protect my data?
Answer:
Two-factor authentication protects against phishing, social engineering, and password brute-force attacks and secures your logins from attackers exploiting vulnerable or stolen credentials. This dramatically improves the safety of login attempts.
4. Does two-factor authentication prevent identity theft?
Answer:
It is basically the same thing – just the use of more than one factor to verify someone’s identity. By adding this additional step, two-factor authentication makes it much tougher for hackers and fraudsters to get access to your account. Even if they manage to steal or get your password, they will additionally need a second authentication to log in.
5. Why to remove two-factor authentication?
Answer:
Your account is safer if you use a password and a verification code to sign up. However, if you lose your second factor of authentication, you may be locked out of your Google accounts forever.
Share your thoughts in the comments
Please Login to comment...