Health Tracker using MERN Stack
Last Updated :
17 Jan, 2024
In this step-by-step guide, we’ll walk through the process of building a Health Tracker application using React for the frontend and Node for the backend. This application allows users to track their health metrics such as steps taken, calories burned, distance covered, and more.
Preview of final output: Let us have a look at how the final output will look like.
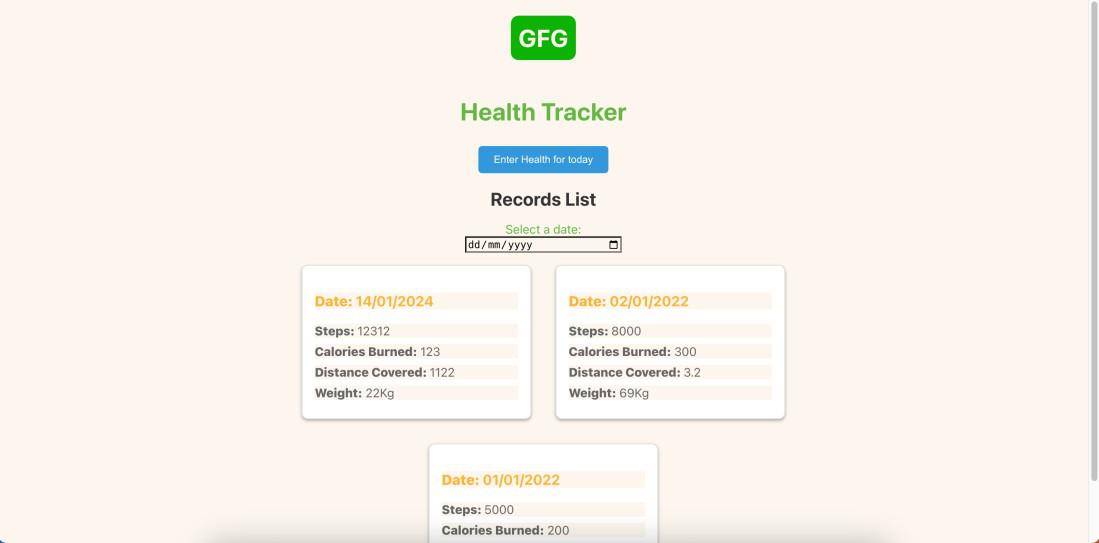
Final Preview
Prerequisite:
Approach to create Health Tracker:
- Component Development:
- Develop key components, such as TrackerApp, TrackerList, and TrackerCard.
- These components represent the overall structure and appearance of the app.
- Implementing Context API:
- Set up a Context API (HealthContext) to manage the state of health data across components.
- Utilize useState and useEffect hooks for fetching initial data and updating the context.
- Styling Components:
- Enhance the visual appeal of the app by adding styles to components.
- Apply hover effects, adjust font sizes, and include subtle box shadows to make the TrackerCard visually appealing.
- Sorting TrackerList:
- Modify the TrackerList component to render health tracker cards based on the most recent date at the top.
- Sort the data array in descending order to display the latest entries first.
- Creating HealthForm Component:
- Develop a HealthForm component for users to input and update their health details.
- Include form fields for steps, calories burned, distance covered, weight, and other health metrics.
- Rendering Today’s Data:
- Fetch today’s health data from the context and pre-fill the form if available.
- Allow users to update their health metrics for the current day.
- Styling HealthForm:
- Apply styles to the HealthForm component to make it visually appealing.
- Create a form that appears on top of the screen with a blurred background when the user clicks a button.
Steps to Setup Backend with Node.js and Express:
Step 1: Creating express app:
npm init -y
Step 2: Installing the required packages
npm install express mongoose cors
Project Structure:
.jpg)
Backend
The updated dependencies in package.json file for backend will look like:
"dependencies": {
    "cors": "^2.8.5",
    "express": "^4.18.2",
    "mongoose": "^8.0.0",
}
Explanation:
- Create a file `server.js` in the `server` folder.
- Set up an Express server, configure MongoDB connection, and enable CORS.
- Define the Mongoose schema for health data, including date, steps, calories burned, distance covered, and weight.
//--------------------------------//
// Define MongoDB schema and model
//--------------------------------//
const healthDataSchema = new mongoose.Schema({
  date: { type: Date, default: Date.now },
  steps: Number,
  caloriesBurned: Number,
  distanceCovered: Number,
  weight: Number,

});
const HealthData = mongoose.model('HealthData', healthDataSchema);
- Implement routes for CRUD operations, including fetching health data, updating metrics, and retrieving data for a specific day.
- If your application has many number of user than you can retrive data by making query but in this although we have cretaed a route but we will filter datewise data in frontend only using Javascript.
- Create a script to seed initial health data into the MongoDB database.
- Run this script to provide sample data for testing and development.
Example: Below is the code for the above explained approach:
Javascript
const express = require('express');
const mongoose = require('mongoose');
const bodyParser = require('body-parser');
const cors = require('cors');
const app = express();
const PORT = process.env.PORT || 5000;
app.use(bodyParser.json());
app.use(cors())
mongoose
{
useNewUrlParser: true,
useUnifiedTopology: true
})
.then(
() => {
console.log('MongoDB connected successfully!');
})
.catch((error) => {
console.error('Error connecting to MongoDB:', error);
});
const healthDataSchema =
new mongoose.Schema(
{
date: { type: Date, default: Date.now },
steps: Number,
caloriesBurned: Number,
distanceCovered: Number,
weight: Number,
});
const HealthData =
mongoose.model('HealthData', healthDataSchema);
const seedData = async () => {
try {
const existingData =
await HealthData.find();
if (existingData.length === 0) {
const initialData = [
{
date: new Date('2022-01-01'),
steps: 5000,
caloriesBurned: 200,
distanceCovered: 2.5,
weight: 70,
},
{
date: new Date('2022-01-02'),
steps: 8000,
caloriesBurned: 300,
distanceCovered: 3.2,
weight: 69,
},
];
await HealthData.insertMany(initialData);
console.log('Data seeded successfully.');
} else {
console.log('Data already exists. Skipping seed.');
}
} catch (error) {
console.error('Error seeding data:', error.message);
}
};
seedData();
app.get('/tracks',
async (req, res) => {
try {
const allTracks = await HealthData.find();
res.json(allTracks);
} catch (error) {
console.error('Error fetching tracks:', error);
res.status(500)
.json(
{
error: 'Internal Server Error'
});
}
});
app.get('/tracks/:date', async (req, res) => {
const requestedDate = new Date(req.params.date);
try {
const tracksForDay =
await HealthData.find(
{
date: {
$gte: requestedDate,
$lt: new Date(
requestedDate.getTime()
+ 24 * 60 * 60 * 1000)
}
});
res.json(tracksForDay);
} catch (error) {
res.status(500)
.json({ error: 'Internal Server Error' });
}
});
app.put('/tracks/:date',
async (req, res) => {
const requestedDate =
new Date(req.params.date);
try {
const existingTrack =
await HealthData.findOne(
{
date:
{
$gte: requestedDate,
$lt: new Date(
requestedDate.getTime()
+ 24 * 60 * 60 * 1000
)
}
});
console.log('existing track', existingTrack);
if (existingTrack) {
Object.assign(existingTrack, req.body);
await existingTrack.save();
res.json(existingTrack);
} else {
const newTrack =
new HealthData(
{
date: requestedDate,
...req.body
});
await newTrack.save();
console.log(newTrack);
res.status(200).json(newTrack);
}
} catch (error) {
res.status(500)
.json(
{
error: 'Internal Server Error'
});
}
});
app.listen(PORT,
() => {
console.log(
`Server is running on port ${PORT}`
);
});
|
Steps to Setup Frontend with React
Step 1: Create React App:
npx create-react-app myapp
Step 2: Switch to the project directory:
cd myapp
Step 3: Installing the required packages:
npm install axios react-router-dom
Project Structure:
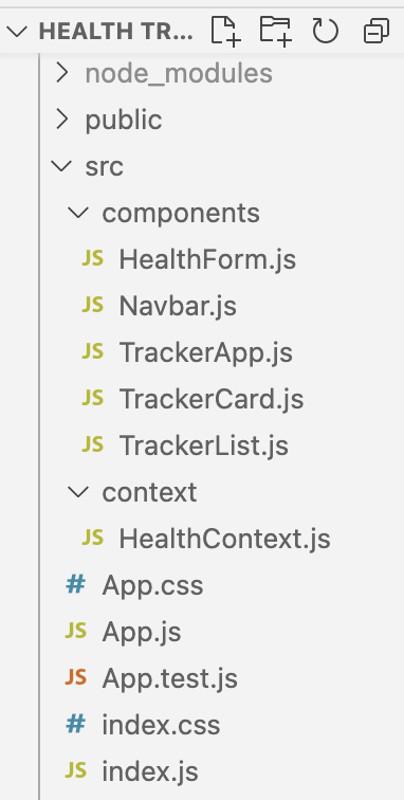
Frontend
The updated dependencies in package.json for frontend will look like:
"dependencies": {
    "axios": "^1.5.1",
    "react": "^18.2.0",
    "react-dom": "^18.2.0",
    "react-router-dom": "^6.17.0",
    "react-scripts": "5.0.1",
    "web-vitals": "^2.1.4"
}
Explanation:
- Develop frontend components, including `TrackerApp`, `TrackerList`, and `TrackerCard`.
- Structure the components to represent the overall app layout and individual health tracker cards.
- Set up a Context API to manage the state of health data across components.
- Utilize `useState` and `useEffect` hooks for fetching initial data.
Javascript
import React from 'react';
import TrackerApp from './components/TrackerApp';
import './App.css'
function App() {
return (
<div className="App">
<TrackerApp />
</div>
);
}
export default App;
|
Javascript
import React from 'react';
import Navbar from './Navbar';
import TrackerList from './TrackerList';
import { HealthProvider }
from '../context/HealthContext';
const TrackerApp = () => {
return (
<HealthProvider>
<div className='main-container'>
<Navbar />
<TrackerList />
</div>
</HealthProvider>
);
};
export default TrackerApp;
|
Javascript
import React,
{
useContext,
useState
} from 'react';
import { HealthContext }
from '../context/HealthContext';
import TrackerCard from './TrackerCard';
const TrackerList = () => {
const { tracks, getTracksForDate } = useContext(HealthContext);
const [selectedDate, setSelectedDate] = useState(null);
const handleDateChange =
(event) => {
const selectedDate = event.target.value;
console.log(selectedDate);
setSelectedDate(selectedDate);
};
const filteredTracks =
selectedDate ?
getTracksForDate(selectedDate) : tracks;
return (
<div className="tracker-list">
<h2>Records List</h2>
<label htmlFor="datePicker">
Select a date:
</label>
<input
type="date"
id="datePicker"
value={selectedDate || ''}
onChange={handleDateChange} />
<div className='lists'>
{
filteredTracks.length === 0 ? (
<p>No tracks for the selected date.</p>
) : (
filteredTracks
.map(
(data) => (
<TrackerCard key={data.date} data={data} />
)
)
)
}
</div>
</div>
);
};
export default TrackerList;
|
Javascript
import React from 'react';
const TrackerCard =
({ data }) => {
const {
date,
steps,
caloriesBurned,
distanceCovered,
weight,
} = data;
const formattedDate =
new Date(date).toLocaleDateString();
return (
<div className="tracker-card">
<h3> <span className='span'>
Date:
</span>
{formattedDate}
</h3>
<p>
<span className='span'>
Steps:
</span>
{steps}
</p>
<p>
<span className='span'>
Calories Burned:
</span>
{caloriesBurned}
</p>
<p>
<span className='span'>
Distance Covered:
</span>
{distanceCovered}
</p>
<p>
<span className='span'>
Weight:
</span>
{weight}Kg
</p>
</div>
);
};
export default TrackerCard;
|
Javascript
import React,
{
createContext,
useState,
useEffect
} from 'react';
import axios from 'axios';
const HealthContext = createContext();
const HealthProvider =
(
{
children
}
) => {
const [tracks, setTracks] = useState([]);
const [selectedDatqe, setSelectedDate] = useState(null);
useEffect(() => {
const fetchTracks =
async () => {
try {
const response =
await
const sortedTracks =
(response.data)
.slice()
.sort(
(a, b) =>
new Date(b.date) -
new Date(a.date));
setTracks(sortedTracks);
} catch (error) {
console.error(
'Error fetching health tracks:',
error.message);
}
};
fetchTracks();
}, []);
const updateTrack =
async (date, newData) => {
try {
const response =
await axios
.put(
`http:
setTracks(
(prevTracks) => {
const isoDate =
new Date(date).toISOString();
const index =
prevTracks.findIndex(
(track) =>
new Date(track.date)
.toISOString() === isoDate);
console.log('index: ', index);
if (index !== -1) {
const updatedTracks = [...prevTracks];
updatedTracks[index] = response.data;
return updatedTracks;
}
return prevTracks;
});
console.log('tracks updated', tracks);
} catch (error) {
console.error(
'Error updating health track:',
error.message
);
}
};
const getTracksForDate =
(date) => {
const selectedDate = new Date(date);
const filteredTracks =
tracks.filter(
(track) => {
const trackDate =
new Date(track.date);
return trackDate.toISOString()
.split('T')[0] ===
selectedDate.toISOString()
.split('T')[0];
});
return filteredTracks;
};
const value = {
tracks,
setSelectedDate,
updateTrack,
getTracksForDate,
};
return <HealthContext.Provider
value={value}>
{children}
</HealthContext.Provider>;
};
export { HealthContext, HealthProvider };
|
CSS
* {
background-color: #FBF6EE;
}
.tracker-list {
display: flex;
flex-direction: column;
flex-wrap: wrap;
justify-content: center;
align-items: center;
max-width: 800px;
margin: 0 auto;
}
.tracker-list h2 {
width: 100%;
text-align: center;
color: #333;
margin-bottom: 16px;
}
#datePicker {
width: 200px;
}
.lists {
display: flex;
flex-direction: row;
flex-wrap: wrap;
justify-content: center;
align-items: center;
}
.tracker-card {
background-color: #fff;
border: 1px solid #ddd;
border-radius: 8px;
padding: 16px;
margin: 16px;
box-shadow: 0 2px 4px rgba(0, 0, 0, 0.312);
width: 300px;
box-sizing: border-box;
}
.tracker-card h3 {
color: #333;
color: #FFB534;
}
.span {
font-weight: 800;
}
.tracker-card p {
margin: 8px 0;
color: #666;
}
.main-container {
display: flex;
flex-direction: column;
justify-content: center;
align-items: center;
color: #65B741;
}
.nav {
display: flex;
flex-direction: column;
justify-content: center;
align-items: center;
gap: 5px;
}
button {
background-color: #C1F2B0;
color: #FFB534;
}
#gfg {
background-color: #0fb300;
padding: 10px;
color: #FBF6EE;
border-radius: 10px;
}
.custom-button {
background-color: #3498db;
color: #fff;
padding: 10px 20px;
border: none;
border-radius: 5px;
cursor: pointer;
transition: background-color 0.3s ease;
}
.custom-button:hover {
background-color: #2980b9;
}
.modal-overlay {
position: fixed;
top: 0;
left: 0;
width: 100%;
height: 100%;
background: rgba(0, 0, 0, 0.5);
display: flex;
justify-content: center;
align-items: center;
z-index: 1000;
}
.health-form {
max-width: 400px;
background-color: #fff;
padding: 20px;
border-radius: 8px;
box-shadow: 0 0 10px rgba(0, 0, 0, 0.2);
z-index: 1001;
}
.health-form h2 {
text-align: center;
color: #333;
}
.health-form form {
display: flex;
flex-direction: column;
}
.health-form label {
margin-bottom: 10px;
font-size: 16px;
}
.health-form input {
padding: 8px;
font-size: 14px;
border: 1px solid #ddd;
border-radius: 4px;
margin-top: 4px;
}
.health-form button {
background-color: #3498db;
color: #fff;
padding: 10px 20px;
border: none;
border-radius: 5px;
cursor: pointer;
font-size: 16px;
margin-top: 10px;
transition: background-color 0.3s ease;
}
.health-form button:hover {
background-color: #2980b9;
}
.health-form button:last-child {
margin-top: 0;
background-color: #e74c3c;
}
.health-form button:last-child:hover {
background-color: #c0392b;
}
|
Steps to run the App:
To run server.js:
node server.js
To run frontend:
npm start
Output:
.gif)
Final preview
Output of Data Saved in Database:
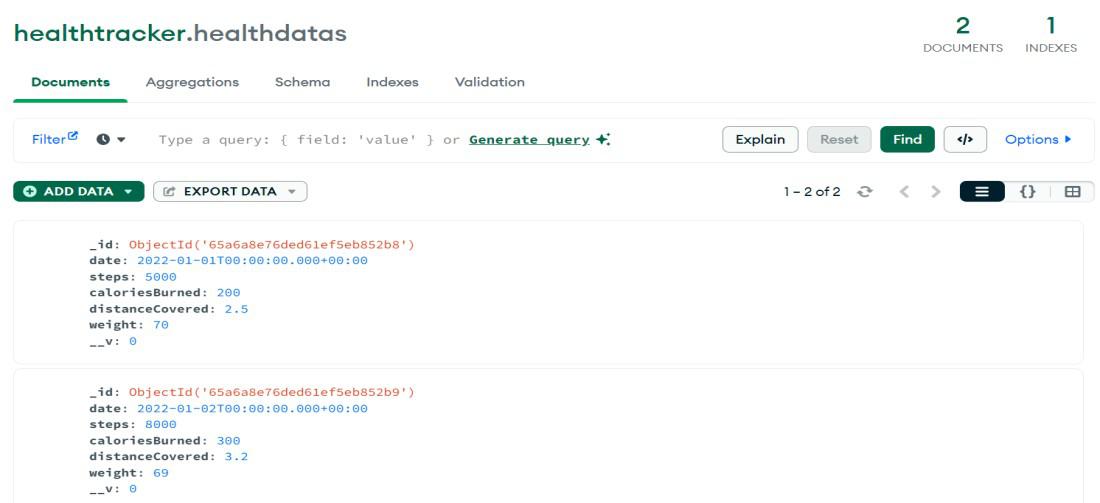
Db
Share your thoughts in the comments
Please Login to comment...