Chat Website using MERN Stack
Last Updated :
13 Jan, 2024
The “Chat Website” project is a dynamic web application that is used for real-time communication. The MERN stack, comprised of MongoDB, Express.js, React.js, and Node.js, is a powerful combination of technologies for developing robust and scalable web applications. In this article, we’ll explore the process of building a real-time chat website using the MERN stack, allowing users to do instant conversations.
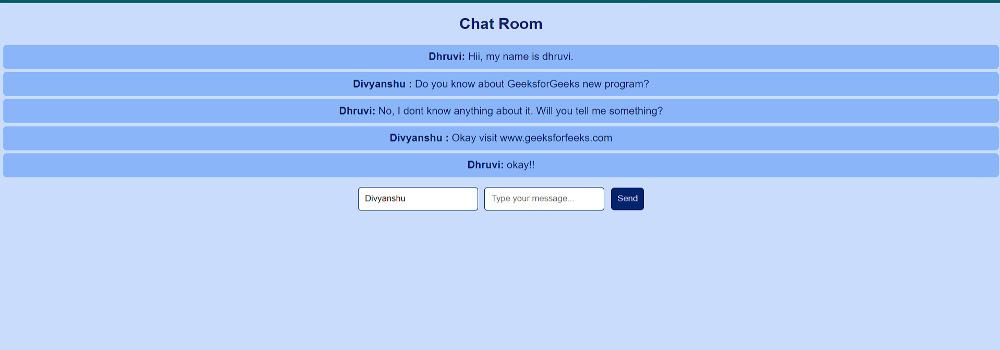
Preview of final output: Let us have a look at how the final output will look like.
Prerequisites:
Approach to create Chat Website:
- First, We will create a backend server which will serve a middleman between mongDB and React FrontEnd.
- We will create an Interactive and Simple UI design for the frontEnd in which the message is sent and the other user responds to it. All the messages along with userName will be sent to backend using above created backend.
- We will use Socket.IO toupport real time chat.
- Lastly, we will create a database in MongoDB to store the messages.
Steps to Create the Project:
Step 1: Create a new project folder and navigate to it:
mkdir chat-backend
cd chat-backend
Step 2: Initialize a Node application and install required dependencies:
npm init -y
npm install express mongoose cors socket.io
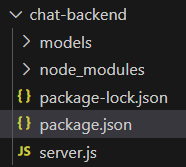
Folder Structure (Backend):
Dependencies (Backend):
"dependencies": {
    "cors": "^2.8.5",
    "express": "^4.18.2",
    "mongoose": "^8.0.4",
    "socket.io": "^4.7.3"
}
Example: Create the respective files and add the following code.
Javascript
const express = require("express");
const mongoose = require("mongoose");
const cors = require("cors");
const ChatMessage = require("./models/ChatMessage");
const app = express();
const PORT = process.env.PORT || 5000;
app.use(cors());
app.use(express.json());
mongoose.connect("Your MongoDB connection string", {
useNewUrlParser: true,
useUnifiedTopology: true,
});
app.get("/messages", async (req, res) => {
try {
const messages = await ChatMessage.find();
res.json(messages);
} catch (error) {
console.error(error);
res.status(500).json({ error: "Internal Server Error" });
}
});
app.post("/messages", async (req, res) => {
try {
const { user, message } = req.body;
if (!user || !message) {
return res
.status(400)
.json({ error: "User and message are required" });
}
const chatMessage = new ChatMessage({
user,
message,
});
await chatMessage.save();
res.status(201).json(chatMessage);
} catch (error) {
console.error(error);
res.status(500).json({ error: "Internal Server Error" });
}
});
app.listen(PORT, () => {
console.log(`Server is running on port ${PORT}`);
});
|
Javascript
const mongoose = require('mongoose');
const chatMessageSchema = new mongoose.Schema({
user: { type: String, required: true },
message: { type: String, required: true },
timestamp: { type: Date, default: Date.now },
});
const ChatMessage = mongoose.model('ChatMessage', chatMessageSchema);
module.exports = ChatMessage;
|
Step 3: To start the server run the following command.
node server.js
Step 4: Creating the frontend of the app by using the following command
cd ..
npx create-react-app chat-frontend
cd chat-frontend
Step 5: Install the required dependencies.
npm install axios react-router-dom socket.io-client
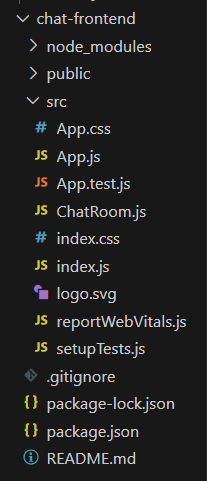
Folder Structure(Frontend):
Dependencies(Frontend):
"dependencies": {
    "@testing-library/jest-dom": "^5.17.0",
    "@testing-library/react": "^13.4.0",
    "@testing-library/user-event": "^13.5.0",
    "axios": "^1.6.5",
    "react": "^18.2.0",
    "react-dom": "^18.2.0",
    "react-router-dom": "^6.21.1",
    "react-scripts": "5.0.1",
    "socket.io-client": "^4.7.3",
    "styled-components": "^6.1.8",
    "web-vitals": "^2.1.4"
}
Example: Create the required files and add the following code.
Javascript
import React, { useState, useEffect } from 'react';
const ChatRoom = () => {
const [messages, setMessages] = useState([]);
const [user, setUser] = useState('');
const [message, setMessage] = useState('');
const fetchMessages = async () => {
try {
const data = await response.json();
setMessages(data);
} catch (error) {
console.error('Error fetching messages:', error);
}
};
const sendMessage = async () => {
try {
method: 'POST',
headers: {
'Content-Type': 'application/json',
},
body: JSON.stringify({ user, message }),
});
setMessage('');
fetchMessages();
} catch (error) {
console.error('Error sending message:', error);
}
};
useEffect(() => {
fetchMessages();
const interval = setInterval(() => {
fetchMessages();
}, 2000);
return () => clearInterval(interval);
}, []);
return (
<div>
<h2>Chat Room</h2>
<ul>
{messages.map((message) => (
<li key={message._id}>
<strong>{message.user}:</strong> {message.message}
</li>
))}
</ul>
<div>
<input
type="text"
placeholder="Your name"
value={user}
onChange={(e) => setUser(e.target.value)}
/>
<input
type="text"
placeholder="Type your message..."
value={message}
onChange={(e) => setMessage(e.target.value)}
/>
<button onClick={sendMessage}>Send</button>
</div>
</div>
);
};
export default ChatRoom;
|
Javascript
import './App.css';
import ChatRoom from './ChatRoom';
function App() {
return (
<div className="App">
<ChatRoom />
</div>
);
}
export default App;
|
CSS
body {
margin: 0;
padding: 0;
font-family: 'Arial', sans-serif;
background-color: #cadcfc;
color: #00246b;
}
.App {
text-align: center;
}
h1 {
color: #00246b;
}
ul {
list-style-type: none;
padding: 0;
}
li {
background-color: #8ab6f9;
margin: 5px;
padding: 10px;
border-radius: 5px;
}
input {
padding: 10px;
margin-right: 10px;
border: 1px solid #00246b;
border-radius: 5px;
}
button {
padding: 10px;
background-color: #00246b;
color: #cadcfc;
border: none;
border-radius: 5px;
cursor: pointer;
}
button:hover {
background-color: #8ab6f9;
color: #00246b;
}
|
Step 6: To start the frontend run the following command.
npm start
Output:
Share your thoughts in the comments
Please Login to comment...