Create an Express server with EJS Templating Engine
Last Updated :
14 Mar, 2024
EJS (Embedded JavaScript) is a simple and popular templating engine for JavaScript. it is designed to generate HTML markup with plain JavaScript.
EJS is commonly used in server-side web applications built with Node.js. It allows you to generate dynamic HTML pages. In this article, we will create student data that includes fields like name, email, and enrolled course & display that table using EJS.
How to Set up an Express Server :
Step 1: Installing Node Js First, check if the node and npm are installed in your system. if not installed Please refer to this article: Installation of Node JS on Windows
Step 2: Initialize NPM: Create and Locate your project folder in the terminal & type the command
npm init -y // It initializes our node application & creates a package.json file.
Step 3: Installing express package in project. Go to the Project directory and install express
npm i express
Step 4: Creating a Server
- Create the server.js file that include the implementation of server creation
- Paste the below code in server.js or you can refer this website
Javascript
const express = require("express");

const app = express();
const PORT = 3000;

app.listen(PORT, (req, res) => {
  console.log("App Started on App:" + PORT);
});
How to Install and Configure EJS
Step 1: Installing EJS using npm
- Use the below command to install ejs
npm i ejs
Step 2: Configuration of EJS as the default templating engine for Express
- In your server.js file , you need to set EJS as the view engine using the app.set() method. Add the following lines of code:
app.set('view engine', 'ejs');Implementation of Express server with the EJS templating engine:
Step 1: Initialize a new Node.js project Using the following command:
npm init -y
Step 2: Install the required Dependencies Using the following command:
npm i express ejs
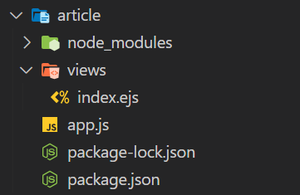
Folder Structure:
The updated dependencies in package.json file will look like:
"dependencies": {
    "ejs": "^3.1.9",
    "express": "^4.18.2"
}
Step 3: Create server.js file add implementation code of server
Step 4: Add the Configuration of EJS in server.js
Step 5: Create a file named students.ejs inside a directory views
Example: Below is an example of creating an Express server with the EJS templating engine.
Javascript
//server.js
const express = require("express");

const app = express();
const PORT = 3000;
const students = [
  {
    name: "Aman Shrey",
    email: "aman@gmail.com",
    enrolledCourse: "Python",
  },
  {
    name: "Shreya Gupta",
    email: "shreya@example.com",
    enrolledCourse: "Web Development",
  },
  {
    name: "Rahul Mishra",
    email: "rahul@example.com",
    enrolledCourse: "DSA in Java",
  },
];

// Configure Express to use EJS
app.set("view engine", "ejs");

app.get("/api", (req, res) => {
  res.render("students", { students });
});

app.listen(PORT, (req, res) => {
  console.log("App Started on App:" + PORT);
});
//students.ejs
<!-- views/students.ejs -->
<!DOCTYPE html>
<html lang="en">
<head>
    <meta charset="UTF-8">
    <meta name="viewport"
          content="width=device-width, initial-scale=1.0">
    <title>Student Information</title>
    <style>
        table {
            width: 100%;
            border-collapse: collapse;
        }
        th, td {
            border: 1px solid black;
            padding: 8px;
            text-align: left;
        }
        th {
            background-color: #f2f2f2;
        }
        h1{
            color: green;
            text-align: center;
        }
    </style>
</head>
<body>
    <h1>GeeksForGeeks Student Data:</h1>
    <table>
        <thead>
            <tr>
                <th>Index</th>
                <th>Student Name</th>
                <th>Email</th>
                <th>Enrolled Course</th>
            </tr>
        </thead>
        <tbody>
            <% students.forEach((student, index) => { %>
                <tr>
                    <td><%= index + 1 %></td>
                    <td><%= student.name %></td>
                    <td><%= student.email %></td>
                    <td><%= student.enrolledCourse %></td>
                </tr>
            <% }); %>
        </tbody>
    </table>
</body>
</html>
Output:
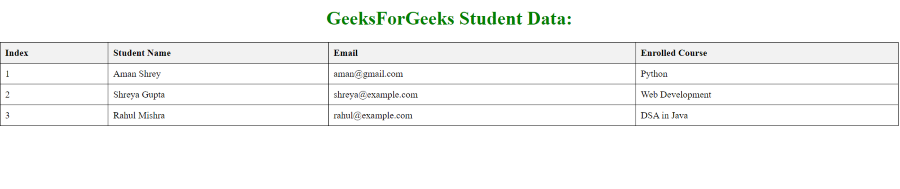
Express server with the EJS Templating Engine
Share your thoughts in the comments
Please Login to comment...