5 Simple Steps for Authentication and Authorization in MERN Stack
Last Updated :
05 Mar, 2024
Implementing authentication and authorization in a MERN stack application is crucial for ensuring the security of your application and protecting sensitive data. Here’s an elaboration on the five simple steps you can take to achieve this:
Implementing Authentication and Authorization in MERN App:
- Import Statements: Import necessary dependencies and components. React is imported for defining React components. App.js is a custom component, assumed to be present in the Home directory. Import JWT to your node application.
- Define backend: Define requests to handled by backend(example login, logout,registration).
- Create your routes: Create database to store the username, password for authentication. Handle your backend by creating backend API.
How Authentication is done in MERN Stack ?
1. User Registration
To enable user account creation in your MERN application, implement an API endpoint dedicated to user registration. Upon signing up, the user’s password must undergo secure hashing before being stored in the database.
Javascript
const express = require('express');
const router = express.Router();
const User = require('../models/user');
const bcrypt = require('bcrypt');
router.post('/register', async (req, res) => {
try {
const { username, email, password } = req.body;
const hashedPassword = await bcrypt.hash(password, 10);
const user = new User({ username, email, password: hashedPassword });
await user.save();
res.status(201).json({ message: 'Registration successful' });
} catch (error) {
res.status(500).json({ error: 'Registration failed' });
}
});
|
2. User Login
To implement a login endpoint that checks the user’s credentials and generates a JWT token upon successful login, you’ll need to follow a few steps. Below is an example of how you can do this within a MERN stack application:
First, ensure you have the necessary dependencies installed. You’ll need express, bcrypt for password hashing, and jsonwebtoken for generating JWT tokens.
Javascript
javascriptCopy code
const jwt = require('jsonwebtoken');
const secretKey = 'your-secret-key';
router.post('/login', async (req, res) => {
try {
const { email, password } = req.body;
const user = await User.findOne({ email });
if (!user) {
return res.status(401).json({ error: 'Authentication failed try Again' });
}
const passwordMatch = await bcrypt.compare(password, user.password);
if (!passwordMatch) {
return res.status(401).json({ error: 'Authentication failed try Again' });
}
const token = jwt.sign({ userId: user._id, email: user.email }, secretKey, {
expiresIn: '1h',
});
res.status(200).json({ token, userId: user._id });
} catch (error) {
res.status(500).json({ error: 'Authentication failed try Again' });
}
});
|
How Authorization is done in MERN Stack:
1. Protecting Routes
To secure routes within your MERN application, employ middleware to authenticate the JWT token within incoming requests. Below is a sample middleware demonstrating how to safeguard routes.
Javascript
const jwt = require('jsonwebtoken');
const secretKey = 'your-secret-key';
module.exports = (req, res, next) => {
try {
const token = req.headers.authorization.split(' ')[1];
const decodedToken = jwt.verify(token, secretKey);
req.userData = { userId: decodedToken.userId, email: decodedToken.email };
next();
} catch (error) {
return res.status(401).json({ error: 'Authentication failed try Again' });
}
};
|
2. Using Protected Routes
Ensure authentication for routes requiring it by applying the check-auth middleware. This middleware verifies the presence and validity of the JWT token in incoming requests, thereby enhancing security for sensitive endpoints. Additionally, it helps restrict unauthorized access to protected routes, ensuring that only authenticated users can access them.
Javascript
const express = require('express');
const router = express.Router();
const checkAuth = require('../middleware/auth');
router.get('/profile', Auth, (req, res) => {
res.json({ message: 'You are authenticated' });
});
module.exports = router;
|
Steps to implement Authentication & Authorization in Backend:
Step 1. Create a NodeJs and ExpressJS Server using the following command:
npm init -y
Step 2: Install the required dependencies in your server using the following command.
npm install express mongoose bcryptjs jsonwebtoken cors
Step 3: Create a MongoDB database to store user information, such as username, email, and hashed passwords. You can use a MongoDB Atlas cluster or set up a local instance.
Folder Structure:
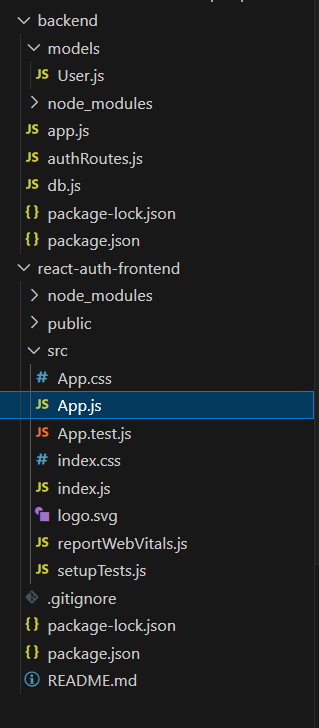
The updated dependencies in package.json file will look like:
"dependencies": {
    "bcrypt": "^5.1.1",
    "cors": "^2.8.5",
    "express": "^4.18.2",
    "jsonwebtoken": "^9.0.2",
    "mongoose": "^8.2.0",
}
Example: Below is an example of creating 5 simple for authentication and authorization in MERN Stack.
Javascript
const express = require('express');
const cors = require('cors');
const db = require('./db');
const authRoutes = require('./authRoutes');
const app = express();
const PORT = 5000;
app.use(cors({
credentials: true,
}));
app.use(cors());
app.use(express.json());
app.use('/auth', authRoutes);
app.listen(PORT, () => {
console.log(`Server is running on http:
});
|
Javascript
const express = require('express');
const bcrypt = require('bcrypt');
const jwt = require('jsonwebtoken');
const User = require('./models/User.js');
const router = express.Router();
router.post('/register', async (req, res) => {
try {
const { username, email, password } = req.body;
const hashedPassword = await bcrypt.hash(password, 10);
const user = new User({
username,
email,
password: hashedPassword,
});
await user.save();
res.status(201).json({
message:
'User registered successfully'
});
} catch (error) {
console.error(error);
res.status(500).json({
error:
'Internal server error'
});
}
});
router.post('/logout', (req, res) => {
res.clearCookie('token').send('Logged out successfully');
});
router.post('/login', async (req, res) => {
try {
const { email, password } = req.body;
const user = await User.findOne({ email });
if (!user) {
return res.status(401).json({
error:
'Invalid credentials'
});
}
const passwordMatch = await bcrypt.compare(password,
user.password);
if (!passwordMatch) {
return res.status(401).json({
error:
'Invalid credentials'
});
}
const token = jwt.sign({ userId: user._id },
'your_secret_key', {
expiresIn: '1h',
});
res.json({ token });
} catch (error) {
console.error(error);
res.status(500).json({
error:
'Internal server error'
});
}
});
module.exports = router;
|
Javascript
const mongoose = require('mongoose');
useNewUrlParser: true,
useUnifiedTopology: true,
});
const db = mongoose.connection;
db.on('error', console.error.bind(console, 'MongoDB connection error:'));
db.once('open', () => {
console.log('Connected to MongoDB');
});
module.exports = db;
|
Javascript
const mongoose = require('mongoose');
const userSchema = new mongoose.Schema({
username: {
type: String,
required: true,
unique: true,
trim: true
},
email: {
type: String,
required: true,
unique: true,
trim: true
},
password: {
type: String,
required: true
}
});
module.exports = mongoose.model('User', userSchema);
|
Start your server using the following command in your terminal.
node app.js
Steps to Create a Frontend Application:
Step 1. Create a frontend application using the following command:
npx create-react-app my-react-app
Step 2: Install the required dependencies in your application using the following command.
npm install axios
Folder Structure:
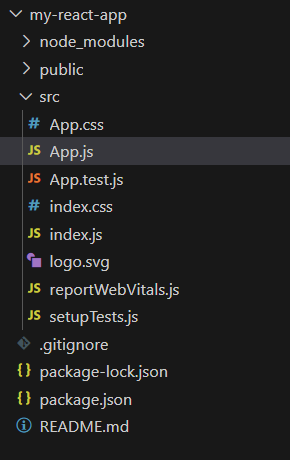
The updated dependencies in package.json file will look like:
"dependencies": {
    "react": "^18.2.0",
    "axios": "^1.6.7",
    "web-vitals": "^2.1.4"
},
Example: Below is an example of creating 5 simple steps for athutentication and authorization in MERN Stack.
CSS
body {
font-family: 'Arial', sans-serif;
background-color: #f4f4f4;
margin: 0;
padding: 0;
}
.container {
max-width: 600px;
margin: 50px auto;
background-color: #fff;
padding: 20px;
border-radius: 8px;
box-shadow: 0 0 10px rgba(0, 0, 0, 0.1);
}
h1 {
text-align: center;
color: #333;
}
form {
display: flex;
flex-direction: column;
}
input {
margin-bottom: 10px;
padding: 8px;
font-size: 16px;
border: 1px solid #ccc;
border-radius: 4px;
}
button {
background-color: #4caf50;
color: #fff;
padding: 10px;
font-size: 16px;
border: none;
border-radius: 4px;
cursor: pointer;
}
button:hover {
background-color: #45a049;
}
p {
margin-top: 20px;
font-size: 14px;
color: #333;
}
|
Javascript
import React, { useState } from 'react';
import axios from 'axios';
import './App.css';
function App() {
const [username, setUsername] = useState('');
const [email, setEmail] = useState('');
const [password, setPassword] = useState('');
const [loginEmail, setLoginEmail] = useState('');
const [loginPassword, setLoginPassword] = useState('');
const [token, setToken] = useState('');
const handleRegister = async () => {
try {
const response = await axios.post(
{
username,
email,
password,
},
{ withCredentials: true }
);
console.log(response.data);
} catch (error) {
console.error(error.response.data.error);
}
};
const handleLogin = async () => {
try {
const response = await axios.post(
{
email: loginEmail,
password: loginPassword,
},
{ withCredentials: true }
);
setToken(response.data.token);
console.log('Login successful');
} catch (error) {
console.error(error.response.data.error);
}
};
const handleLogout = async () => {
try {
const response = await
method: 'POST',
credentials: 'include',
});
if (!response.ok) {
throw new Error(`HTTP error! Status:
${response.status}`);
}
localStorage.removeItem('token');
console.log("Logged out");
} catch (error) {
console.error('Error during logout:', error);
}
};
return (
<div>
<h1>Authentication App</h1>
<div>
<h2>Register</h2>
<input
type="text"
placeholder="Username"
value={username}
onChange={(e) => setUsername(e.target.value)}
/>
<input
type="email"
placeholder="Email"
value={email}
onChange={(e) => setEmail(e.target.value)}
/>
<input
type="password"
placeholder="Password"
value={password}
onChange={(e) => setPassword(e.target.value)}
/>
<button onClick={handleRegister}>Register</button>
</div>
<div>
<h2>Login</h2>
<input
type="email"
placeholder="Email"
value={loginEmail}
onChange={(e) => setLoginEmail(e.target.value)}
/>
<input
type="password"
placeholder="Password"
value={loginPassword}
onChange={(e) => setLoginPassword(e.target.value)}
/>
<button onClick={handleLogin}>Login</button>
</div>
{token && <p>Token: {token}</p>}
<button onClick={handleLogout}>Logout</button>
</div>
);
}
export default App;
|
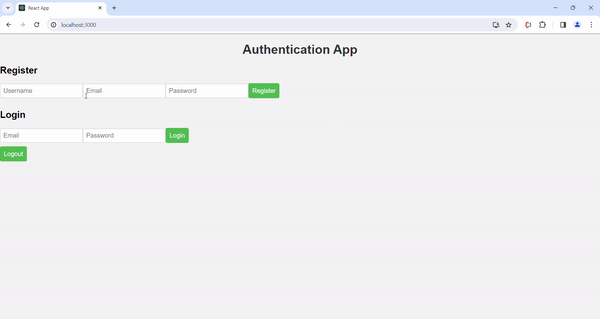
Start your application using the following command in your terminal.
npm start
Output:
Share your thoughts in the comments
Please Login to comment...