Spring Boot Security Auto-Configuration
Last Updated :
23 Apr, 2024
Spring Boot Security Auto Configuration can simplify the process of securing the Spring Boot applications by providing default security configurations. It can automate the many common security tasks such as setting up the authentication, and authorization and it can handle the common security vulnerabilities, allowing the developers to focus on the application logic rather than the boilerplate security configurations of the Spring application.
Spring Boot Security Auto Configuration defines the Spring Security. It is a powerful authentication and access control framework to provide security features out of the box. It can automatically configure the security settings based on the dependencies present in the Spring Boot project. For instance, If Spring security is detected in the classpath and Spring Boot automatically applies sensible default of the security configurations.
Key Terminologies:
- Spring Boot Security: This module provides the security features for the spring boot applications by integrating with Spring Security.
- Spring Security: The power authentication and access control framework for Java applications and can provide comprehensive security services.
- Authentication: The process of the verifying the identity of the user and it can validate the credentials such as the username and password of the Spring Security.
- Authorization: The process of the determining whether the authenticated user is allowed to the access certain the resource or the perform the specific actions.
- HttpSecurity: The class that can used to the configure the HTTP security settings such as the access control rules, authentication mechanisms and the session management.
- RequestMatchers: Patterns used to the match URL or the request paths for the applying the security rules and it can typically used in the authorization configuration of the application.
Working with Spring Security
Add the Spring Boot Security Dependency
<dependency>
    <groupId>org.springframework.boot</groupId>
    <artifactId>spring-boot-starter-security</artifactId>
</dependency>
By the default, Spring Boot Security Auto configuration secures all the endpoints of the application. Try to accessing any endpoint in the application. Display the prompted to the login in with the default username and password.
Project Implementation of Spring Boot Security Auto-Configuration
Below are the steps to implement Security Auto-Configuration in Spring Boot.
Step 1: We will create a Spring Boot project using Spring STS IDE adding below mentioned dependencies to the project.
Dependencies:
- Spring Web
- Spring Security
- Spring Dev tools
- Lombok
Once we complete the project creation then the file structure looks like the below image.

Step 2: Open the application.properties file and put the below code for the spring security user credentials configuration of the spring project.
spring.application.name=spring-security-configuration

# Server port
server.port=8080

# Spring Security default user credentials
spring.security.user.name=admin
spring.security.user.password=admin
Step 3: Create a new java package named config, in that package, create the new Java class named as WebSecurity.
Go to src > main > java > springsecurityconfiguration > config > WebSecurity and put the below code.
Java
package org.example.springsecurityconfiguration.config;

import org.springframework.context.annotation.Configuration;
import org.springframework.security.config.annotation.web.builders.HttpSecurity;


@Configuration
public class WebSecurity {
    @Deprecated
    protected void configure(HttpSecurity http) throws Exception {
        http.authorizeRequests()
                .requestMatchers("/").permitAll() // Allow access to home page
                .anyRequest().authenticated() // Authenticate all other requests
                .and()
                .formLogin().permitAll(); // Enable form login
    }
}
Step 4: Create a new java package named controller, in that package, create a new Java class named HomeController.
Go to src > main > java > springsecurityconfiguration > config > HomeController and put the below code.
Java
package org.example.springsecurityconfiguration.controller;

import org.springframework.web.bind.annotation.GetMapping;
import org.springframework.web.bind.annotation.RestController;

@RestController
public class HomeController {
    @GetMapping("/")
    public String home() {
        return "Welcome to the secure area!";
    }
}
Step 5: Now open the main class file and write the below code.
Java
package org.example.springsecurityconfiguration;

import org.springframework.boot.SpringApplication;
import org.springframework.boot.autoconfigure.SpringBootApplication;

@SpringBootApplication
public class SpringSecurityConfigurationApplication {

    public static void main(String[] args) {
        SpringApplication.run(SpringSecurityConfigurationApplication.class, args);
    }

}
pom.xml:
XML
<?xml version="1.0" encoding="UTF-8"?>
<project xmlns="http://maven.apache.org/POM/4.0.0" xmlns:xsi="http://www.w3.org/2001/XMLSchema-instance"
         xsi:schemaLocation="http://maven.apache.org/POM/4.0.0 https://maven.apache.org/xsd/maven-4.0.0.xsd">
    <modelVersion>4.0.0</modelVersion>
    <parent>
        <groupId>org.springframework.boot</groupId>
        <artifactId>spring-boot-starter-parent</artifactId>
        <version>3.2.4</version>
        <relativePath/> <!-- lookup parent from repository -->
    </parent>
    <groupId>org.example</groupId>
    <artifactId>spring-security-configuration</artifactId>
    <version>0.0.1-SNAPSHOT</version>
    <name>spring-security-configuration</name>
    <description>spring-security-configuration</description>
    <properties>
        <java.version>17</java.version>
    </properties>
    <dependencies>
        <dependency>
            <groupId>org.springframework.boot</groupId>
            <artifactId>spring-boot-starter-security</artifactId>
        </dependency>
        <dependency>
            <groupId>org.springframework.boot</groupId>
            <artifactId>spring-boot-starter-web</artifactId>
        </dependency>

        <dependency>
            <groupId>org.springframework.boot</groupId>
            <artifactId>spring-boot-devtools</artifactId>
            <scope>runtime</scope>
            <optional>true</optional>
        </dependency>
        <dependency>
            <groupId>org.projectlombok</groupId>
            <artifactId>lombok</artifactId>
            <optional>true</optional>
        </dependency>
        <dependency>
            <groupId>org.springframework.boot</groupId>
            <artifactId>spring-boot-starter-test</artifactId>
            <scope>test</scope>
        </dependency>
        <dependency>
            <groupId>org.springframework.security</groupId>
            <artifactId>spring-security-test</artifactId>
            <scope>test</scope>
        </dependency>
    </dependencies>

    <build>
        <plugins>
            <plugin>
                <groupId>org.springframework.boot</groupId>
                <artifactId>spring-boot-maven-plugin</artifactId>
                <configuration>
                    <excludes>
                        <exclude>
                            <groupId>org.projectlombok</groupId>
                            <artifactId>lombok</artifactId>
                        </exclude>
                    </excludes>
                </configuration>
            </plugin>
        </plugins>
    </build>

</project>
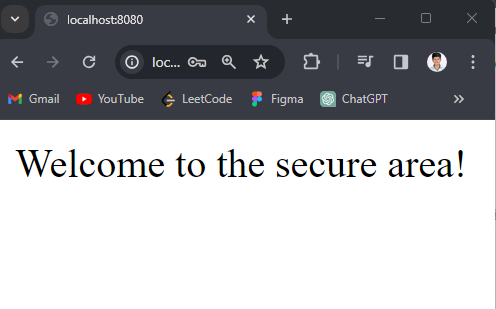
Step 6: Once completed the project, it will run the application as spring project at port 8080. Refer the below output image for the better understanding.

Output:
GET http://localhost:8080/

Once login with credentials then show the below output.
If we follow the above steps, then we can demonstrate the Spring Boot Auto configuration in the Spring applications.
Conclusion
Spring Boot Security Auto configuration simplifies the process of the securing the Spring Boot applications by the providing default security configurations. It can automate many common security tasks such as the authentication, authorization and protection against the common security vulnerabilities.
Share your thoughts in the comments
Please Login to comment...