Real-time chat application in JavaScript
Last Updated :
05 Jul, 2023
A real-time chat application is a software application that enables users to exchange messages and communicate with each other in real-time. It allows individuals or groups to have conversations, share information, and collaborate instantly over the Internet.
Real-time chat applications are designed to provide a responsive and interactive experience, where messages are delivered and displayed immediately as they are sent. This means that users can engage in conversations and receive updates in real-time, without significant delays.
Let’s have an interactive look at what our final project will look like:
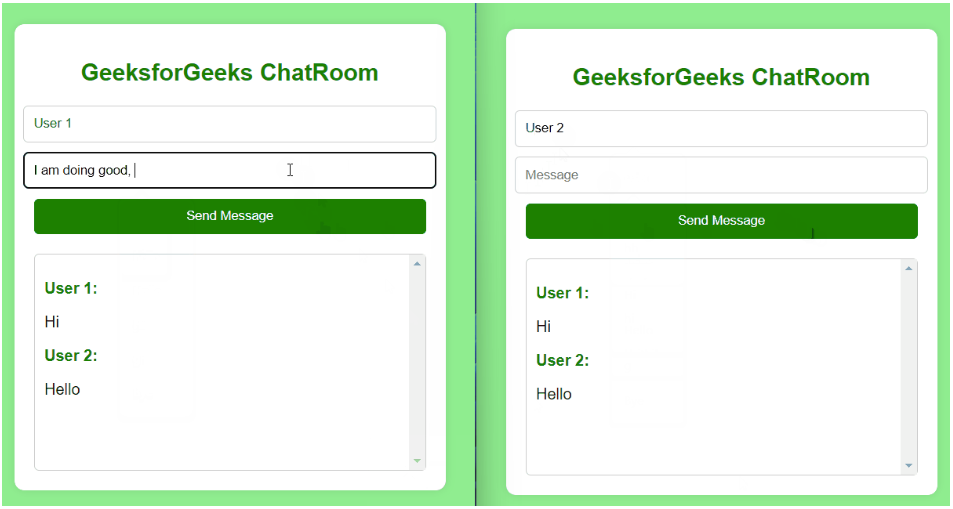
Real-Time Chat Application
To overcome these issues, consider using WebSocket or a WebSocket library (such as Socket.IO) for the real-time communication aspects of your chat application. WebSocket provides a more efficient and scalable solution compared to traditional HTTP-based approaches.
About Socket.io :
Socket.io is a popular JavaScript library that enables real-time, bidirectional communication between a client (usually a web browser) and a server. It is commonly used in the development of real-time applications, including chat applications.
Role of Socket.io :
- It allows for instant updates and eliminates the need for the client to continuously poll the server for new information.
- Uses an event-driven architecture, where both the client and the server can emit and listen for events. This allows for a flexible and decoupled communication model.
- Provides mechanisms for broadcasting events to multiple clients or specific groups of clients. It also supports the concept of rooms, where clients can join or leave specific rooms to enable targeted messaging.
- Handles automatic reconnection in case of network disruptions or server unavailability. It tries various strategies to reconnect and resume the connection seamlessly.
- Can be used with JavaScript on the client side and various server-side technologies, including Node.js, Python, and PHP. It is compatible with different browsers and operating systems.
- Socket.io can be scaled horizontally by deploying multiple instances of the server and utilizing a load balancer. It also integrates well with other technologies for handling scalability, such as Redis or message queues.
Prerequisites:
Project Structure :
Steps to create the application:
Step 1: Create a new directory for your project and navigate to it using the command line.
mkdir real-time-chat-app
Step 2: Navigate to the project directory.
cd real-time-chat-app
Step 3: Initialize a new Node.js project: Run the following command in the project directory to create a new package.json file:
npm init -y
Step 4: Install the required dependencies: Install Socket.IO packages by running the following command:
npm install socket.io
Step 5: Create the following files index.js, index.html, style.css
package.json:
{
  "name": "real-time-chat-app",
  "version": "1.0.0",
  "description": "",
  "main": "index.js",
  "scripts": {
    "test": "echo \"Error: no test specified\" && exit 1"
  },
  "keywords": [],
  "author": "",
  "license": "ISC"
}
Example: Write the following code in respective files
- index.js file: This file is responsible for handling the server-side operations of a web application. It receives HTTP requests from clients and processes them using the appropriate logic and algorithms.
- index.html file: This file is responsible for defining the structure and content of the user interface.This HTML file contains HTML code & client-side JavaScript code
- style.css file: This file contains the styling of the application
Javascript
const http = require('http');
const fs = require('fs');
const server = http.createServer((req, res) => {
if (req.url === '/') {
fs.readFile(__dirname + '/index.html', (err, data) => {
if (err) {
res.writeHead(500);
res.end('Error loading index.html');
} else {
res.writeHead(200, { 'Content-Type': 'text/html' });
res.end(data);
}
});
}
});
const io = require('socket.io')(server);
const port = 5000;
io.on('connection', (socket) => {
socket.on('send name', (user) => {
io.emit('send name', user);
});
socket.on('send message', (chat) => {
io.emit('send message', chat);
});
});
server.listen(port, () => {
console.log(`Server is listening at the port: ${port}`);
});
|
HTML
<!DOCTYPE html>
<html>
<head>
<title>GeeksforGeeks ChatRoom</title>
<link rel="stylesheet" href="style.css">
</head>
<body>
<div class="container">
<h1 class="logo">GeeksforGeeks ChatRoom</h1>
<form class="form" id="form">
<input class="input" type="text" placeholder="Name" id="myname">
<input class="input" type="text" placeholder="Message" id="message">
<button class="button">Send Message</button>
</form>
<div class="messageArea" id="messageArea"></div>
</div>
<script src="/socket.io/socket.io.js"></script>
<script>
let socket = io();
let form = document.getElementById('form');
let myname = document.getElementById('myname');
let message = document.getElementById('message');
let messageArea = document.getElementById('messageArea');
form.addEventListener('submit', (e) => {
e.preventDefault();
if (message.value) {
socket.emit('send name', myname.value);
socket.emit('send message', message.value);
message.value = '';
}
});
socket.on('send name', (username) => {
let name = document.createElement('p');
name.classList.add('message');
name.innerHTML = `<span class="username">${username}:</span>`;
messageArea.appendChild(name);
});
socket.on('send message', (chat) => {
let chatContent = document.createElement('p');
chatContent.classList.add('message');
chatContent.textContent = chat;
messageArea.appendChild(chatContent);
});
</script>
</body>
</html>
|
CSS
body {
background-color: #90EE90;
margin: 0;
padding: 0;
font-family: Arial, sans-serif;
}
.container {
max-width: 400px;
margin: 50px auto;
padding: 20px;
background-color: white;
border-radius: 10px;
box-shadow: 0 0 10px rgba(0, 0, 0, 0.1);
}
.logo {
text-align: center;
font-size: 24px;
font-weight: bold;
margin-bottom: 20px;
color: #008000;
}
.form {
display: flex;
flex-direction: column;
align-items: center;
}
.input {
border: 1px solid #ccc;
border-radius: 5px;
padding: 10px;
margin-bottom: 10px;
width: 100%;
}
.button {
background-color: #008000;
color: white;
border: none;
border-radius: 5px;
padding: 10px;
width: 100%;
cursor: pointer;
}
.messageArea {
margin-top: 20px;
border: 1px solid #ccc;
border-radius: 5px;
padding: 10px;
height: 200px;
overflow-y: scroll;
}
.message {
margin-bottom: 5px;
}
.username {
font-weight: bold;
color: #008000;
}
|
Steps to run the application :
Step 1: Start the server: Run the following command to start the server and make it listen on port 5000(or the specified PORT environment variable):
node index.js
Step 2: Open a web browser and type the following link in the web browser visit
http://localhost:5000
Output :
Real-time chat between two users 1 & 2
Issues that can occur because of HTTP :
- Lack of real-time updates occurs as HTTP is a request-response protocol, which means that clients need to send a request to the server to receive updates.
- High latency occurs as HTTP requests and responses involve establishing a new connection for each request, which can introduce latency.
- Scalability limitations occur as HTTP-based applications typically rely on techniques like long polling or frequent polling to simulate real-time updates.
- Server resource consumption occurs as HTTP requests create overhead in terms of server resources, as each request requires processing and memory allocation.
- Firewall and proxy issues occur as some firewalls or proxies may not allow WebSocket connections, limiting the accessibility of the chat application to users behind those network configurations.
Host your created app on Netlify, using the following steps :
Step 1: Sign up for a Netlify account: Visit the Netlify website (https://www.netlify.com) and sign up for a free account if you don’t have one already.
Step 2: Connect your project to Netlify
Step 3: Go to the Netlify dashboard and click on the “New site from Git” button.
Step 4: Choose your preferred Git provider and follow the instructions to connect your repository.
Step 5: Configure your deployment settings
Step 6: On the deployment settings page, ensure that the build command is set to:
npm install && npm run build
Step 7: Set the publish directory to the directory containing your HTML file and other static assets (e.g., public).
Step 8: Review and deploy
Netlify will automatically detect the build settings and provide a summary of your project.
Step 9: Click on the “Deploy site” button to start the deployment process.
Wait for the deployment to finish. Netlify will build and deploy your project based on the provided settings. Once the deployment is complete, Netlify will provide you with a unique URL for your hosted app.
Step 10: Visit your hosted app.
Open a web browser and visit the provided URL to see your chat app hosted on Netlify.
Now your Real-time chat app is successfully hosted on Netlify, and you can access it from anywhere using the provided URL.
Share your thoughts in the comments
Please Login to comment...