QR Code Generator Service with Node.js and Express.js
Last Updated :
22 Feb, 2024
Nowadays, Quick Response (QR) codes have become an integral tool for transferring information quickly and conveniently. This project aims to develop a QR code generation API service using Node.js and Express.js. In addition, it goes further and extends the former by providing more customization options to follow RESTful API design principles and handle errors.
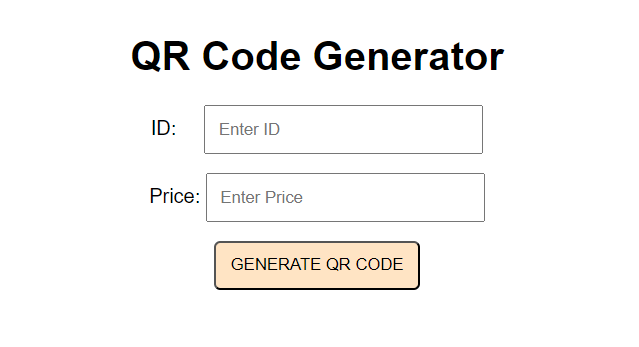
Output Preview: Let us have a look at how the final output will look like.
Prerequisites
How QR Codes Work?
Quick response codes (QR codes) are two-dimensional barcodes that can store much more information than traditional one-dimensional barcodes. The following are the basics of how it works.
- Data encoding: The given data (text, URL, contact information, etc.) will be converted into a sequence of bits (binary digits i.e. 0s and 1s).
- To create “qrcode” and other QR codes in our API, the library uses an error-correcting method that adds extra bits to ensure that even if some parts were damaged during transmission or scanning, it can be rebuilt from scratch.
- Reading and decoding: A smartphone camera or a reader specifically designed for QR codes is able to recognize unique barcodes. The decoder looks for patterns to find timestamps and grid size. It then ejects the data module together with the error correction bit. The error correction algorithm repairs any possible errors that may occur based on the image.
- Finally, this decoded data is then reversed to its original form i.e. text, URL etc.
Approach to create QR Code Generator Service:
We will follow some industry standards to organize our code and write the application server. The separation of controller, routes, and services layer helps to make the code more readable, modify friendly and such modules can be easily debugged for server issues.
- app.js: This file will contain our basic server file details and also the express setup. To spin up the server we just use node app.js and you can find the server to be started at the specified port mentioned.
- routes.js: This file contains all our API routes, having a separate routes file is handy when there are large number of api endpoints.
- controller.js: This file contains the first place where our request for generating a QR Code will hit. Generally controller have all the authentications and permissions attached to the endpoints. Any middlewares are tested before entering into the controller functions. This also controls the response type and any validation of needed for the request body.
- service.js: This file will have the business logic/algorithms (the most important part of the application). The logic of qr code generation will be written here. For this we are using a library qrcode, to encode the data that we have received into 2D bar code image.
Steps to create QR Code Generator Service
Step 1: Create the folder for the project by using the following command.
mkdir qr-code-generator
cd qr-code-generator
Step 2: Create the server folder inside it and initialize the Node application:
mkdir server
cd server
npm init -y
Step 3: Install the required dependencies:
npm install express qrcode body-parser cors
Project Structure:
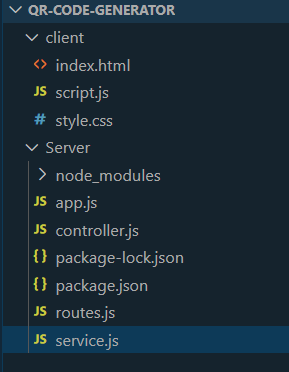
Folder structure
The updated dependencies in package.json file will look like:
"dependencies": {
    "body-parser": "^1.20.2",
    "cors": "^2.8.5",
    "express": "^4.18.2",
    "qrcode": "^1.5.3"
}
Example Code for Backend: Now create the required files as suggested and add the following code.
Javascript
const express = require('express');
const bodyParser = require('body-parser');
const cors = require('cors');
const router = require('./routes');
const app = express();
const port = process.env.PORT || 3000;
app.use(bodyParser.json());
app.use(cors());
app.use(router);
app.listen(port, () => {
console.log(`Server listening on port ${port}`);
});
|
Javascript
const service = require('./service');
exports.generateQR = async (req, res) => {
try {
const { data } = req.body;
const qrCodeText = service.formatData(data);
const qrCodeBuffer = await service.generateQRCode(qrCodeText);
res.setHeader('Content-Disposition', 'attachment; filename=qrcode.png');
res.type('image/png').send(qrCodeBuffer);
} catch (err) {
console.error('Error generating QR code:', err);
res.status(500).send({ error: 'Internal Server Error' });
}
};
|
Javascript
const express = require('express');
const controller = require('./controller');
const router = express.Router();
router.post('/generate-qr', controller.generateQR);
module.exports = router;
|
Javascript
const QRCode = require('qrcode');
exports.formatData = (data) => {
const qrCodeText = `Product ID: ${data.id}, Price: $${data.price}`;
return qrCodeText;
};
exports.generateQRCode = async (qrCodeText) => {
const options = {
errorCorrectionLevel: 'M',
type: 'image/png',
margin: 1
};
const qrCodeBuffer = await QRCode.toBuffer(qrCodeText, options);
return qrCodeBuffer;
};
|
Step 4: To start the application run the following command.
node app.js
Step 5: Now go to the root folder and create folder for the frontend.
mkdir client
Example Code for Frontend: Create the required files and add the following codes.
Javascript
document.getElementById('qr-form').addEventListener('submit', function (e) {
e.preventDefault();
const id = document.getElementById('qr-id').value;
const price = document.getElementById('qr-price').value;
const data = { id, price }
method: 'POST',
headers: {
'Content-Type': 'application/json',
},
body: JSON.stringify({ data })
})
.then(response => response.blob())
.then(blob => {
const qrImage = document.createElement('img');
const qrImageUrl = URL.createObjectURL(blob);
qrImage.src = qrImageUrl;
const qrResultDiv = document.getElementById('qr-result');
qrResultDiv.innerHTML = '';
qrResultDiv.appendChild(qrImage);
})
.catch(error => console.error('Error generating QR code:', error));
});
|
HTML
<!DOCTYPE html>
<html lang="en">
<head>
<meta charset="UTF-8">
<meta name="viewport" content="width=device-width, initial-scale=1.0">
<title>QR Code Generator</title>
<link rel="stylesheet" href="style.css">
</head>
<body>
<h1>QR Code Generator</h1>
<form id="qr-form">
<div class="content">
<label for="qr-id" class="margin">ID:</label>
<input type="text" id="qr-id" class="qr-input" placeholder="Enter ID">
</div>
<div class="content">
<label for="qr-price">Price:</label>
<input type="text" id="qr-price" class="qr-input" placeholder="Enter Price">
</div>
<button type="submit" class="content">Generate QR Code</button>
</form>
<div id="qr-result">
</div>
<script src="script.js"></script>
</body>
</html>
|
CSS
body {
font-family: Arial, sans-serif;
text-align: center;
margin-top: 50px;
}
.content {
margin-bottom: 15px;
}
.margin {
margin-right: 18px;
}
.qr-input {
padding: 10px;
width: 200px;
}
#qr-result img {
margin-top: 20px;
border: 1px solid #000;
}
button {
padding: 10px 12px;
text-transform: uppercase;
border-radius: 5px;
background-color: bisque;
}
|
Output:

Final Output
Share your thoughts in the comments
Please Login to comment...