Optimizing Costs with Azure Blob Storage: Storage Tiers and Lifecycle Policies
Last Updated :
19 Oct, 2023
Azure Blob Storage, a key component of Microsoft Azure, is a powerful service designed to store and manage massive amounts of unstructured data in the cloud. It offers various ways to optimize costs, including selecting appropriate storage tiers and implementing lifecycle policies. This article explores these cost optimization strategies to help businesses make informed decisions and effectively manage their storage expenses.
Key Terminologies
Before diving into the optimization strategies, let’s define some essential terms related to Azure Blob Storage:
- Azure Blob Storage: An object storage solution for the cloud that’s optimized for storing large amounts of unstructured data.
- Storage Tiers: Different levels of performance and pricing for blob data, including hot, cool, and archive tiers.
- Lifecycle Policies: Rules that automatically move or delete blob data based on its age and access frequency.
Cost Optimization Strategies
1. Storage Tiers
Azure Blob Storage offers three storage tiers, each tailored to different usage patterns:
- Hot Tier: Optimized for frequent access with low latency and the highest cost.
- Cool Tier: Ideal for infrequently accessed data, providing a balance of cost and access latency.
- Archive Tier: Suited for rarely accessed data, offering the lowest cost but with additional retrieval charges and higher latency.
By understanding the access patterns of the data, we can strategically place data in the appropriate tier to optimize costs.
2. Lifecycle Policies
Lifecycle policies are powerful tools for managing data automatically based on its lifecycle. These policies enable you to define rules for transitioning data between storage tiers or even deleting it when it’s no longer needed.
For example, you can create a policy that moves data from the hot tier to the cool tier after a certain period of inactivity. Subsequently, you can move it to the archive tier for long-term storage after an extended period of inactivity. This automation helps optimize costs by placing data in the most cost-effective tier according to its usage.
Examples
Example 1: Transitioning Data to Cool and Archive Tiers
Imagine you have a dataset that is frequently accessed initially but becomes less relevant over time. You can set up a lifecycle policy to automatically move this data from the hot tier to the cool tier after 30 days of inactivity. Furthermore, you can move it to the archive tier after 90 days of no access.
Example 2: Deleting Redundant Data
In a scenario where you have temporary data or logs that are only relevant for a short period, you can create a policy to delete these blobs after 60 days to free up storage space and reduce costs.
Example for Step-by-Step Cost Optimization
Here, let’s transition our data to cool tiers to optimize costs.
In this example, we’ll illustrate how to set up a lifecycle management policy to automatically transition data from the hot tier to the cool tier after a period of inactivity.
Step 1: Navigate to the Lifecycle Management Section
Log in to the Azure portal and navigate to your storage account.Under “Data management,” select “Lifecycle Management” to access the policy settings.

Step 2: Add a New Rule
Select the “List View” tab to manage the policies using a list view.Click on “Add a rule” to create a new policy.
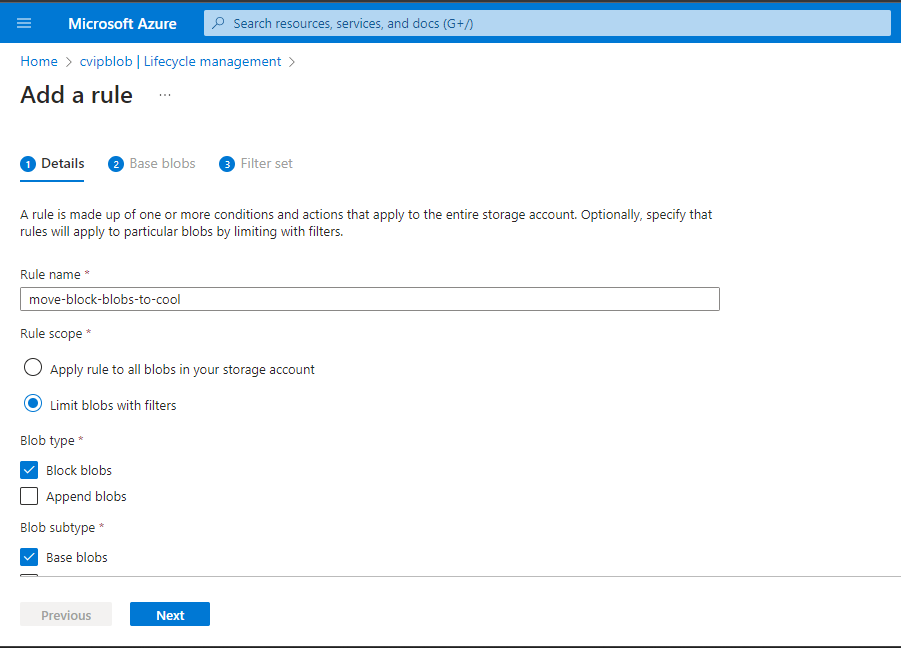
Step 3: Configure Rule Details
Name your rule to easily identify its purpose.Set the rule’s scope, blob type, and blob subtype values. For this example, set the scope to filter blobs, which will add the “Filter set” tab for further configuration.
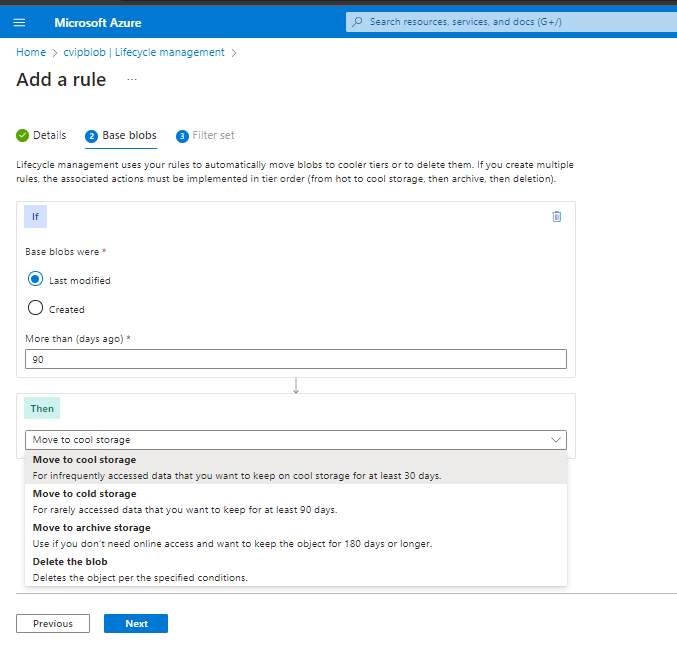
Step 4: Define Conditions for Transition
Under “Base blobs,” set the conditions for your rule. In this example, we’ll transition blobs to cool storage if they haven’t been modified for 90 days. Select the “Last modified” or “Last accessed” option (available if access time tracking is enabled and Block blobs are selected as the blob type).
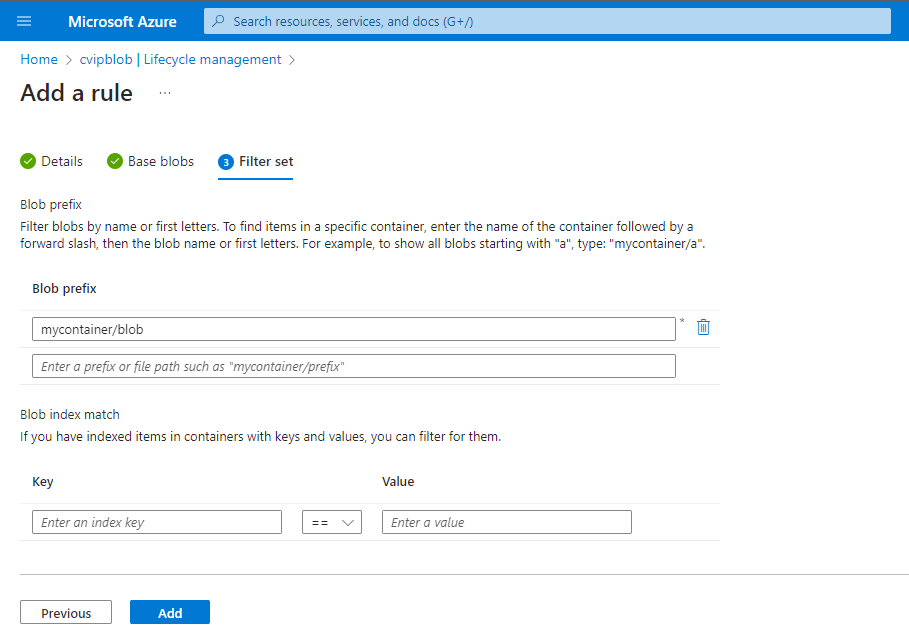
Step 5: Optionally Define Filters
If needed, you can further filter the blobs based on specific criteria. Select “Filter set” to define optional filters. For instance, you can filter blobs whose names begin with “blob” in a container named “mycontainer.”
Step 6: Add the Policy
After configuring the rule and optional filters, click “Add” to apply the new policy.
Note: Keep in mind that a lifecycle management policy will not delete the current version of a blob until any previous versions or snapshots associated with that blob have been deleted. If there are previous versions or snapshots, ensure to select “Base blobs,” “Snapshots,” and “Versions” in the Blob Subtype section when specifying a delete action as part of the policy.
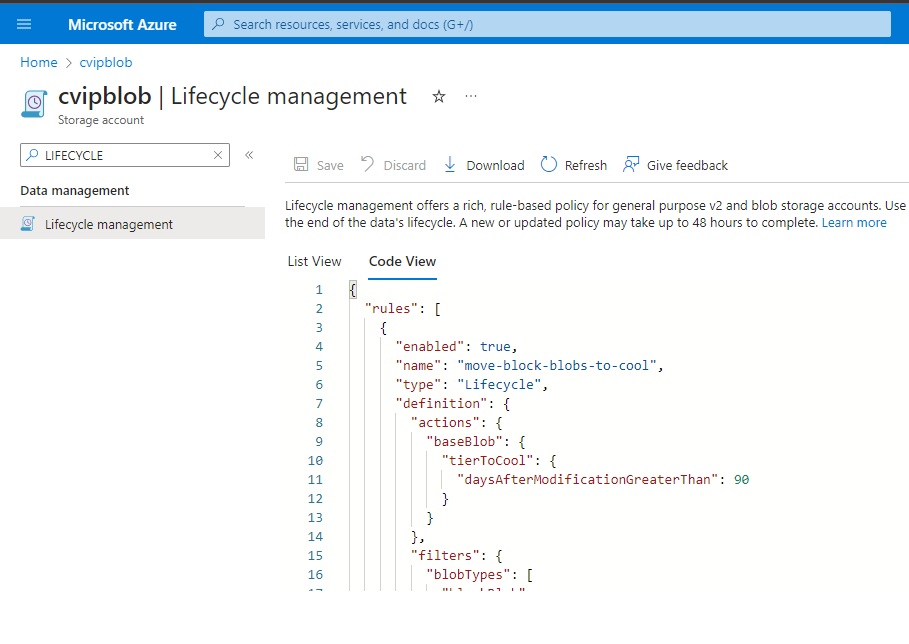
Step 7: Code View Configuration
Alternatively, you can define the lifecycle management policy in JSON using the “Code View” tab. This allows you to create the policy in JSON format, providing a more detailed and structured representation of the policy.By following these steps, you can effectively set up a lifecycle management policy to transition data between storage tiers based on defined conditions, optimizing storage costs and access efficiency.
Conclusion
Optimizing costs with Azure Blob Storage involves thoughtful planning and effective utilization of storage tiers and lifecycle policies. By analyzing data access patterns and strategically placing data in the appropriate storage tier, along with automating transitions using lifecycle policies, businesses can significantly reduce storage costs while ensuring optimal data accessibility. Understanding these strategies is vital for cost-effective cloud storage management.
FAQs On Optimizing Costs with Azure Blob Storage
1. What is Azure Blob Storage?
Azure Blob Storage is a cloud-based object storage solution designed to store large amounts of unstructured data.
2. How can I optimize costs with Azure Blob Storage?
You can optimize costs by strategically selecting storage tiers (hot, cool, or archive) based on your data access patterns and implementing lifecycle policies to transition or delete data automatically.
3. Can I change the storage tier of my blobs?
Yes, you can change the storage tier of your blobs using Azure Storage lifecycle management or programmatically via the Azure Storage API.
4. Are there any additional charges for using the archive tier?
Yes, the archive tier incurs additional charges for data retrieval, making it important to consider the access patterns of your data before moving it to this tier.
Share your thoughts in the comments
Please Login to comment...