Online Markdown Editor using Django
Last Updated :
06 Feb, 2024
In this article, we will guide you through the process of creating an Online Markdown Editor using Django. This powerful tool allows users to seamlessly convert HTML code into a polished web output. By simply entering your HTML code into the input field, our Online Markdown Editor will instantly generate the corresponding output, making the process of creating and visualizing web forms a breeze.
Why Use an Online Markdown Editor?
An Online Markdown Editor proves to be a valuable asset for developers and web designers alike. It simplifies the task of converting HTML code into a presentable web form, eliminating the need for manual rendering and reducing the likelihood of errors. With this tool, users can focus on their HTML content, confident that the Online Markdown Editor will handle the transformation seamlessly.
Online Markdown Editor using Django
To install Django follow these steps.
Starting the Project Folder
To start the project use this command
django-admin startproject core
cd core
To start the app use this command
python manage.py startapp home
Now add this app to the ‘settings.py’
INSTALLED_APPS = [
    "django.contrib.admin",
    "django.contrib.auth",
    "django.contrib.contenttypes",
    "django.contrib.sessions",
    "django.contrib.messages",
    "django.contrib.staticfiles",
    "home",
]
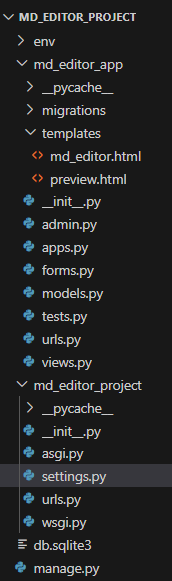
File Structure
Setting Necessary Files
models.py : This Django code defines a model called `Edit_Doc` with title and content fields, allowing the creation of documents with specified titles and associated text content.
Python3
from django.db import models
class Edit_Doc(models.Model):
title = models.CharField(max_length=255)
content = models.TextField()
|
views.py : First install the markdown library using the command , pip install markdown. This Django view, `markdown_editor`, processes form submissions from an Online Markdown Editor, converting Markdown content to HTML using the `markdown` library. It renders a preview with the title and HTML content..
Python3
from django.shortcuts import render
from django.shortcuts import render
from .forms import Edit_Doc_Form
import markdown
def markdown_editor(request):
if request.method == 'POST':
form = Edit_Doc_Form(request.POST)
if form.is_valid():
title = form.cleaned_data['title']
content = form.cleaned_data['content']
html_content = markdown.markdown(content)
return render(request, 'preview.html', {'title': title, 'html_content': html_content})
else:
form = Edit_Doc_Form()
return render(request, 'md_editor.html', {'form': form})
|
forms.py : The Django form `Edit_Doc_Form` is created with fields for title (max length: 255) and content (text area), designed for capturing input in the Online Markdown Editor.
Python3
from django import forms
class Edit_Doc_Form(forms.Form):
title = forms.CharField(max_length=255)
content = forms.CharField(widget=forms.Textarea)
|
md_editor_app/urls.py : This Django `urls.py` establishes a URL pattern for the ‘markdown_editor’ view, accessible at ‘/markdown_editor/’.
Python3
from django.urls import path
from .views import markdown_editor
urlpatterns = [
path('markdown_editor/', markdown_editor, name='markdown_editor'),
]
|
md_editor_project/urls.py : In this Django `urls.py` configuration, the admin site is mapped to ‘/admin/’, and the URLs from the ‘md_editor_app’ are included, allowing the app’s functionality to be accessed from the root path.
Python3
from django.contrib import admin
from django.urls import path,include
urlpatterns = [
path("admin/", admin.site.urls),
path('', include('md_editor_app.urls')),
]
|
Creating GUI
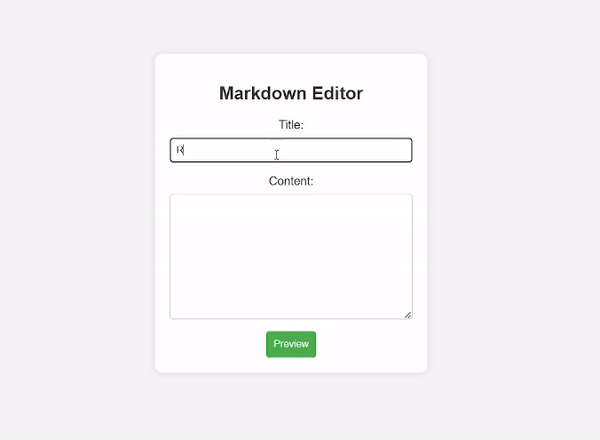
md_editor.html : This HTML template for the Markdown Editor features a clean and user-friendly design. The form includes fields for title and content, with a ‘Preview’ button. The styling provides a pleasant editing experience with a centered layout, responsive design, and subtle box-shadow effects.
HTML
<!DOCTYPE html>
<html lang="en">
<head>
<meta charset="UTF-8">
<meta name="viewport" content="width=device-width, initial-scale=1.0">
<title>Markdown Editor</title>
<style>
body {
font-family: Arial, sans-serif;
background-color: #f4f4f4;
margin: 0;
padding: 0;
display: flex;
justify-content: center;
align-items: center;
height: 100vh;
}
.editor-container {
text-align: center;
background-color: #fff;
padding: 20px;
border-radius: 10px;
box-shadow: 0 0 10px rgba(0, 0, 0, 0.1);
}
h2 {
color: #333;
}
form {
display: flex;
flex-direction: column;
align-items: center;
}
label {
margin-bottom: 8px;
}
input, textarea {
padding: 8px;
margin-bottom: 16px;
width: 100%;
box-sizing: border-box;
border: 1px solid #ccc;
border-radius: 4px;
}
button {
padding: 10px;
background-color: #4CAF50;
color: #fff;
border: none;
border-radius: 4px;
cursor: pointer;
}
button:hover {
background-color: #45a049;
}
</style>
</head>
<body>
<div class="editor-container">
<h2>Markdown Editor</h2>
<form method="post">
{% csrf_token %}
<label for="{{ form.title.id_for_label }}" >Title:</label>
{{ form.title }}
<label for="{{ form.content.id_for_label }}">Content:</label>
{{ form.content }}
<button type="submit">Preview</button>
</form>
</div>
</body>
</html>
|
preview.html : This HTML template, ‘preview.html’, renders a preview of the Markdown content along with the provided title. The design is clean and centered, featuring a ‘Download as PDF’ button. It includes minimal styling for readability and a responsive layout.
HTML
<!DOCTYPE html>
<html lang="en">
<head>
<title>{{ title }} - Preview</title>
<style>
body {
font-family: Arial, sans-serif;
background-color: #f4f4f4;
margin: 0;
padding: 0;
display: flex;
justify-content: center;
align-items: center;
height: 100vh;
}
.preview-container {
text-align: center;
}
h2 {
color: #333;
margin-top: 0;
}
button {
padding: 10px;
margin-top: 20px;
background-color: #4CAF50;
color: #fff;
border: none;
border-radius: 4px;
cursor: pointer;
}
button:hover {
background-color: #45a049;
}
</style>
</head>
<body>
<div class="preview-container">
<h2>{{ title }}</h2>
<br><br>
{{ html_content|safe }}
</div>
</body>
</html>
|
Deployment of the Project
Run these commands to apply the migrations:
python3 manage.py makemigrations
python3 manage.py migrate
Run the server with the help of following command:
python3 manage.py runserver
Output :
Share your thoughts in the comments
Please Login to comment...