Objection.js | SQL friendly ORM for Node.js
Last Updated :
13 Aug, 2020
Node.js has plenty of object-relational mappers (for relational databases) that we can choose from few popular ones are:
- Sequelize
- Mongoose or Prisma
- TypeORM
- Objection.js (Read the full documentation here)
Why consider Objection.js?
So here are few reasons to consider using it:
- Easy way to define models and relationships between them.
- Create queries with Node’s async/await.
- Use eager-loading and transactions with your models.
- Work with nested documents in rows.
- Powerful mechanisms for inserting and upserting object graphs.
- TypeScript support and JSON schema validation.
The following steps have to be followed to install and use Objection.js:
So the way you install it is to install two dependencies: knex and objection using the following command:
npm i knex -g --save
npm i objection --save
Knex is a powerful SQL query builder (it is used a whole bunch of different ORMs). So under the hood, objection uses Knex. Besides building SQL queries, Knex is used to establish database connections and pooling connections. It is also used for managing database schemas via migrations.
You might also need to install a database driver for whatever SQL database you want to use. Some various options available, just install them using the following command:
npm i pg
npm i sqlite3
npm i mysql
npm i mariasql
Creating a Database:
Filename: app.js
const { Client } = require('pg');
const { db } = require('./config');
const client = new Client();
(async () => {
await client.connect();
await client.query(`CREATE DATABASE ${db.connection.database}`);
await client.end();
})();
|
Creating Migrations:
- Migrations allow you to apply a change to a database schema in a step-by-step manner.
- The “up” action applies a change (creating a table, adding/modifying a column, etc.).
- The “down” action applies the reverse action of the change (eg. if a migration’s “up” action creates a table, it’s equivalent “down” action will drop the table).
- Knex will create a migration folder (unless it exists already).
- It then creates a file in the migrations folder for the migration.
knex migrate:make create_tasks_table
The generate migrations will look something like this:
Filename: empty_migration.js
exports.up = function (knex, Promise) {
};
exports.down = function (knex, Promise) {
};
|
Now we can perform certain actions like creating a table:
Filename: knex_migration.js
const tableName = 'tasks';
exports.up = knex => {
return knex.schema.createTable(tableName, table => {
table.increments('id').primary();
table.string('name');
table.date('due_by');
table.boolean('is_done').defaultTo(false);
table.timestamps(true, true);
table.unique(['name']);
});
};
exports.down = knex => {
return knex.schema.dropTableIfExists(tableName);
};
|
Now, if you want to run them, then the following code will execute it:
knex migrate:latest
Models:
- Models are the wrappers around the database tables.
- They help to encapsulate the business logic within those tables (relations, validations, indexes, triggers).
- Objection.js allows you to create Models using ES6 classes.
A really nice and simple example is shown below:
Filename: TaskModel.js
const { MODEL } = require('objection');
const db = require('../db');
Model.knex(db);
class Task extends Model {
static get tableName() {
return 'tasks';
}
}
module.exports = Task;
|
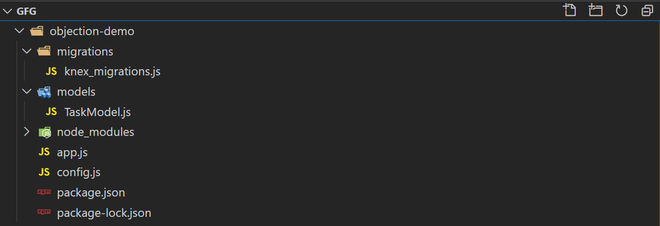
The project structure will look like this:
-
Simple Select Query:
Filename: select_query.sql
SELECT * from tasks;
Can be done with:
Filename: objection_select_query.js
const tasks = await Task.query();
-
Typical SELECT Query:
Filename: standard_select_query.sql
SELECT * from tasks WHERE is_done = false ORDER BY due_by asc;
Can be done with:
Filename: objection_standard_select_query.js
const tasks = await Task.query()
    .where({is_done: false}).orderBy('due_by');
-
Insert Query:
Filename: insert_query.sql
INSERT INTO tasks (name) VALUES ('Setup Code Coverage');
Can be done with:
Filename: objection_insert_query.js
await Task.query().insert({ name: 'Setup Code Coverage' });
-
Update Query:
Filename: update_query.sql
UPDATE tasks SET is_done = true WHERE id = 1;
Can be done with:
Filename: objection_insert_query.js
await Task.query().patch({ is_done: true }).where({ id: 1 });
If we use the objection_standard_query.js file to check the output then the output will look something like this:
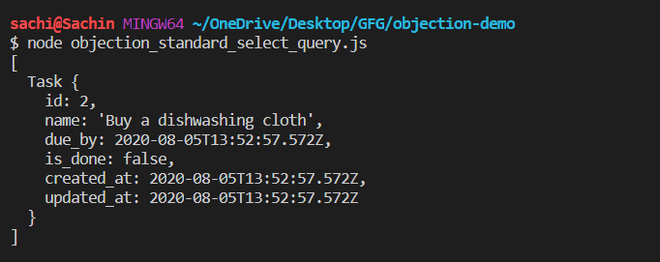
So the Objection queries are really powerful and easy to use.
Share your thoughts in the comments
Please Login to comment...