Kubernetes also known as K8s, is defined in simple terms as a Container orchestration system. It is an open-source API used for automating software deployment, scaling, and management. the Kubernetes project was originally designed by Google, and now it is maintained by the Cloud Native Computing Foundation. The container orchestration feature is the ability to deploy and manage multiple containers across private and public cloud infrastructure.
Containers in cloud computing is an approach to operating system virtualization. Containers are a standardized, portable packaging for your applications that bundle an application’s code together with the related configuration files and libraries, and with the dependencies required for the app to run. They are used to abstract applications from the physical environment in which they are running.
Use Kubernetes with Azure to Build and Deploy Containerized Applications
Kubernetes is a powerful container orchestration platform that can be used to build, deploy, and manage containerized applications at scale. Azure offers a range of tools and services to help you use Kubernetes effectively, including:
- Azure Kubernetes Service (AKS): AKS is a fully managed Kubernetes service that makes it easy to get started with Kubernetes and run containerized applications on Azure.
- Azure Container Registry (ACR): ACR is a private registry for container images that makes it easy to store, manage, and deploy container images to AKS clusters.
- Azure DevOps: Azure DevOps provides a suite of tools for developing, testing, and deploying applications, including support for Kubernetes deployments.
Kubernetes extensions for Visual Studio Code – A Developer’s Best Friend
Kubernetes extension is used to develop, deploy and debug Kubernetes applications from VS Code and it provides a simplified Kubernetes development experience. Kubernetes extension is useful for developers to build applications to run Kubernetes clusters and for the DevOps team for troubleshoot Kubernetes applications.
Kubernetes extension lets you create manifest file (usually written in YAML) which tells everything it needs to know about the application and to deploy the application in the Kubernetes cluster. It is also used to deploy containerized micro-service based applications to Azure Kubernetes clusters. Also live applications running in containers on Kubernetes clusters can be debug using the Kubernets extensions. Kubernetes extension makes it easy to browse and manage your Kubernetes clusters in VS Code and provides seamless integration with Draft to streamline Kubernetes development.
Step-By-Step To Installing Kubernetes Extension For Visual Studio Code
Step 1: Installing Kubernetes Extension for VS code
1. Open Visual Studio Code
2. Click ‘Extensions’ icon from the left bar.

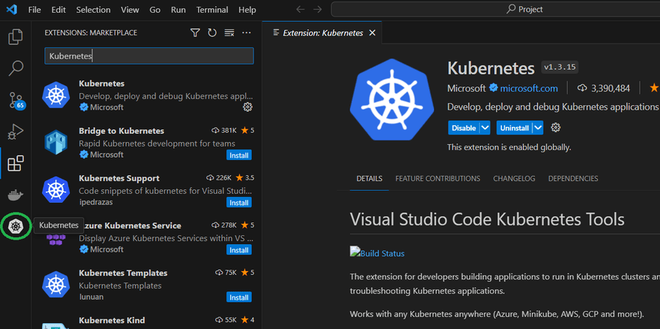
3. The installed extensions panel with the option to ‘Search Extensions in Marketplace’ will be displayed on top as below:

4. From ‘Search Extensions in Marketplace’ type ‘Kubernetes’, and the search result with ‘Kubernetes’ will be displayed

5. Select ‘Kubernetes’ from the search result and click ‘Install’ button from the Kubernetes extension by Microsoft.

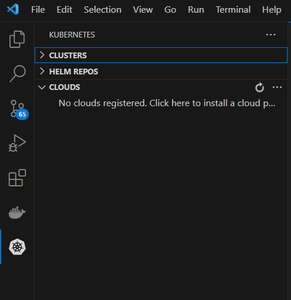
Once Kubernetes extension is installed in VS code, the ‘Kubernetes’ icon will be added to the left bar as below:
Step 2: Configuring Kubernetes Cluster
1. Select ‘Kubernetes’ icon from the left bar. The Kubernetes panel will be displayed with tabs for Clusters and Helm Repos.
2. Select ‘Add Existing Cluster’ or ‘Create Cluster’ from the cluster menu by clicking the three dots on the right top of the clusters panel.
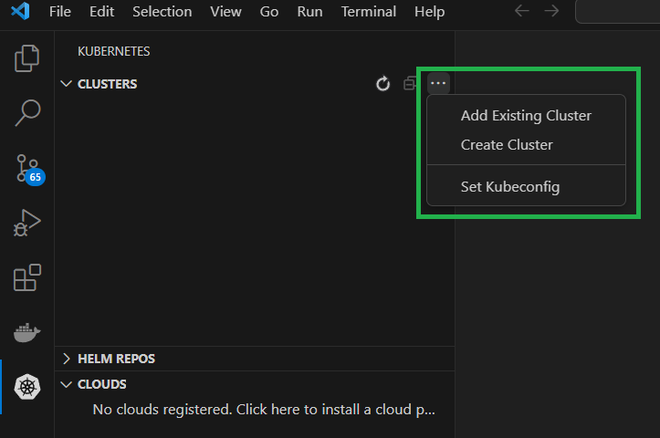
3. Select the ‘Cluster Type’ from available list and click ‘Next’. For example select type ‘Azure Kubernetes Service’

The new Kubernetes cluster of type ‘Azure Kubernetes Service’ will be created.
Now the Kubernetes Extension for Visual Studio Code is ready to use for Kubernetes based application development.
DRAFT
Draft is an open-source project launched by Microsoft in 2017, that streamlines the process of creating Docker images, Helm charts, and Kustomize configurations. Using Draft, ‘GitHub Action’ workflow file is created to quickly build and deploy applications onto any Kubernetes cluster.

Draft makes it easier for developers who want to simplify their experience with Kubernetes to build applications that run on Kubernetes by using below:
- The ‘draft init’ command is used to set up Draft (Kubernetes cluster and Helm should be running)
- The ‘draft create’ command provides developers with the artifacts they need to build and run their applications in Kubernetes
- The ‘draft up’ command builds the container image for an application and deploy your application to a Kubernetes dev sandbox
- When application changes made via Draft, developer can commit and push to version control, from there continuous integration (CI) system takes over. Draft uses Kubernetes Helm and the Kubernetes Helm Charts to construct CI pipelines from Draft Enabled applications.
HELM
Helm is an application package manager for Kubernetes which combines all your application’s resources and deployment information into a single deployment package.Helm can be used to simplify the application deployment process of cloud-native applications on Kubernetes.
The benefits of using Helm includes simplifying application deployment and improves productivity in the development and deployment lifecycle of cloud-native applications. Helm uses below four components to manage application deployments on a Kubernetes cluster.

Helm-Deployment Tool
- A Helm client – Helm helps you manage Kubernetes applications
- Helm charts – helps you define, install, and upgrade Kubernetes application
- Helm releases – A Helm release is an instance of a chart running in a Kubernetes cluster
- Helm repositories – a HTTP server location where packaged charts can be stored and shared, that houses an index.yaml file and optionally some packaged charts
Step-by-Step Guide For Using Helm To Deploy An Application To Kubernetes cluster
Step 1: Initialize Helm:
First you need to initialize Helm on your Kubernetes cluster using below command.
helm init
Step 2: Create a Helm Chart
A Helm Chart is a package that contains all the Kubernetes resources and configurations needed to run an application.
Using below steps we can create a simple Helm Chart for a sample NGINX web application:
1. Create a directory for your Helm Chart using below commands:
mkdir my-nginx-hlmchart
cd my-nginx-hlmchart
2. After directory is created, generate a basic Helm Chart structure:
helm create my-nginx
Select and edit the values.yaml file inside the my-nginx directory to configure your NGINX deployment. You can use default values as in the yaml file for this example.
Step 3: Install the Helm Chart
Install your Helm Chart onto your Kubernetes cluster using below command.
helm install my-nginx ./my-nginx
In the above command, ‘my-nginx’ is the release name, and ‘./my-nginx’ is the path to your Helm Chart.
Step 4: Verify the Deployment to Kubernetes
You can use the below ‘kubectl’ commands to check the status of your deployed resources:
kubectl get pods
kubectl get services
Step 5: Access the NGINX Service
By default, the NGINX service is not exposed externally. You need to port-forward to access it:
kubectl port-forward service/my-nginx 8080:80
The above command forwards port 80 of the NGINX service to port 8080 locally and you can access the NGINX service in your browser at http://localhost:8080.
Azure Kubernetes Service (AKS)
The deployment tool from Azure, AKS used to deploy and scale containers on managed Kubernetes. Further AKS makes it simple to manage a hosted Kubernetes environment in Azure. AKS is a fully managed Kubernetes service in Azure, allows to quickly deploy production ready Kubernetes cluster in Azure. AKS offers features such as node autoscaling, AKS spot node pools and Azure policy to optimize compute costs when developing cloud-native applications. From cloud-native applications AKS interoperate with Azure security, identity, cost management, and migration services. Many Kubernetes development and management tools like Helm and the Kubernetes extension for Visual Studio Code work seamlessly with AKS.

Accessing the AKS
- Azure portal: Go to Azure services -> Create Kubernetes services
- Azure CLI: Command-line interface (CLI) used to create and manage Azure resources
- Azure PowerShell: Set of cmdlets for managing Azure resources directly from PowerShell
Step-by-Step Guide For Deploying Kubernetes Resource Using Azure Kubernetes Service (AKS)
Step 1: Log in to Azure:
Open a terminal or command prompt and log in to your Azure account using the Azure CLI:
az login
Follow the Azure prompt instructions to authenticate.
Step 2: Create an Azure Resource Group:
You can create a new resource group for your AKS cluster.
az group create --name KuberResources --location eastus
A new resource group ‘KuberResources’ will be created at the specified location, ‘eastus’
Step 3: Create an AKS Cluster:
Create an AKS cluster within the resource group.
az aks create --resource-group KuberResources --name aksKuberClust --node-count 2 --enable-addons monitoring --generate-ssh-keys
This command will create a basic AKS cluster with monitoring enabled and generates SSH keys.
Step 4: Configure kubectl to use the AKS Cluster:
To interact with your AKS cluster, configure kubectl to use the cluster credentials:
az aks get-credentials --resource-group KuberResources --name aksKuberClust --overwrite-existing
Step 5: Deploy an Application to AKS
Let’s deploy a simple NGINX web server as an example. Create a file named ‘nginx-deployaks.yaml’ with the following content:
apiVersion: apps/v1
kind: Deployment
metadata:
  name: nginx-deployment
spec:
  replicas: 3
  selector:
    matchLabels:
      app: nginx
  template:
    metadata:
      labels:
        app: nginx
    spec:
      containers:
        - name: nginx-container
          image: nginx:latest
File name:nginx-deployaks.yaml
Deploy the NGINX deployment:
kubectl apply -f nginx-deployaks.yaml
Step 6: Expose the Deployment
To access the NGINX service externally, we need to expose it using a Kubernetes service.
Create a file named nginx-serviceaks.yaml and add the following content:
apiVersion: v1
kind: Service
metadata:
  name: nginx-service
spec:
  selector:
    app: nginx
  ports:
    - protocol: TCP
      port: 80
      targetPort: 80
  type: LoadBalancer
Deploy the service to Kubernetes:
kubectl apply -f nginx-serviceaks.yaml
Step 7: Access the NGINX Service
To get the external IP address of the service , use:
kubectl get svc nginx-serviceaks
Access the NGINX service using a web browser or a tool like curl.
Using the above steps and guidelines we’ve successfully set up an Azure Kubernetes Service (AKS) cluster, deployed an application to it, and exposed it externally.
Azure Kubernetes Service Benefits
- AKS offers efficient resource utilization for easy deployment and management of containerized applications.
- Helps in faster application development as AKS handles, auto-upgrades, and self-healing and simplifies the container orchestration.
- AKS helps to manage resources for auto-upgrades, monitoring, and easier scaling.
- AKS provides advantage of reduced cost and faster start-up speed compared to onsite hardware and software.
- AKS provides on demand access to greatly reduce threats and risks of security. It is also fully complaint with security standards such as SOC,HIPAA, ISO and PCI DSS.
Azure Kubernetes Service Use Cases
- Lift and Shift scenario where migrating to containers in azure cloud without redesigning application or making code changes.
- You can quickly deploy and manage a microservices-based architecture in the cloud with AKS.
- AKS is reliable resource to bring Kubernetes and Azure DevOps.
- AKS helps in Machine Learning model Training.
- AKS can help to deploy and manage IoT devices on demand using Azure IoT Edge.
- Helps to achieve enterprise-grade security and management by integrating with Azure Active Directory (Azure AD).
DAPR – The Distributed Application Runtime
Dapr, the distributed application runtime, offers APIs which can be used to write and implement simple, portable, resilient, and secured microservices. Dapr is developed by Microsoft and supports SDKs and APIs for Java,.Net,Phython and Go and integrates with Azure Kubernetes Service (AKS). Dapr extension uses the Azure CLI to provision the Dapr control plane on your AKS or Arc-enabled Kubernetes cluster.

Dapr-Deployment Tool
Running as a sidecar process in tandem with your applications, Dapr APIs tackle the challenges that come with building microservices, helps in implementing below services:
- Service discovery
- Message broker integration
- Encryption
- Observability
- Secret management
How To Install Dapr
Dapr can be installed using AKS Dapr extension on Azure Kubernetes Service. Azure CLI is used to provision the Dapr control plane on your AKS or Arc-enabled Kubernetes cluster.
The Dapr control plane consists of following Dapr services:
- dapr-operator
- dapr-sidecar-injector
- dapr-placement
- dapr-sentry
Microsoft Azure Services and components
The below Azure Services and components can be integrated with Kubernetes for managing and deploying applications.
Azure DevOps:
Azure DevOps is a Software-as-a-Service (SaaS) platform from Microsoft which provides a suite of tools for building, testing, and deploying applications to Kubernetes. This SaaS platform can be used to create CI/CD pipelines using Azure DevOps Pipelines to automate the deployment of containerized applications to AKS clusters.
Azure Functions:
Microsoft Azure Function is a serverless compute platform with advantages of less code, minimal infrastructure maintenance and low costs. Azure function can be integrated with Kubernetes through tools like KEDA (Kubernetes-based Event-Driven Autoscaling). Also it enables you to build event-driven applications that scale automatically.
Azure Logic Apps:
Microsoft Azure Logic Apps is a cloud-based platform having options to create and run automated workflows to automate tasks that involve Kubernetes and other Azure services. The Logic Apps can also be configured to respond to events or triggers in your Kubernetes environment.
Azure Functions for Kubernetes (KEDA):
KEDA is a Kubernetes-based event-driven autoscaling component that scales your functions based on the rate of events. It pairs seamlessly with the Azure Functions runtime and other event-driven services.
Azure Resource Manager (ARM) Templates:
ARM templates are JSON based files that enable you to define and deploy your entire AKS infrastructure and related resources as code.
Optimizing Kubernetes Deployments on Azure for High Traffic
1. Cluster Architecture:
- Use Azure Kubernetes Service (AKS) managed clusters, which is easier to manage than self managed clusters. AKS features such as Node Upgrades and Automatic Scaling helps to optimize deployments.
- Select the right node pool size and node type based on application’s workload. Based on the CPU, memory and storage requirement of your applications, choose the node sizes.
- Based on workloads’ resource requirements use multiple node pools with varying sizes and instant types.
2. Workload architecture:
- Use Microservice application architecture, as it can be scaled independently, which makes it easier to manage and maintain.
- Use node taints and pod tolerations which helps to ensure pods are not scheduled into inappropriate nodes, optimizing workload placement.
- Use containers to package your applications for Kubernetes.
- Include container images from a trusted registry like Azure Container Registry, which helps to ensure that your images are secure and up-to-date.
3. Resource Management:
- Utilize resource quotas to set limit on CPU, memory and storage resources in a namespace.
- Set pod requests and limits to ensure pods have required resources and cluster is not overloaded.
- Use horizontal pod autoscaling to automatically scale the number of pods in a deployment to Kubernetes.
4. Monitoring and logging:
- Set up Azure monitor and enable logging to collect metrics, logs and traces from AKS cluster with alerts for critical thresholds.
- Monitor your cluster and workloads with Azure Monitor to identify any performance or reliability issues.
- Collect monitoring data and use it to identify performance bottlenecks and resource constraints, which helps to optimize application and clusters deployed in Kubernetes.
5. Security
- Implement Role-Based Access Control (RBAC) to your AKS cluster and resource with Azure Active Directory (AD) integrating for centralized identity management.
- Use Azure Policy for Kubernetes to restrict public access to certain resources and to enforce encryption at rest.
- Use Azure Network policies to control flow of traffic between pods and to implement security rules.
- Implement Pod Security Policies (PSPSs) to enforce security policies at the pod level.
- Use tools like Azure Container Registry security scanning to scan vulnerabilities in container images.
- Make use of Azure Key Vault and integrate it with your Kubernetes pods securely for passwords and API keys management.
6. Scaling
- Implement Horizontal Pod Autoscaling (HP) and Vertical Pod Autoscaling (VPA)
- Configure Cluster Autoscaler to automatically adjust the size of AKS cluster.
- Set up and configure cluster autoscaling to add or remove nodes as needed.
- Based on workloads’ resource requirements and scale, use node pools of varying sizes and types.
- Implement Azure Load balancer using autoscaling rules to distribute traffic evenly across pods.
7. Cost optimization:
- Use right node size and multiple node pools for cost optimization.
- Use Azure Kubernetes Service managed clusters, which optimize costs in the long run.
Conclusion
The above Azure tools, services and components provide a comprehensive ecosystem for developing, deploying, and managing applications on Kubernetes. Based on your specific application needs and workflows, you can choose the appropriate combination of these tools to streamline your Kubernetes development and deployment processes on the Azure platform.
FAQs on Microsoft Azure and Kubernetes Tools
1. Why Do We Need Kubernetes?
Kubernetes is a platform that helps you manage the deployment, scaling, and availability of your containerized applications. The key benefits of using Kubernetes for your applications includes:
Scalability, Resource efficiency, High availability, Portability and Extensibility
2. What Are The Prerequisites For Dapr Extension?
For AKS Dapr extension, user need to first enable the AKS-ExtensionManager and AKS-Dapr feature flags from the Azure subscription used for AKS.Also enable ‘k8s-extension’ Azure CLI extension for cluster extensions.
3. Difference Between Kubernetes vs Docker?
Kubernetes and Docker are container management platforms which run on both cloud and on-premise servers, but both are different technologies used for building , delivering and scaling containerized apps.
- Kubernetes is a container orchestration engine for automating deployment, scaling, and management of containerized applications.
- Docker is a used for automating deployment of application packages as single file called container images.
Share your thoughts in the comments
Please Login to comment...