lzop Linux Command
Last Updated :
10 Oct, 2023
When it comes to managing files and optimizing storage space on a Linux system, compression tools play a crucial role. lzop is one such tool that provides a fast and efficient way to compress and decompress files. In this article, we will explore the lzop command, its features, and how to use it effectively in a Linux environment.
What is ‘lzop’?
lzop is a command-line utility in Linux that is used for file compression and decompression. It is designed to provide high-speed compression and decompression while maintaining relatively good compression ratios. This makes lzop an excellent choice for scenarios where speed is a priority, such as backing up files or transferring data over a network.
Installing lzop
Before you can use lzop, you need to ensure that it is installed on your Linux system. On many Linux distributions, lzop is available in the standard repositories, so you can install it using the package manager specific to your distribution.
For example, on Debian/Ubuntu-based systems, you can use apt:
sudo apt install lzop
On Red-Hat using yum: (For latest version of RedHat we can use `dnf`)
sudo yum install lzop
Fedora using dnf package manager:
sudo dnf install lzop
Once installed, you can verify the installation by running:
lzop --version

lzop –version output
If you are getting this output, lzop is installed in your system.
Basic Usage of lzop command
Type `lzop –help` you’ll get all the available options for lzop command
Syntax of lzop command:
lzop [options] [file(s)]
Compressing a file
To compress a file type
lzop <file path>
New compressed file with name <file name>.lzo will be generated.

Compressing single file using lzop
Compressing multiple files
lzop <file1 path> <file2 path> ...
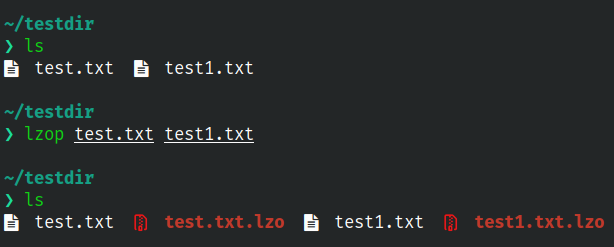
Compressing multiple files using lzop
Separate files with .lzo extension are generated in the present working directory after using command ‘lzop test.txt text1.txt’
Decompressing a file
lzop -d <file path>
OR
lzop --decompress <file path>
To decompress a file, use the `-d` option followed by the name of the compressed file:

Decompressing a file using lzop
This will decompress test.txt.lzo back to test.txt.
Decompressing multiple files
It is same a compressing multiple files
lzop -d <file1 path> <file2 path>

Decompressing multiple files using lzop
Advanced usage
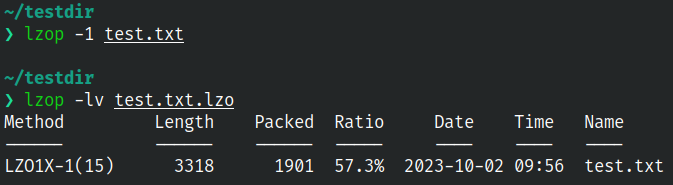
Show details of compressed file
lzop -lv <file path>

Details of compressed file
- Method: This column indicates the compression method used. In this case, it’s “LZO1X-1,” which is the LZO algorithm with compression level 1.
- Length: This column shows the original size of the file before compression. In this example, the original file size is 3318 bytes.
- Packed: This column displays the size of the file after compression. In this case, the compressed file size is 1897 bytes.
- Ratio: The ratio column represents the compression ratio, which is the percentage of space saved by compression. It’s calculated as
(1 – (Packed / Length)) * 100.
In this example, the compression ratio is 57.2%, which means the compressed file is 57.2% smaller than the original file.
- Date and Time: These columns show the date and time when the compression operation was performed. In this case, it was done on “2023-10-02” at “09:56.”
- Name: The name column displays the name of the file that was compressed. In this case, it’s “test.txt.”
Adjusting compression Level
By default, lzop uses a moderate compression level ‘-3’ (the default level offers pretty fast compression level). If you want to adjust the compression level, you can use the -1 to -9 options, where
- -1 is the fastest but provides the worst compression ratio
- -9 is the slowest but provides the best compression ratio.
Here’s a comparison between the two:
`-1` compression (fastest, worst):
Compression ratio: 57.3%
Using -1 compression
`-9` compression (slowest, best):
Compression ratio: 48%

Using -9 compression
Piping Data
You can use lzop in combination with other commands to compress or decompress data that is generated or consumed by another process. For example, you can use tar to create a compressed archive and then pipe it through lzop for compression.
For example:
tar cf - testdir | lzop -c > archive.tar.lzo
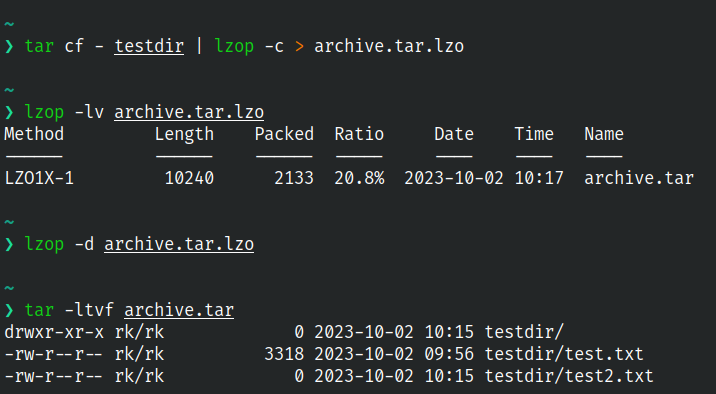
Piping in lzop command
- tar cf -testdir : Here I’m creating a compressed archive .tar file for testdir directory, and using pipe operator I’m sending the ‘archive.tar’ as standard output to another command.
- lzop -c > archive.tar.lzo: I’m further compressing the archive.tar file using LZO compression.
- -c : This option tells lzop to write the compressed data to standard output (stdout) instead of creating a compressed file. This is necessary because we want to pipe the compressed data to the next command.
- > archive.tar.lzo: This part redirects the compressed data from standard output to a file named archive.tar.lzo.
The > operator is used for output redirection.
Testing Compressed Files
To check the integrity of a compressed file (check whether the compressed data in an archive contains any errors), you can use the `-t` option:
lzop -t test.txt.lzo
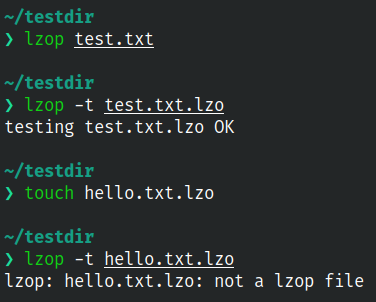
Checking integrity of .lzop file
Here test.txt.lzop is a true compression lzop file after checking it using `-t` option, lzop command returns OK.
If it’s a faulty compression of irrelevant file with `.lzop` extension (here hello.txt.lzop), lzop command will return not a lzop file.
Conclusion
The lzop command in Linux is a versatile and efficient tool for compressing and decompressing files. Its speed and moderate compression ratios make it a valuable choice for various use cases, especially when time is of the essence. Whether you need to save storage space or transfer data over a network, lzop can be a reliable companion in your Linux command-line toolkit.
Share your thoughts in the comments
Please Login to comment...