JUnit 5 – XML Report Example
Last Updated :
20 Feb, 2024
In Spring Boot, JUnit can be used for unit testing frameworks in Java, and Junit5 is the latest version. Junit provides a set of tools and APIs for developers to use to write and execute automated tests, and it is primarily used for unit testing Java applications. It is an open-source testing framework.
Key Terminologies:
- Test case: Test cases can be used to create a unit of testing that can check the specific behavior of a piece of code under specific conditions. A test case can be represented by a method annotated with @Test.
- Test Suite: The test suite can be defined as the collection of test cases that are executed together in the test class of the Java program. It can be annotated with @Suite.
Example Project:
In this project, we developed the Crud Application of the User data and write the test cases using JUnit5 after running the test cases and generating the XML report of the test cases.
- Create the simple crud application with save data get the user data and delete data.
- In this project, we mostly focus on the test cases if you are working with the JUnit testing framework add the below the dependencies.
Prerequisites:
- Advanced Java programming
- Good Knowledge of Spring Boot
- Basic Understanding of JUnit Framework
- Good Knowledge of MongoDB Database
JUnit Dependency:
<dependency>
    <groupId>org.junit.platform</groupId>
    <artifactId>junit-platform-reporting</artifactId>
    <scope>test</scope>
</dependency>
When we need to generate the XML reports, we are using surefire plugin to generate the JUnit XML reports into the project and to configure the one plugin to code can be paste into the pom.xml file.
<!-- Surefire Plugin -->
<plugin>
  <groupId>org.apache.maven.plugins</groupId>
  <artifactId>maven-surefire-plugin</artifactId>
  <version>3.0.0-M5</version> <!-- Adjust version if needed -->
  <configuration>
    <reportsDirectory>${project.basedir}/target/surefire-reports</reportsDirectory>
  </configuration>
</plugin>
</plugins>
Project Requirements:
- Project: Maven
- Language: Java
- Packaging: Jar
- Java: 17
Step-by-Step Implementation to generate XML Report using JUnit 5
Step 1: Create a new spring Boot project in the Spring STS IDE with below mention dependencies and open in it.
Dependencies can be added into the project:
- Spring Web
- Spring Data MongoDB
- Spring DevTools
- Lombok
- JUnit Reports
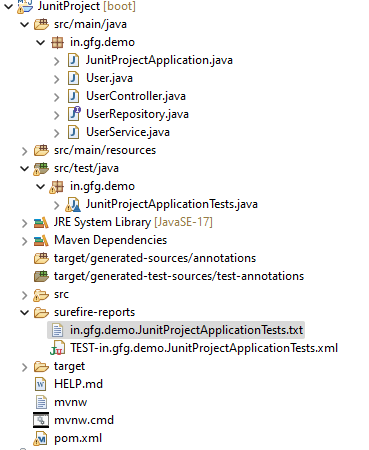
Project Structure:
Step 2: Now, connect to a MongoDB local host with a MongoDB connection URL and then add it to the application.properties file.
server.port=8083
spring.data.mongodb.uri=mongodb://localhost:27017/userregistration
Step 3: Create one class named as User and put the below mention code into it and this can be handles the user data into the application.
Go to the src > main > java create a User class and put the below code.
User.java:
Java
package in.gfg.demo;
import org.springframework.data.annotation.Id;
import org.springframework.data.mongodb.core.mapping.Document;
import lombok.AllArgsConstructor;
import lombok.NoArgsConstructor;
@Document
public class User {
@Id
String id;
String email;
String password;
public User(String string, String string2, String string3) {
}
public String getId(){
return id;
}
public void setId(String id) {
this.id = id;
}
public String getEmail(){
return email;
}
public void setEmail(String email){
this.email = email;
}
public String getPassword(){
return password;
}
public void setPassword(String password){
this.password = password;
}
}
|
Step 4: Create the repository interface and it named as the UserRepository and it extends to the MongoRepository and this repository accepts the two parameters are User class and another as type of id can be used to save data into the mongoDB database.
Go to the src > main > java create a UserRepository interface and put the below code.
UserRepository.java:
Java
package in.gfg.demo;
import org.springframework.data.mongodb.repository.MongoRepository;
import org.springframework.stereotype.Repository;
@Repository
public interface UserRepository extends MongoRepository<User, String> {
}
|
Step 5: Create the service class and it named as the UserService and annotated with @service.
Go to the src > main > java create a UserService Class and put the below code.
UserService.java:
Java
package in.gfg.demo;
import org.springframework.beans.factory.annotation.Autowired;
import org.springframework.stereotype.Service;
@Service
public class UserService {
@Autowired
private UserRepository userRepository;
public User createUser(User user)
{
return userRepository.save(user);
}
public User updateUser(String id, User user)
{
if (userRepository.existsById(id))
{
user.setId(id);
return userRepository.save(user);
}
return null;
}
public void deleteUser(String id) {
userRepository.deleteById(id);
}
}
|
Step 6: Create the controller class and it named as the UserController and annotated with @Controller.
Go to the src > main > java create a UserController Class and put the below code.
UserController.java:
Java
package in.gfg.demo;
import org.springframework.beans.factory.annotation.Autowired;
import org.springframework.web.bind.annotation.DeleteMapping;
import org.springframework.web.bind.annotation.PathVariable;
import org.springframework.web.bind.annotation.PostMapping;
import org.springframework.web.bind.annotation.PutMapping;
import org.springframework.web.bind.annotation.RequestBody;
import org.springframework.web.bind.annotation.RestController;
@RestController
public class UserController {
@Autowired
private UserService userService;
@PostMapping("/sigin")
public User createUser(@RequestBody User user) {
return userService.createUser(user);
}
@PutMapping("/{id}")
public User updateUser(@PathVariable String id, @RequestBody User user) {
return userService.updateUser(id, user);
}
@DeleteMapping("/{id}")
public void deleteUser(@PathVariable String id) {
userService.deleteUser(id);
}
}
|
Step 7: Open the main class of the spring project and put the code below into it.
Go to the src > main > java > JunitProjectApplication
Java
package in.gfg.demo;
import org.springframework.boot.SpringApplication;
import org.springframework.boot.autoconfigure.SpringBootApplication;
@SpringBootApplication
public class JunitProjectApplication {
public static void main(String[] args) {
SpringApplication.run(JunitProjectApplication.class, args);
}
}
|
Step 8: Open the test main class into the project and write the test cases of the crud application and each test case can annotated with @Test.
Go to the src > main > java > test and JunitProjectApplicationTests main class and put the code below:
Java
package in.gfg.demo;
import static org.junit.jupiter.api.Assertions.assertEquals;
import static org.mockito.Mockito.times;
import static org.mockito.Mockito.verify;
import static org.mockito.Mockito.when;
import org.junit.jupiter.api.BeforeEach;
import org.junit.jupiter.api.Test;
import org.mockito.InjectMocks;
import org.mockito.Mock;
import org.mockito.MockitoAnnotations;
import org.springframework.boot.test.context.SpringBootTest;
@SpringBootTest
class JunitProjectApplicationTests {
@Mock
private UserRepository userRepository;
@InjectMocks
private UserService userService;
@BeforeEach
public void setUp() {
MockitoAnnotations.initMocks(this);
}
@Test
void contextLoads() {
}
@Test
public void testCreateUser() {
User user = new User("dssbdbsd" ,"John", "john@example.com");
when(userRepository.save(user)).thenReturn(user);
User result = userService.createUser(user);
assertEquals(user, result);
}
@Test
public void testUpdateUser() {
User existingUser = new User("dssbdbsd", "John", "john@example.com");
User updatedUser = new User("dssbdbsd", "John Doe", "johndoe@example.com");
when(userRepository.existsById("dssbdbsd")).thenReturn(true);
when(userRepository.save(updatedUser)).thenReturn(updatedUser);
User result = userService.updateUser("dssbdbsd", updatedUser);
assertEquals(updatedUser, result);
}
@Test
public void testDeleteUser() {
userService.deleteUser("dssbdbsd");
}
}
|
pom.xml file:
XML
<?xml version="1.0" encoding="UTF-8"?>
<modelVersion>4.0.0</modelVersion>
<parent>
<groupId>org.springframework.boot</groupId>
<artifactId>spring-boot-starter-parent</artifactId>
<version>3.2.2</version>
<relativePath />
</parent>
<groupId>in.GfG.Demo</groupId>
<artifactId>Junit-Demo</artifactId>
<version>0.0.1-SNAPSHOT</version>
<name>JunitProject</name>
<description>This is the demo of Junit Xml Example</description>
<properties>
<java.version>17</java.version>
</properties>
<dependencies>
<dependency>
<groupId>org.springframework.boot</groupId>
<artifactId>spring-boot-starter-data-mongodb</artifactId>
</dependency>
<dependency>
<groupId>org.junit.platform</groupId>
<artifactId>junit-platform-reporting</artifactId>
<scope>test</scope>
</dependency>
<dependency>
<groupId>org.springframework.boot</groupId>
<artifactId>spring-boot-starter-web</artifactId>
</dependency>
<dependency>
<groupId>org.projectlombok</groupId>
<artifactId>lombok</artifactId>
<optional>true</optional>
</dependency>
<dependency>
<groupId>org.springframework.boot</groupId>
<artifactId>spring-boot-starter-test</artifactId>
<scope>test</scope>
</dependency>
</dependencies>
<build>
<plugins>
<plugin>
<groupId>org.springframework.boot</groupId>
<artifactId>spring-boot-maven-plugin</artifactId>
<configuration>
<excludes>
<exclude>
<groupId>org.projectlombok</groupId>
<artifactId>lombok</artifactId>
</exclude>
</excludes>
</configuration>
</plugin>
<plugin>
<groupId>org.apache.maven.plugins</groupId>
<artifactId>maven-surefire-plugin</artifactId>
<version>3.0.0-M5</version>
<configuration>
<reportsDirectory>${project.basedir}/target/surefire-reports</reportsDirectory>
</configuration>
</plugin>
</plugins>
</build>
</project>
|
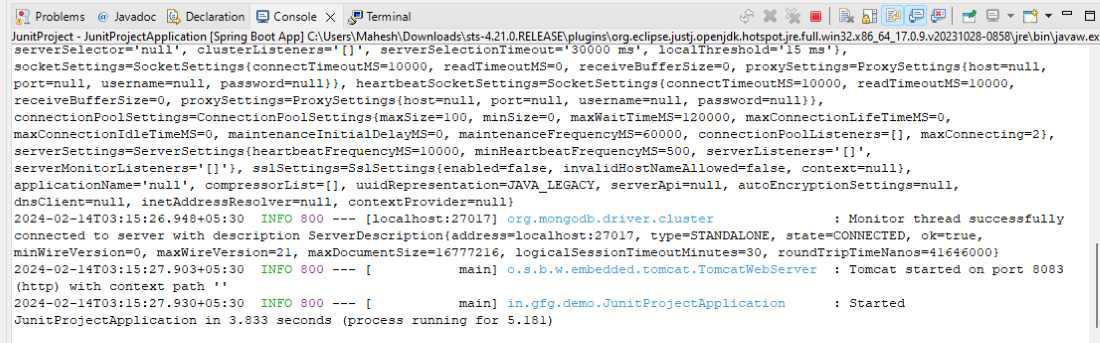
Step 9: Once’s the project successfully completed and run it as spring boot app and check the application run successful or not. If application run successful the application starts with specified port as mentioned into the application.properites file. For better understanding refer the below image.
Step 10: Once the application run successful run the test cases with below command.
Open the terminal into the project root folder and run the below command.
mvn test
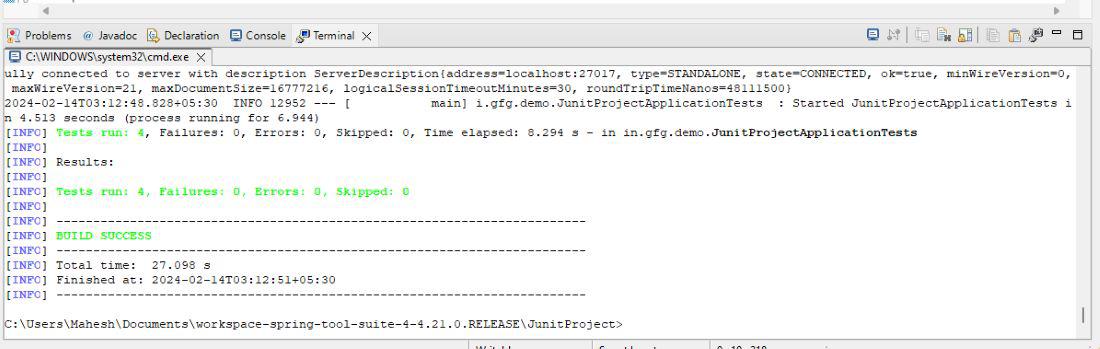
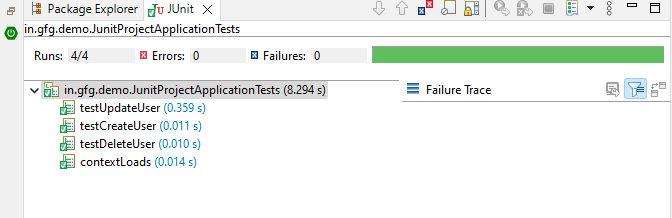
Once the test cases are runs successfully then the results looks like the below image.
When the test cases are run successfully, then we will find the one more folder in you project it named as surefire-reports and in that folder generates the Junit XML reports.

Output XML report:
Here the example project of the Junit5-XML reports once completed all execution and testing then generates the Junit XML report and it contains the test cases reports of the project.
Share your thoughts in the comments
Please Login to comment...