Image Carousel using react-native-snap-carousel package
Last Updated :
01 Apr, 2024
A React-Native Image Carousel offers seamless navigation through a series of images in a horizontal format. Using React-Native’s framework, developers create dynamic carousels with swipe gestures, pagination indicators, and smooth transitions. This component is ideal for product galleries, sliders, or multimedia presentations in mobile apps, enhancing user engagement.
In this tutorial, we will craft an immersive wallpaper carousel in React Native.
Output Preview: Let us have a look at how the final output will look like
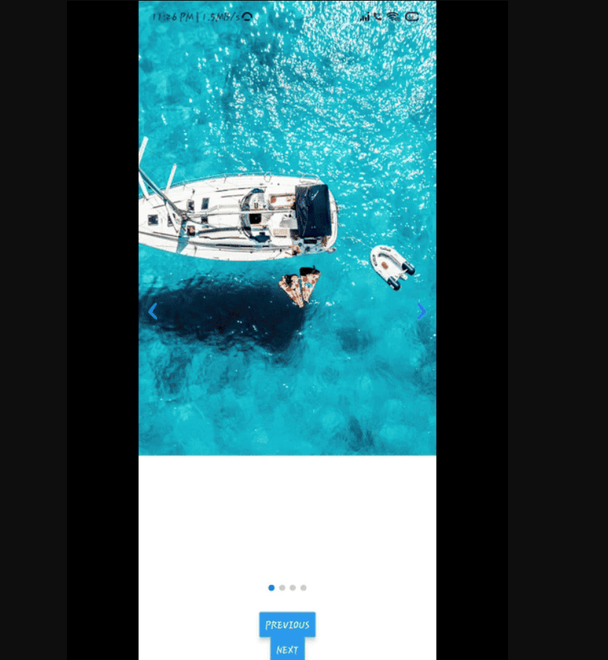
Output
Prerequisites:
Approach to create Image Carousel :
- This React Native snippet empowers you to create a seamless wallpaper carousel effortlessly.
- Leveraging useState, it efficiently manages state to handle carousel data and smooth transitions, ensuring an engaging user experience.
- Featuring a scrollable interface with captivating wallpapers, users can navigate through the carousel and enjoy a visually rich presentation.
- Utilizing modal pop-ups for customization, users can effortlessly interact with the carousel, adding, editing, or removing wallpapers with ease.
Steps to install and create the Image Carousel:
Step 1: Create a react native application by using this command. This will install the expo-cli globally int your local machine.
npm install -g expo-cli
Step 2: Create a react native application by using this command. From command prompt changed the drive you want to create the folder for your application and run this command.
expo init imagecrousel
Step 3: After creating your project folder, i.e. imagecrousel, use the following command to navigate to it:
cd imagecrousel
Step 4: Install the following package in your app.
npm i react-native-snap-carousel
npm deprecated-react-native-prop-types
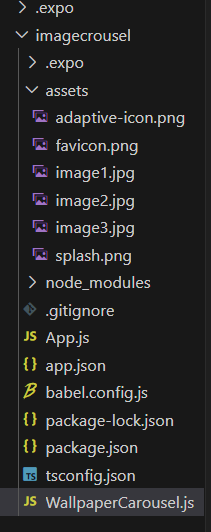
Step 5: Add the images to the Assets folder that you want to use for the carousel. I have added 4 images named image1, image2 and image3 in this source code i have inserted the image links.
Project Structure:
package.josn:
"dependencies": {
    "react-native-paper": "4.9.2",
    "@expo/vector-icons": "^14.0.0",
    "react-native-reanimated-carousel": "*",
    "react-native-gesture-handler": "~2.14.0",
    "react-native-reanimated": "~3.6.2",
    "react-native-swiper": "*",
    "react-native-snap-carousel": "*"
}
Example 2: Below is an example of creating React-Native Carousel.
Javascript
import React, { useRef } from 'react';
import { Image, View, StyleSheet, Button } from 'react-native';
import Carousel from 'react-native-snap-carousel';

const images = [
  'https://media.geeksforgeeks.org/wp-content/uploads/20240306153044/Unity-Books-For-Game-Development.webp',
  'https://media.geeksforgeeks.org/wp-content/uploads/20240306152952/What-is-Vizard-AI-and-How-to-Use-it-(1).webp',
  'https://media.geeksforgeeks.org/wp-content/uploads/20240306150928/community-marketplace.jpg',
  // Add more images as needed
];

const WallpaperCarousel = () => {
  const carouselRef = useRef(null);

  const handlePrevious = () => {
    if (carouselRef.current) {
      carouselRef.current.snapToPrev();
    }
  };

  const handleNext = () => {
    if (carouselRef.current) {
      carouselRef.current.snapToNext();
    }
  };

  const renderItem = ({ item, index }) => {
    return (
      <View style={styles.slide}>
        <Image source={{ uri: item }} style={styles.image} />
      </View>
    );
  };

  return (
    <View style={styles.container}>
      <Carousel
        style={styles.wrapper}
        data={images}
        renderItem={renderItem}
        ref={carouselRef}
        sliderWidth={300}
        itemWidth={300}
      />
      <View style={styles.buttonContainer}>
        <Button title="Previous" onPress={handlePrevious} />
        <Button title="Next" onPress={handleNext} />
      </View>
    </View>
  );
};

const styles = StyleSheet.create({
  container: {
    flex: 1,
    justifyContent: 'center',
    alignItems: 'center',
  },
  wrapper: {
    height: 700, // Adjust the height as needed
  },
  slide: {
    width: 300,
    height: 300,
    justifyContent: 'center',
    alignItems: 'center',
  },
  image: {
    width: '100%',
    height: '100%',
    resizeMode: 'cover',
  },
  buttonContainer: {
    flexDirection: 'row',
    justifyContent: 'space-between',
    marginTop: 10,
    width: '100%',
    paddingHorizontal: 20,
  },
});

export default WallpaperCarousel;
import React from 'react';
import { View } from 'react-native';
import WallpaperCarousel from './WallpaperCarousel';

export default function App() {
  return (
    <View style={{ flex: 1 }}>
      <WallpaperCarousel />
    </View>
  );
}
Step 8: Go to the Terminal and type the following command to run the react native application and Install the expo go application in your android or ios device from store and run the below code:
npm start
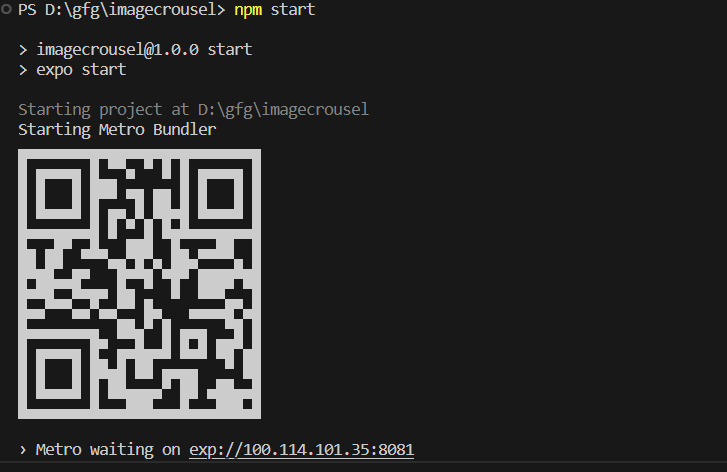
Now open the expo go application and scan this qr code and the application will be rendered to to device directly.
Note: The laptop/pc and the mobile should be connected to the same network.
Output:

Share your thoughts in the comments
Please Login to comment...