In this article, we’ll learn how to create a CI/CD pipeline using Gitlab. We’ll use the Website version provided by Gitlab at Gitlab.com to avoid any problems with system requirements. We’ll create the CI/CD pipeline to automate the whole manual process of building, testing, and deploying an application every time there is a bug fix or a new feature is added to it After this tutorial you’ll be able to create your own CI/CD pipeline according to your own project need.
What is GitLab?
GitLab is a DevOps software that helps developers work together on code at the same time, store and manage the code by developers and the whole team, help to keep track of the code changes, etc. Developers get many features for every stage of a development cycle.
What is the CI/CD Pipeline?
CI stands for Continues Integration and CD stands for Continuous delivery/Continues Deployment, it is a software development method that is continuous, which means continuously building, testing, deploying, and tracking changes in a code. And CI/CD pipeline refers to the steps or series of steps that help automate the whole CI/CD process to create software.
Prerequisites
- Basic Knowledge of Git and Gitlab and an account on Gitlab or Gitlab installed on your local machine.
- A project to work on.
- Basic knowledge of Linux commands.
What we’ll do?
We’ll create a CI/CD pipeline for a website, which will execute automatically whenever changes are merged in the main branch, and then the website will go through 3 stages – build, test, and deploy and will go through the defined rules.
CI/CD Pipeline Using GitLab
Step 1: Create your Gitlab account from https://gitlab.com/. We’ll use the Website version, but you can also install Gitlab on your machine. Please refer the official guide to check the system requirements and installation methods as per your OS need.
Step 2: Now you have to check if you have runners or not. Runners run the CI/CD jobs. If you are using the Gitlab website then go and check in Settings -> CI/CD and then click on the ‘Expand’ beside the Runners option and check if any of the present Instance runners are active, they will have green circle beside them.
If you are using it locally, you’ll need to install the Runners and register it.
- Install runner.
- Register runner.

Available Runner on gitlab.com
Step 3: First you need to create a project in your Gitlab or just import a project from your GitHub. If you have already made project, then use that. In this tutorial I’ll import a project from GitHub which is a website. For that
- Click on the ‘+’ icon beside your profile icon. This will Open the ‘Create new project’ window.
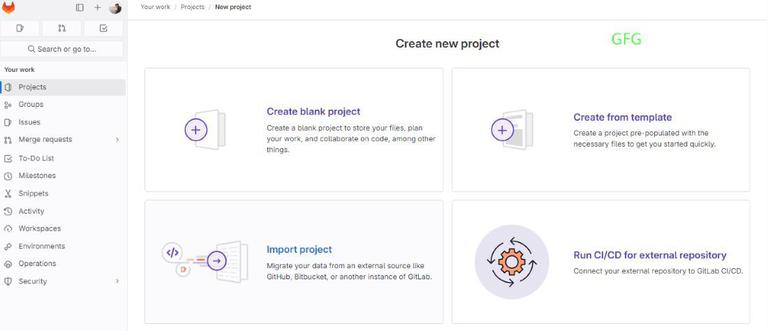
Create New Project window
- Select the option you want, here we’ll select Import Project.
- You will get the Options to choose the providers to import from.
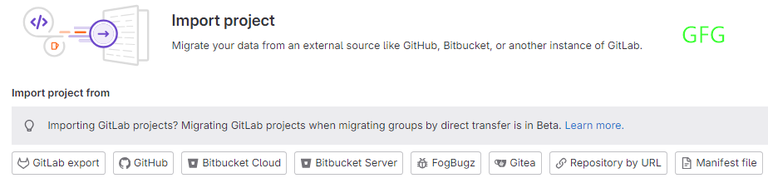
Import Options
- Select your provider and import the Project which you want.
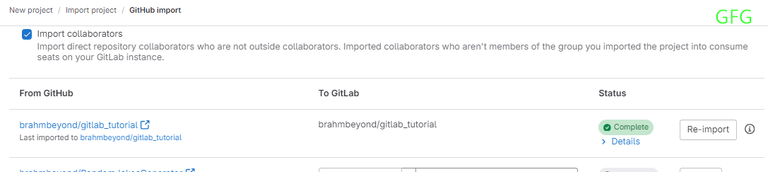
Successfully Imported Project from Github
Step 4: Now open the project.
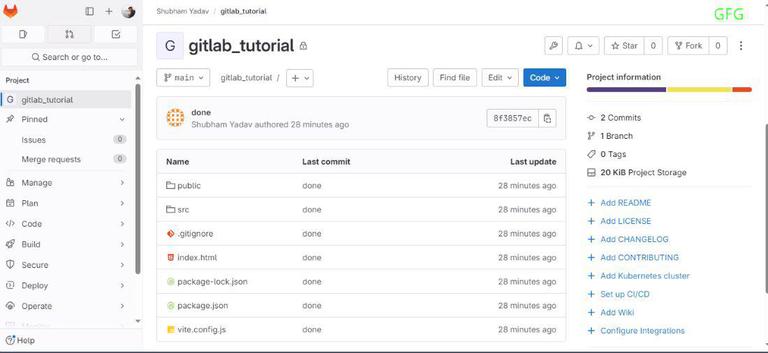
Project Window
Step 5: Now Create a new ‘.gitlab-ci.yml’ file by clicking on the ‘+’ icon below the project name as shown in image and then Click on ‘New file’. Remember it’s important to create this file in root folder.
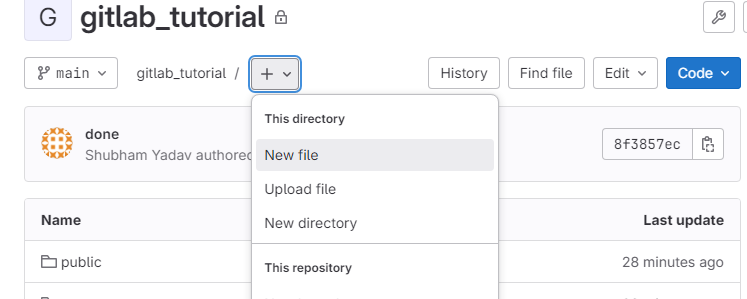
select ‘New File’ to create a new file
Step 6: Now give the file name ‘.gitlab-ci.yml’. From here the main part starts.

naming file
Step 7: Now we to define the CI/CD jobs. Let’s understand what we have to write in CI/CD configuration file to create a CI/CD pipeline.
- We can write various stages in this file like – build, test and deploy.
- Jobs define the task that have to be done. Each stage can have multiple jobs like in this tutorial you’ll test stage will have multiple jobs.
- The jobs have script where what task has to be done is defined.
- You can also define a image which is the container in which the jobs will be executed.
- We’ll discuss more while writing the YAML file. For more knowledge of YAML syntax you can visit the Gitlab Documents.
Now we’ll move step by step or we can say stage by stage for creating the file.
Build Stage: To create build folder of the website
build-job:
  image: node
  stage: build
  script:
    - npm install
    - npm run build
  artifacts:
    paths:
      - "dist/"
- build-job is the Job for build stage
- image as node which tells the runner to use node docker container to run job.
- script here define to run npm install command and then build the website.
- artifacts is used to store files as jobs doesn’t share the resources with each other as they are self-contained containers, so here we will use to store created ‘dist’ folder.
Test stage: To test the updated/created website
test-html:
  stage: test
  dependencies: []
  script:
    - npm install --save-dev htmlhint
    - npx htmlhint "dist/**/*.html"
- We have 1 job in this test stage.
- dependencies means that it will be depended on any other job or not. So, for test-html the dependency is not needed so kept empty [].
- The scripts is using htmlhint to check all the html files for their correct syntax and all that.
- I’m giving you an overview on how to add tests so you can create your own and you can create as many tests as you want.
Deploy stage: To deploy website
deploy:
  stage: deploy
  image: busybox
  dependencies:
    - build-job
  script:
    - mv dist/ public/
  artifacts:
    paths:
      - "public/"
  rules:
    - if: $CI_COMMIT_BRANCH == $CI_DEFAULT_BRANCH
- This is the last stage which will deploy the website.
- Here image is defined as busybox which is the light weight Linux environment and will be best for this case as we don’t want to waste the resources.
- dependencies is set to build-job as it will get the build folder from first stage for deploy.
- In script its set to send the contents of build folder to the public folder to deploy the website to Gitlab
Step 8: Above we had created the full CI/CD configuration file, but it has duplications, and we also want that when the user mergers the applied changes to the main branch then only deploy the website. So this is the final version of the file.
# .gitlab-ci.yml

stages:
  - build
  - test
  - deploy

default:
  image: node

.standard-rules:
  rules:
    - if: $CI_PIPELINE_SOURCE == 'merge_request_event'
    - if: $CI_COMMIT_BRANCH == $CI_DEFAULT_BRANCH

build-job:
  image: node
  extends:
    - .standard-rules
  stage: build
  script:
    - npm install
    - npm run build
  artifacts:
    paths:
      - "dist/"

test-html:
  extends:
    - .standard-rules
  stage: test
  dependencies: []
  script:
    - npm install --save-dev htmlhint
    - npx htmlhint "dist/**/*.html"

deploy:
  stage: deploy
  image: busybox
  dependencies:
    - build-job
  script:
    - mv dist/ public/
  artifacts:
    paths:
      - "public/"
  rules:
    - if: $CI_COMMIT_BRANCH == $CI_DEFAULT_BRANCH
- So here we defined the order of stages to be executed.
- Then image is set to node by default.
- After that we had defined the .standard_rules which is a hidden job as started by ‘.'(dot), hidden jobs are the one which are defined but are not included in pipeline. but we defined them above because we had to reuse it with the extend, (extend is used to reuse any configuration in the pipeline) in many jobs.
- In the hidden job , the rules are defined to trigger the job when merge is performed.
Step 9: Now to save the file, write a commit message which is present at the end of the page, select the main branch and then Commit the changes.
Step 10: Now go to Build -> Pipelines to check for pipeline details as they would have been triggered because of merging the changes in the project.
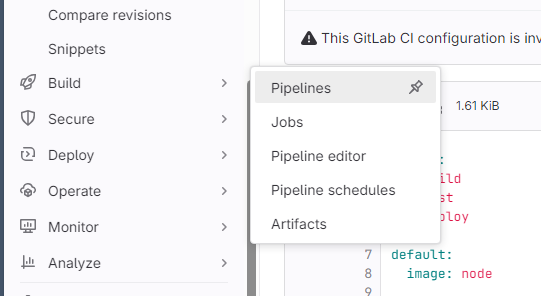
Click on Pipeline
Step 11: There you will see your pipeline status, id and stages and on which stage it’s on currently.
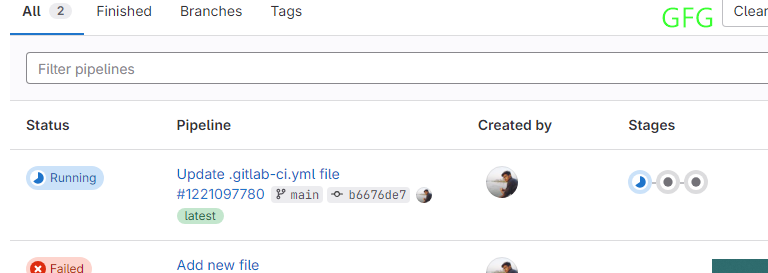
pipeline status
Step 12: When you will click on the pipeline id starting with #, it will send you to the visual representation page of pipeline with jobs.

Visual Representation of pipeline
Step 13: You can click on each job to check the process, also when completed all will be marked green.
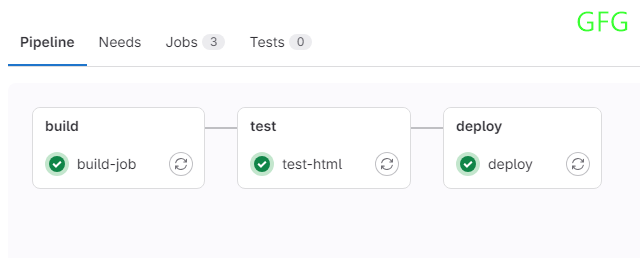
All the jobs completed successfully.
Now you have successfully created the CI/CD pipeline using Gitlab.
Conclusion
In this whole article we saw on how to create CI/CD pipeline in Gitlab to build, test and deploy a website. The automated process saves a lot of time when compared to manual process and reduces the chances of deploying a buggy application. Whenever there are committed and merged changes in the project/Software the pipeline runs. With this tutorial you got the basics with example on how this pipeline works and how to create that, now you just need to explore more in the Gitlab documentation to know more.
CI/CD Pipeline Using GitLab – FAQ’s
Can I apply CI/CD pipeline in any Software Project?
Yes, you can apply CI/CD pipeline in any software project regardless of its size as it can be customized according to its project size.
Is CI/CD pipeline beneficial?
Yes, it’s highly beneficial as it automates the manual tasks which reduces the full time to create a whole software and faster delivery of features.
Is Gitlab only platform to create CI/CD pipeline?
No, while GitLab is famous choice, there are many platforms out there which provides similar functionality, and some can be integrated with other software to get this functionality like GitHub, AZURE DevOps, Jenkins, GitKraken etc.
Does Gitlab provides local installation ?
Yes, Gitlab provides both cloud and local installation. If you want limited functionalities, you can use it freely or don’t want the tension to manage own server, then use Gitlab.com which is the online version. But if you think you have better resources in your local Machine and its cost effective then surely install that on your machine.
Share your thoughts in the comments
Please Login to comment...