How to Use Hosting Console in Firebase?
Last Updated :
05 Dec, 2022
For developers, Firebase Hosting offers production-quality online content hosting. You may easily launch web applications and send both static and dynamic content to a global CDN with a single command (content delivery network). You can host your app’s static assets (HTML, CSS, JavaScript, media files, etc.) with Firebase Hosting, which also allows you to deliver dynamic content and host microservices. To create and host microservices on Firebase, you may also use Cloud Run or Cloud Functions in conjunction with Firebase Hosting.
Let’s see what Hosting provides us:
| Particulars |
Description |
| provide content across a secure connection |
The contemporary web is safe. Content is always sent securely thanks to Firebase Hosting’s zero-configuration SSL. |
| host dynamic and static content in addition to microservices |
Everything from your CSS and HTML files to your Express.js microservices or APIs can be hosted on Firebase Hosting. |
| Quickly deliver content |
Every file you upload is provided as gzip or Brotli and is cached on SSDs at CDN edges all over the world. The ideal compression technique is automatically chosen for your content. The content is quickly distributed to all of your users, wherever they may be. |
| Before publishing your modifications, replicate and even share them. |
Use a locally hosted URL to view and test your updates while interacting with a simulated backend. |
How Exactly Does Firebase Hosting Work
For the contemporary web developer, Firebase Hosting is created. With the development of front-end JavaScript frameworks like Angular and static generation tools like Jekyll, apps and websites are more powerful than ever. Hosting offers us the infrastructure, tools, and features we need to launch and maintain websites and apps, regardless of whether we are launching a sophisticated progressive web app (PWA) or a straightforward app landing page.
Now, without further ado, let’s start jumping deep into the topic and start using the Hosting Tab.
Step 1: Crunch in the Firebase Command Line Interface into your Project
You will need to install the firebase project first from here How to Upload the Project on GitHub from Android Studio? Or in short, refer to the below image to install the project online which will be a time saver:

Image #1: Setting up the hosting in the console.
Step 2: Initialize the Project
Run the following command from the root of your local project directory to link your local project files to your Firebase project:
firebase init hosting
From the Firebase CLI prompts, at project startup:
- To connect to your local project directory, choose a Firebase project.
- The chosen Firebase project serves as your local project directory’s “default” Firebase project. Create project aliases to connect multiple Firebase projects to your local project directory
- A directory should be designated as your public root directory
- All of your publicly accessible static files, such as your index.html page and any other assets you wish to deploy to Firebase Hosting, may be found in this directory
- The public root directory’s default name is public.
- Your firebase.json configuration file allows you to either specify your public root directory now or at a later time.

Image #2: Init the project
Step 3: Deploy your Project
firebase deploy --only hosting
Use the above command to host the project, while at the same time know that, When you use the —only-hosting flag with this command, you only deploy the configuration and content for your hosting account.
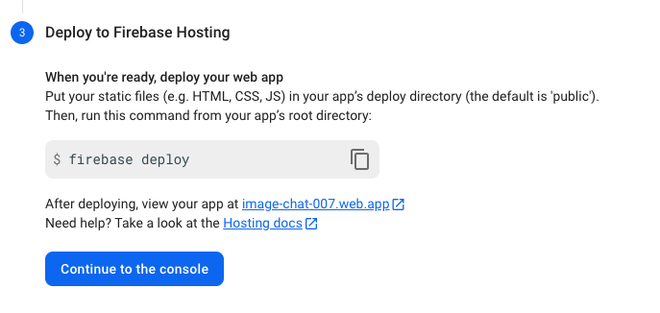
Image #3: Deploying the project live.
Conclusion
With these simple 3 steps, you will complete your Firebase Hosting of your project and you will be ready to work with your new environment, remember to close the sockets before you log out of the system.
Share your thoughts in the comments
Please Login to comment...