“How to Use Django’s Flatpages App” is an article that guides you through the utilization of Django’s Flatpages app for managing and displaying static content on your website. This article provides insights, code examples, and step-by-step instructions on implementing Flatpages in your Django project.
What is the Flatpages App?
Django’s Flatpages app is a robust tool that empowers you to create and manage static website content effortlessly, without the need to delve into code. This built-in Django feature streamlines the process of handling unchanging content, such as “About Us,” “Contact Us,” or legal notices like “Terms of Service” and “Privacy Policy.” In this article, we will explore the fundamental concepts behind the Flatpages app, provide a step-by-step guide with illustrative code examples, and discuss the practical implementation of Flatpages via the Django admin interface, accessible through the superuser account.
Key Features of Flatpages App
Django’s Flatpages app offers a versatile toolset for managing static content on your website while providing an intuitive and accessible admin interface. Let’s delve deeper into some of the key features and advantages it brings to the table:
- Admin Interface: The Flatpages app integrates seamlessly with Django’s admin interface, which means website administrators and content managers can effortlessly update and maintain the website’s static content. Even those without technical backgrounds can easily modify text, images, or links, as the admin interface abstracts the need for HTML or programming knowledge.
- URL Routing: One of the strengths of Flatpages is its association with specific URLs. This feature enables you to create clean and meaningful URLs for your static content. For example, you can define the URL path at which a page created using Flatpages should be displayed, making it easier for users and search engines to find your content.
- Template Integration: Flatpages seamlessly integrates into your website’s templates directory, allowing you to maintain a consistent and uniform look and feel throughout your entire site. This ensures that your static content aligns with your site’s overall design and styling, enhancing the user experience.
- Permission Control: Collaborative website management often involves multiple users with different roles and responsibilities. Flatpages supports granular permission control, enabling you to specify who can edit or delete Flatpages. This fine-grained control ensures that only authorized individuals can make changes, adding a layer of security and management to your website
FlatPages App Implementation
Let’s explore how the Flatpages App functions by creating a new project. In this example, we’ve initiated a Django project named ‘flatpagesDjango,’ where we’ll demonstrate how to create an ‘About’ page using the Flatpages App, which comes as a built-in feature in Django.
Step 1: Create Project
First install the django using below command and then xreate the project name faltpagesDjango
pip install django
django-admin startproject flatpagesDjango
File Structure
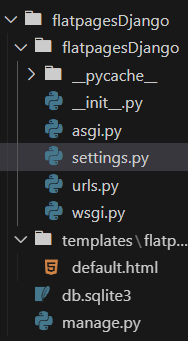
File Structure
Step 2: Configure settings.py
In this step, open your project’s settings.py file and make the following changes: Add ‘django.contrib.sites’ and ‘django.contrib.flatpages’ to the INSTALLED_APPS list:
INSTALLED_APPS = [
    # ...
    'django.contrib.sites',
    'django.contrib.flatpages',
    # ...
]

SITE_ID = 1
Step 3: Defining The Default template directory
In the settings.py file, set the path for your templates directory. Since we’ve created our templates directory in the main project’s root directory, the path should be “BASE_DIR/templates.” Make these changes in the settings.py file to specify the location of our templates.
TEMPLATES = [
    {
        "BACKEND": "django.template.backends.django.DjangoTemplates",
        "DIRS": [BASE_DIR / "templates"],  # here we had made changes
        "APP_DIRS": True,
        "OPTIONS": {
            "context_processors": [
                "django.template.context_processors.debug",
                "django.template.context_processors.request",
                "django.contrib.auth.context_processors.auth",
                "django.contrib.messages.context_processors.messages",
            ],
        },
    },
]
Step 4: Defining URL Paths for Flatpages App Pages
In this step, we define the URL path where our pages will be rendered. For our website, we want to display all pages under the URL structure “domain.name/pages/PAGENAME.” To achieve this, we add the corresponding URL pattern to our urls.py file.
Python3
from django.contrib import admin
from django.urls import path, include
from django.contrib.flatpages import views
urlpatterns = [
path("admin/", admin.site.urls),
path("pages/", include("django.contrib.flatpages.urls")),
]
|
Step 5: Defining the Default Template
In this step, we need to create an HTML template that will be used to render pages when accessed via the URL “pages/PAGENAME/“. Let’s define the template for the pages we’ve created using the Flatpages app. Make sure these templates are stored inside the ‘templates/flatpages/default.html’ directory. flatpage.title and flatpage.content. These variables allow us to access the data for our pages. You can enhance the template’s appearance using HTML and CSS as desired. We’re using the Jinja2 template engine, which allows us to access variables using the {{ VARNAME }} syntax
HTML
<!DOCTYPE html>
<html lang="en">
<head>
<meta charset="UTF-8" />
<meta name="viewport" content="width=device-width, initial-scale=1.0" />
<title>{{ flatpage.title }}</title>
</head>
<body>
<div">
<h2 style="color: green;">{{ flatpage.title }}</h2>
<p>{{ flatpage.content }}</p>
</div>
</body>
</html>
|
Step 6: Making Database Migrations
Before starting the server, we always need to create migrations, as some default Django migrations are necessary. You can migrate the database by using the following command:
python manage.py makemigrations
python manage.py migrate
Step 7: Creating a Superuser
To make any changes to pages created using the Flatpages App, you need to log in to the admin panel provided by Django. To access the admin panel, you require a superuser account. We manage our pages from the Django Admin panel, so let’s create a superuser account using the following command: and run the server
python manage.py createsuperuser
After running the server, log in to the admin panel and add data by clicking on the “add” icon. Fill in the URL (through which you want to serve your pages), title, content, and also specify the site. After completing the necessary fields, click on “Save.” You can access the page by writing the URL in the following way.
http://127.0.0.1:8000/pages/about (url name)/
Output :
.gif)
Conclusion
In , a conclusion majority of websites contain static content pages such as ‘About Us,’ ‘Privacy Policy,’ ‘Terms of Use,’ and others that typically remain unchanged. The Flatpages app proves to be an invaluable asset for the efficient management of such static content. It provides a user-friendly admin interface, ensures clean and user-friendly URLs, and seamlessly integrates with templates. This simplifies the task of keeping these pages up to date and well-maintained, especially when they don’t require dynamic features. Consequently, Flatpages serves as an indispensable tool for both web developers and content managers.
Share your thoughts in the comments
Please Login to comment...