How to Root in Kali Linux?
Last Updated :
04 Mar, 2024
Every Linux Distribution comes up with a dedicated account service where all the Administrative Privileges of Linux are kept. And the Debian Linux Distribution, Kali Linux is not also different from that. If you want to get all the Administrative Abilities in Kali Linux, you have to perform Root in Kali Linux.
Kali Linux Root is the Superuser of the device. The Root of Kali Linux executes any operation on the device. If you successfully Get Root Access in Kali Linux, all the possible Terminal Commands in Kali Linux will become open to you. However, the Root Access in Kali Linux is disabled by default. We have to use some steps to Unlock Root in Kali Linux.
This article will highlight the steps needed to Root in Kali Linux without having any kind of issues on the Kali Linux Terminal itself.
know more about the Kali Linux OS on GeeksforGeeks.
Quick Highlights on Root in Kali Linux:
- Root User is assumed to be the most powerful user in Kali Linux.
- The Root User gets full control of the system, hence the Administrator.
- The Root Access can Create New Users, Destroy File Systems, etc.
- In the Root Folder Essential System Binaries are kept.
- In need of the “sudo” command is Null in the Root of Kali Linux.
How to Root in Kali Linux?
Step 1: Open Kali Linux Terminal & execute the following command. As the Root is disabled in Kali Linux, this should be enabled first.
sudo apt install kali-root-login

Step 2: Now, if you execute the following command, you can see that the Root is active now. However, it is not in full potential power.
sudo su

Step 3: Using the following command, you are going to change the Default Password. You have to put in a new password & reconfirm it. It will give a successful message.
passwd

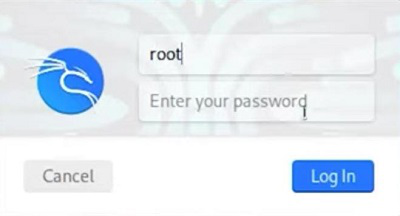
Step 4: At last, log out from the device & log in again with the Root. Enter Root as the Username & the set Password.
From the above steps, we can understand to Enable Root in Kali Linux, there is a need to execute a few commands in a series. Also, whenever you make Changes to Root in Kali Linux, do specifically change the password as well. If you Change Password in Kali Linux Root it will increase your security.
Also Read
Frequently Asked Questions to Root in Kali Linux
How to root in Kali Linux?
To root in Kali Linux, the following steps should be executed on the Kali Linux Device.
- Open Terminal.
- Execute the command sudo apt install kali-root-login
- Execute the command sudo su.
- Change & set a new password using the command passwd.
- Log out & login using the Root Username & set the Password.
What is the root of Kali Linux?
The Root is the Master Key in the Kali Linux. Not only in Kali Linux, but all Linux Distributions have the Root Facility to get the power of Superusers. The Root access in Kali Linux permits to act as the Administrator & make any changes to the device. In Kali Linux, the Root is disabled by default.
How do I know that I am using the Root in Kali Linux?
You can easily understand whether you are using Root Access in Kali Linux or not. The first thing is to use Root Access, you need to log in as Root to the device. However, to check it while the device is running, open the Terminal. If you find the Root instead of your Username, be sure you are using the Root Account.
Share your thoughts in the comments
Please Login to comment...