How to Open web camera in Google Colab?
Last Updated :
02 Oct, 2023
If you want to create a machine learning model but say you don’t have a computer that can take the workload, Google Colab is the platform for you. In this article, we will see how we can open a camera in Google Colab.
What is Google Colab?
Google offers the Google Colab service to numerous researchers and developers worldwide. It provides a virtual and remote environment that is readily accessible and free to use with some computational and resource access limitations. This service is very similar to what Jupyter Notebook provides, with the added benefit of free access to GPUs (Graphics Execution Units) for accelerated parallel execution of code. It has a Google Colab Pro version too which is a paid version and serves researchers with more computational resources and engines. This turns out to be one of the best available resources for students and researchers interested in computer science, particularly machine learning, data science, artificial intelligence, etc. Python3 or R notebooks are available as a free workspace from Colab. These notebooks make it simple to implement many compute-intensive activities.
What is the use of a web camera in Google Colab?
The camera can be used for various purposes on Google Colab Notebook, for example, to capture real-time images and videos for machine learning and data science tasks. These tasks include images and object classification and detection, real-time face recognition, testing of an already-built model, etc.
Web Camera on Google Colab
Prerequisite: A Google Account. Refer to this article which explains how to create a Gmail account, which is equivalent to creating a Google Account.
The Colab notebook was previously used to support the openCV library for image and video capturing. But, recently, there have been a lot of issues with the library on Colab including the unavailability of some important functions. Hence, Google Colab has come up with its in-build code snippet to capture images on Google Colab. We will be utilizing such snippets for this article.
Steps to Open the Web Camera
Step 1: Open a new Google Colab Notebook and connect it to get access to available RAM and memory resources.
Step 2: Click on the “Code Snippets” button on the bottom-left sidebar with <> logo. It will open up a sidebar with a search option on the right-hand side of the notebook.
sidebar.

Step 3: Search for “Camera Capture” in the search bar and click on “+” sign to insert that snippet code block onto our google colab notebook. This will insert 2 code-blocks into the notebook.
.jpg)
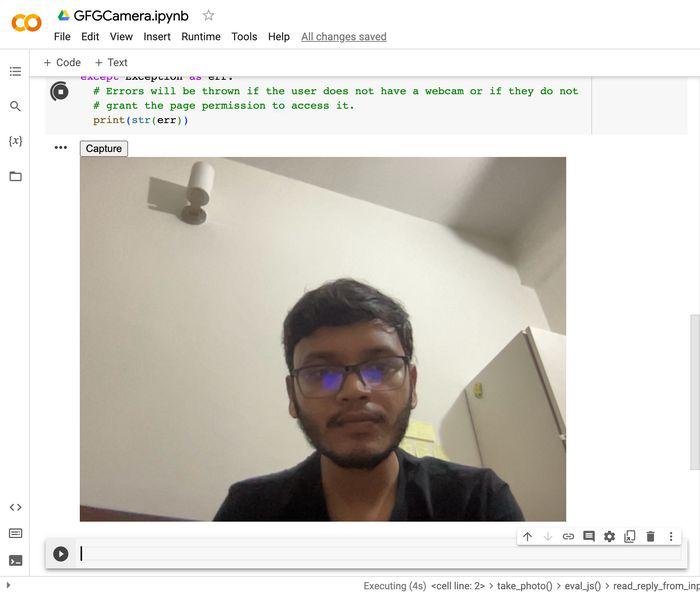
Step 4: There are 2 code blocks inserted into out notebook. Click on Play button to run both the cells of the notebook. On running the second cell, it will ask the browser permission for the Web Camera to be accessible to the google colab website. Prompt the permission to the usage of camera.
.jpg)
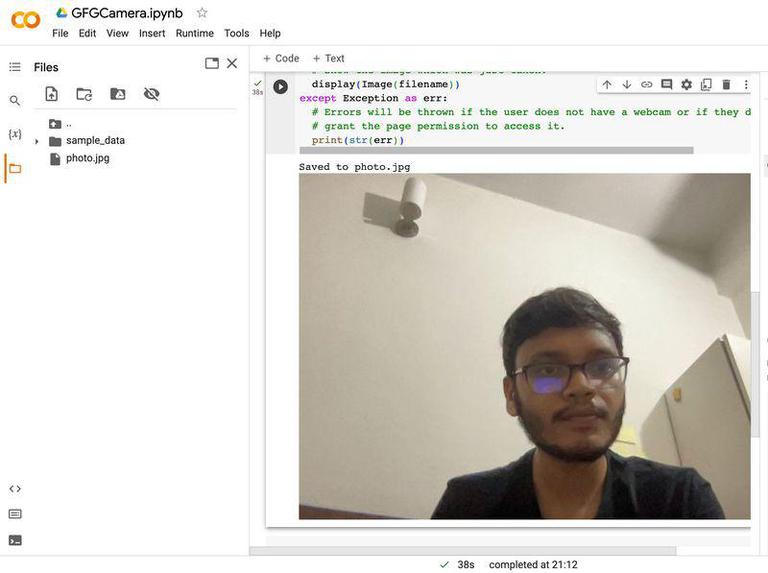
Step 5: It will open up the camera and you can see the frame output onto the output of second cell. You will also find a capture button to capture the image. The captured image would be saved to the memory by the name photo.jpg.
Step 6: The saved image can be accessed via Files section in the left side menu bar.
Share your thoughts in the comments
Please Login to comment...