Ever worried about accidentally messing up your Microsoft Excel file? It happens to the best of us. But don’t worry, there’s an easy way to keep your important stuff safe – it’s called cell locking.
Imagine your Excel sheet is like a big playground, and each cell is a sandbox. Some sandboxes have really important stuff in them, like treasure! With cell locking, you can put a special fence around those important sandboxes so nobody messes with them by mistake.
In this guide, we’ll show you a super easy way to lock cells and protect your sheet. It’s all about making sure your formulas stay safe and your data doesn’t get messed up. So, if you’re ready to keep your Excel world in order, let’s get started!

Learn How to Lock Cells In Excel: A Complete Guide
Lock All Cells in Excel
By default, it automatically locks all cells in a worksheet. However, you need to secure your worksheet with a password.
While sharing your spreadsheets with others, you may have data in some specific cells that you don’t want them to modify. This is especially true for cells that contain formulas and special formatting.
You can lock or unlock any cell, or range of cells to keep your work protected.
How to Lock Cells In Excel
Here are some quick and easy steps to lock cells in Excel:
Step 1: Select the Cells
Select the Cells that you want to lock in Excel.
Step 2: Go to the Home Tab and Select Format
Navigate to the Home tab and select the Format tab.
Step 3: Select Lock Cell
A dropdown will open as you click on Format. From the provided options, click on Lock Cell.

Locking Cells
Lock All Cells in Excel
By default, it automatically locks all cells in a worksheet. However, you need to secure your worksheet with a password.
While sharing your spreadsheets with others, you may have data in some specific cells that you don’t want them to modify. This is especially true for cells that contain formulas and special formatting.
You can lock or unlock any cell, or range of cells to keep your work protected.
How to Lock Specific Cells in Excel
Step 1: Select Cells or Range of Cells
Select Cells or Range of Cells that you want to lock.

Select Cells or Range of Cells
Step 2: Right Click and then Click Format Cells
Right-click and choose “Format Cells,” or use the shortcut key “Ctrl + 1.“
Right Click and then Click Format Cells
Step 3: Enable the Locked Option and Click Ok
Within the Format Cells Dialog box, opt for the Locked setting.
.webp)
Enable the Locked Option and Click OK
Follow the below steps to lock formula cells in Excel:
Step 1: Select All Cells
Select all the cells in your Excel sheet.

Select All Cells
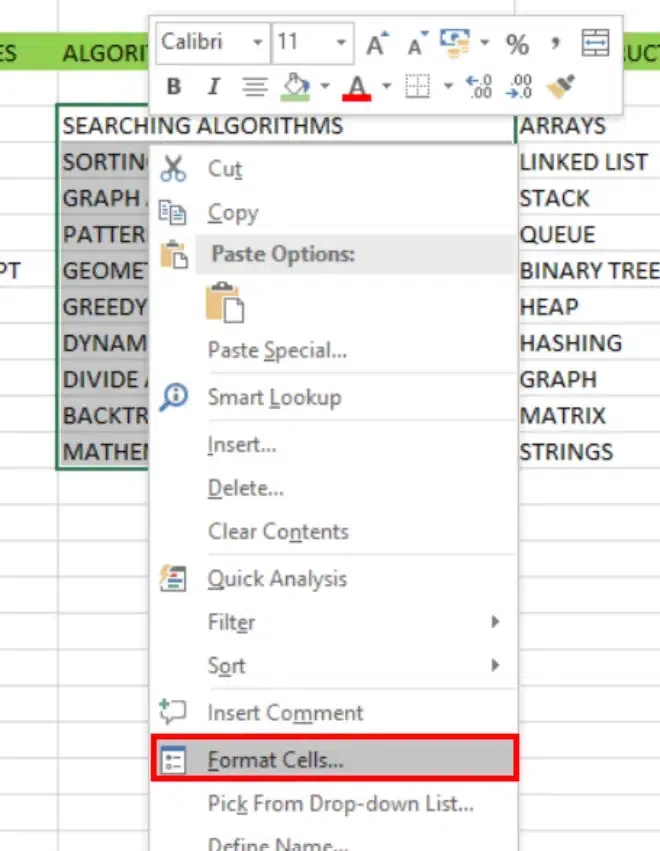
Step 2: Right Click and Click on Format Cells
Right-click on the selected cells and from the dropdown click on Format Cells.

Right Click and Click on Format Cells
Step 3: Uncheck the Locked and Click OK
On the Protection Tab, Uncheck the Locked Checkbox and then click Ok.

Step 4: Navigate to the Home tab
Go to the Home tab in the toolbar.

Navigate to the Home tab
Step 5: Click Find and Select and Click on Go to Special
Under the Home tab , go to Find and Select option and click on it. From the displayed dropdown, click on Go to Special.
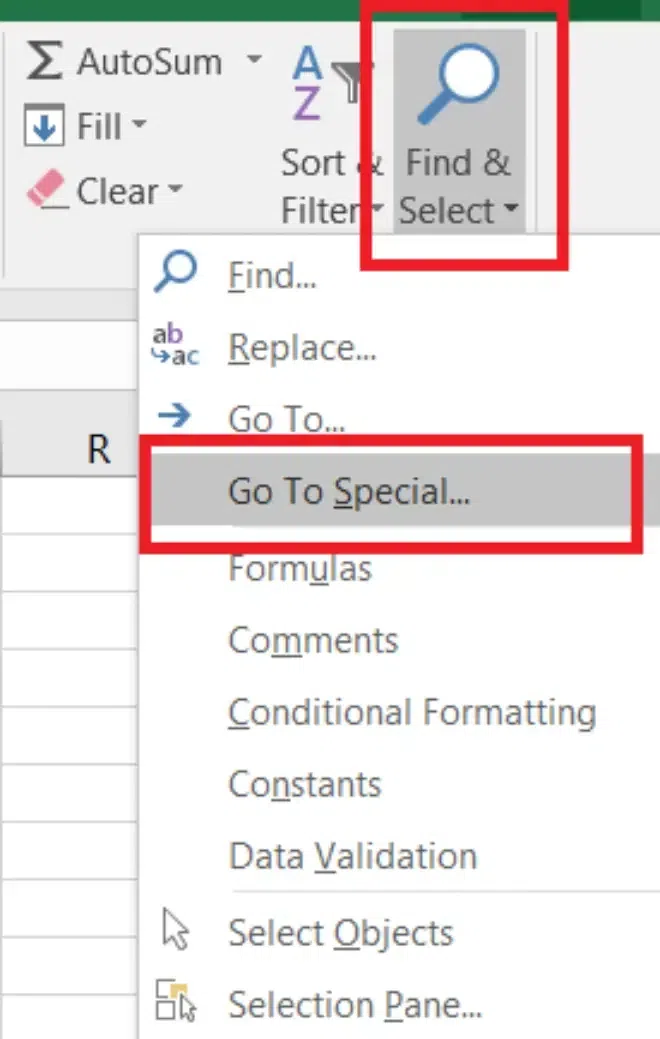
Click Find and Select and Click on Go to Special
Step 6: Select Formulas and Click Ok
Select Formulas and Click Ok, Excel will Select all the Formulas in the Sheet.

Select Formulas and Click Ok
Step 7: Go back to the Protection Tab and Enable the Locked Check Box
In the prompt box on screen enable the Locked option check box under the Protection section.

Go back to the Protection Tab and Enable the Locked Check Box
Note: Locking Cells or hiding formulas have no effect until you protect the worksheet
How To Protect a Worksheet in Excel
Step 1: Go to the Review tab
In your Excel sheet, go to the Review tab. You will see multiple options after you click on it.
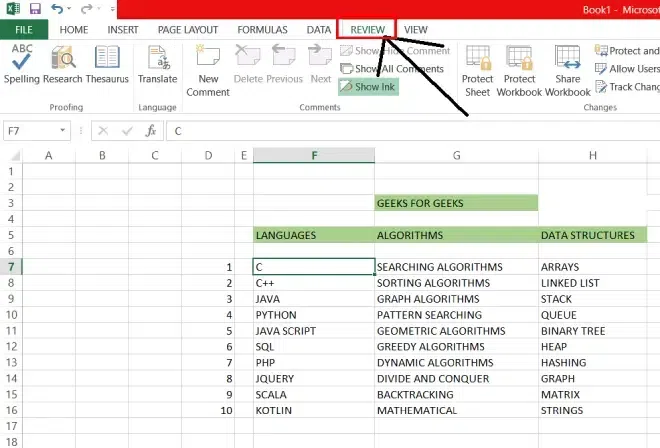
Go to the Review tab
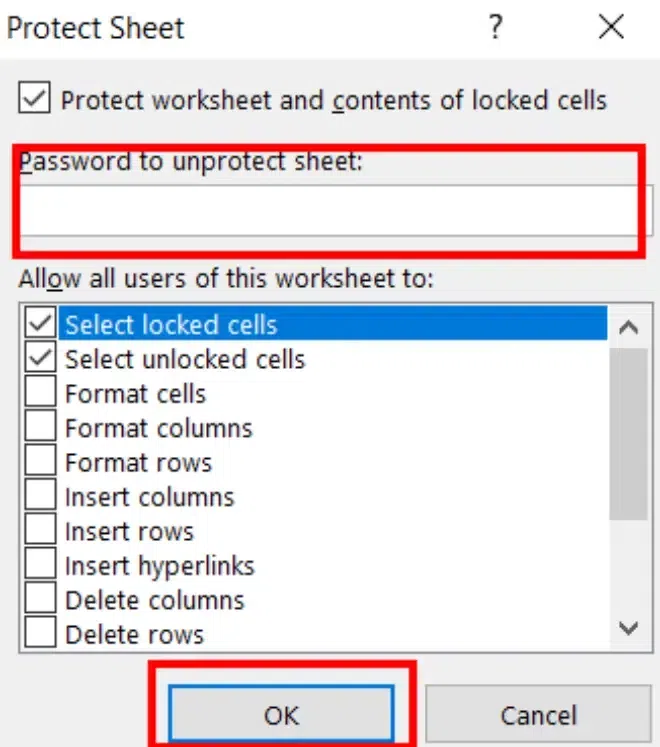
Step 2: Click Protect Sheet
From the given options, select the Protect Sheet option under the Changes section.

Click Protect Sheet
Step 3: Choose a Password and Click OK
Enter the Password in the password files to protect the sheet. Click on the OK button.
Choose a Password and Click OK
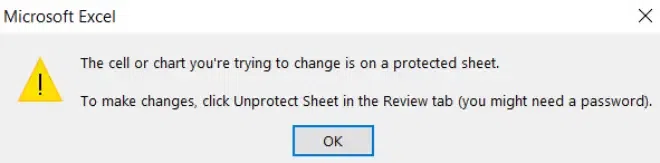
Now, with the sheet protected, users cannot edit locked cells. If they try to, they will get an error message.
Note: The user can unprotect the sheet in the same way it is used to protect the cells. By right-clicking on the sheet tab.
Another way to Protect or Unprotect a sheet is by selecting Protect sheet button in the Review tab of Ribbon.
How to Unlock All Cells in Excel
By default, all cells are locked for editing in a spreadsheet, but it has no effect until you protect the worksheet. So, first, you need to unlock all cells, by following these quick and easy steps.
Step 1: Select All Cells
Press “Ctrl+A” on your keyboard to select all cells. (To select a whole range of sheets).

Select All Cells
Step 2: Select Format cells
Right-click on the selected cells and select the Format Cells option from the dropdown.

Step 3: Choose the Protection Tab and Uncheck the Locked
A prompt box will open on your screen under the Protection tab uncheck the Locked option. (Alternatively, you can press Ctrl+1). Click on the OK button.

How to Mixed Lock State in Excel
A Solid box will appear Locked when the Selected Range contains both locked and unlocked cells.

Mixed Locked State
Conclusion
In the above article, we discussed various methods of locking cells in the Excel sheet to protect it from unauthorized access. We also learned about how to protect the complete Excel sheet and discussed the procedure to unlock the cells required. All the steps are easy to follow and helpful in terms of data.
How to Lock Cells in Excel – FAQs
What is the shortcut key to choose the Protection tab?
“Ctrl+1” is the Shortcut key to Choose Protection tab.
What are the tips for locking cells and protecting cells?
Some of the tips for locking and protecting cells are:
- Prevent locked cells from being selected .
- Add a button for Locking cells to Quick Access Toolbar.
- Use different formatting for locking cells.
How to prevent locked cells from being selected?
For this you just have to
- Untick the option “Select locked cells” on the protected sheet window. This step will make the user to insert the data quickly and easily.
- Turning off the Select lock cells will prevent the locked cells from being selected.
How to add a button for locking cells to the quick access toolbar?
With the help of this user can lock and unlock cells with one click. Follow the below steps to add a button :
Step 1: Click on the Home tab Go to Format button and see the option Lock cell.
Step 2: Right click on the lock cell. Select Add to quick access toolbar.
How can I lock unused cells?
To lock unused cells in Excel do the following steps:
- Select the cells you want to leave unlocked
- Go to Format Cells > Protection, uncheck “Locked“, and click OK.
- Select the entire sheet, open the Format Cells dialog again, ensure “Locked” is checked.
- Protect the sheet via Review > Protect Sheet.
Share your thoughts in the comments
Please Login to comment...