How to Install GIT on Windows using Putty?
Last Updated :
22 Mar, 2023
Installing Git in Putty is a straightforward process that allows developers to use Git through the Putty terminal emulator. Git is a version control system that is widely used to manage and track changes in software projects, and the integration with Putty makes it easy to access Git repositories on remote servers. In this guide, we will provide a step-by-step explanation of how to install Git in Putty, including the necessary software and configurations required for a successful installation. Whether you are a beginner or an experienced developer, this guide will provide you with a complete understanding of you can start working with Git in Putty.
Key Terminologies
Git: Git is a version control system that is used to manage and track changes in software projects. It enables developers to work together on the same codebase, maintain different versions of their work, and collaborate on complex projects. Git keeps a complete history of all changes, making it possible to roll back to previous versions if needed. It also allows multiple developers to work on the same file simultaneously, avoiding conflicts and facilitating collaboration.
Putty: Putty is a terminal emulator, serial interface, and network file-sharing program that is free and open source. It allows users to access remote computers securely over the internet using the SSH (Secure Shell) protocol. Putty provides users with a graphical user interface that makes it easy to connect to remote servers and perform various operations such as file transfer, command execution, and terminal emulation.
Git in Putty: It refers to using the Git version control system through the Putty terminal emulator. With Git in Putty, developers can access Git repositories on remote servers, perform Git operations, and manage their code directly from the terminal. Putty also allows users to securely connect to remote Git servers, ensuring that sensitive data is protected during transmission. Developers can use Git commands in the Putty terminal to perform various Git operations such as cloning repositories, committing changes, and pushing changes to the remote server. With Git in Putty, developers can manage their projects from anywhere, eliminating the need for local Git installations.
Step-by-Step Guide for Installation
Follow the given steps to install Git on putty:
Step 1: Connect to the server
Open the Putty application on your system and then connect to the server you want to install Git on. You can do that by following these steps:
Open Putty by double-clicking on the icon on the desktop. In the “Host Name (or IP address)” field, enter the IP address or hostname of the server you want to connect to. Then in the “Port” field, enter the port number that the server is listening on (the default port number is 22 for SSH). Now click on the “Open” button to form a connection to the server.
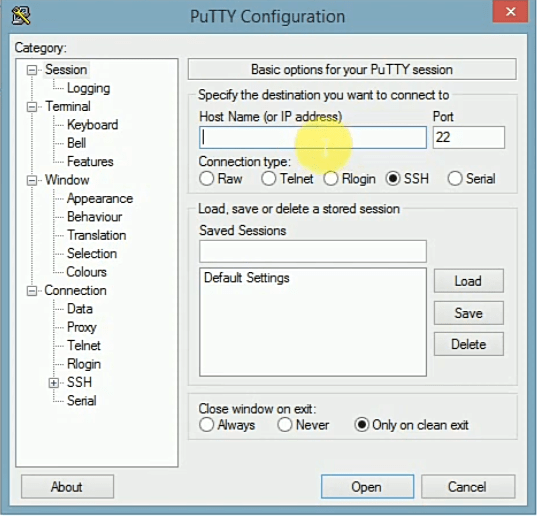
Putty configuration
After this process, you will be prompted to enter your username and password to log into the server. Once you are logged into your account, then you will see a terminal window with a command prompt. You are now connected to the remote server now you have access to run commands on it.
Step 2: Update the package list
Once connected, run the following command to update the package list:
sudo apt-get update
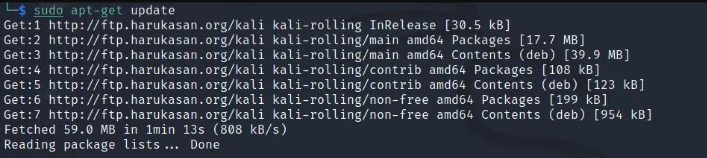
Update package
Step 3: Installation of ‘Git’
You can run the following given command to install Git on your system.
sudo apt-get install git
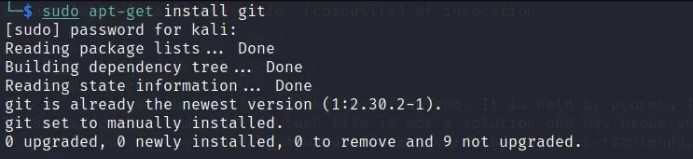
Git installation
Step 4: Verification of installation
Verify the installation by running the following command:
git –version
By using this command we can see that the version of Git that is installed on your system is displayed.

Verification
Possible methods of installation
There are various methods to install Git on putty, it can be different for various other operating systems here are some of them:
- Debian-based systems: It uses the apt-get package manager to install Git. Its examples are Ubuntu, and Debian The commands are:
sudo apt-get update
sudo apt-get install git
.jpg)
Git update

Git install
- Arch Linux: It uses the Pacman package manager to install Git. The command is:
sudo pacman -Syu git
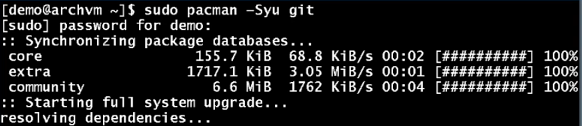
pacman _Syu git
- Fedora-based systems: Use the yum package manager to install Git. Its examples are Fedora, CentOS, and Red Hat The commands are:
sudo yum update
sudo yum install git

yum update

yum install git
- For MacOS: Using Homebrew package manager The command is: If the git is already installed then it will only update the git.
brew install git

brew install git
- Using MacPorts package manager :
sudo port install git-core +svn

sudo port install git
choco install git.install
.png)
choco Install git.install
These are some of the methods for installation these are the methods of different operating systems.
Note : There are some third party package manager for that we need to install them first externally
Conclusion
By following all these above steps, you should now have Git installed on your Putty terminal. You can now use Git to track changes made to your code and also collaborate with other members of your team.
Share your thoughts in the comments
Please Login to comment...