Imagine you have a smartphone with lots of different apps on it. Now, testing those apps to make sure they work properly can be a big job, especially if they need to work on different kinds of phones like iPhones and Androids. That’s where Appium comes in! Appium is like a special tool that helps to test these apps automatically.
Instead of someone having to tap on buttons and type things over and over again, Appium can do it automatically. It’s kind of like a robot tester for apps and it works for all sorts of apps, whether they’re for playing games, shopping online, or checking the weather. So, it’s like having an automatic tester tool that checks all your apps to make sure they’re working just right!
What is Appium?
Appium is the open source tool to automate mobile applications this Can automate Native, web, and hybrid mobile applications Appium also supports Android, iOS, and Windows desktop platforms. Appium is for all languages this Supports multiple programming languages
Prerequisites:
Here let’s check what are the prerequisite for Appium so, to use Appium effectively you will need to have :
- Hardware Requirements: Multicore processor with a speed of at least 1.6 GHz or higher. You will need a minimum of 4 GB of RAM running macOS and development tools like Xcode.
- Programing language: Appium supports multiple programming languages such as Java, Python, Ruby, PHP, C#, Javascript, RobotFramework, and Swift to use appium your project should written using this language
- Development Environment Setup: Choose an Integrated Development Environment (IDE) such as Android Studio, Eclipse, IntelliJ IDEA, Visual Studio Code, or any other preferred IDE. But in our case, we will need Xcode OR Android Studios
- SDKs or Tools: Install Xcode on a macOS system.
Software Needed for Appium Installation
- macOS: Any version
- Xcode(If you are using Xcode): Xcode is Apple’s integrated development environment (IDE) for macOS, used for developing iOS applications. It includes the iOS SDK, compilers, simulators, and other development tools necessary for iOS app development and testing. You can download Xcode for free from the Mac App Store.
- Android Studios(If you are using Android Studios)
- Homebrew: Install Homebrew
- Node.js and npm:
- Node.js: Node.js is an essential component for running Appium. Appium is built on top of Node.js, which is a JavaScript runtime environment
- npm (Node Package Manager): Node.js comes with npm, a package manager for JavaScript. npm allows you to easily install, manage, and distribute JavaScript libraries and dependencies, including the Appium package itself
- Java Development Kit (JDK): The JDK is a development environment for building applications, applets, and components using the Java programming language.
- Xcode: If you are installing the appium for the Xcode(Swift) then no need to download the JDK.
- Android Studios: If you are installing the appium for the Android studio then you will need idk.
- Xcode and Xcode Command Line Tools (for iOS automation): You will need Xcode ide if you want appium for Swift/Flutter
- Homebrew package manager: Homebrew is a package manager for macOS which makes it easy to install and manage software packages and dependencies.
Install Appium Using npm (Command-line Approach)
Step 1: Check whether the node is already installed on your system or not
1. Click command + space to open spotlight search and search the terminal and open the terminal past the following command on the terminal:
node –version
2. If the node is not installed then you will get this kind of message:
-bash: node: command not found
Otherwise, you will get the version of node “Goto step 3”.
3. Now check for npm:
npm –version
3. If the npm is not in your system then you will get this kind of message:
env: node: No such file or directory
Otherwise, you will get the version of npm. Now, “Goto step 3”.
Step 2: Install node.js
1. If you have brewed in your system then run the following command on the terminal to install node.js:
brew install node
Else search:
https://nodejs.org/en/download

node js search
2. Open the first website and then get the macOS installer.
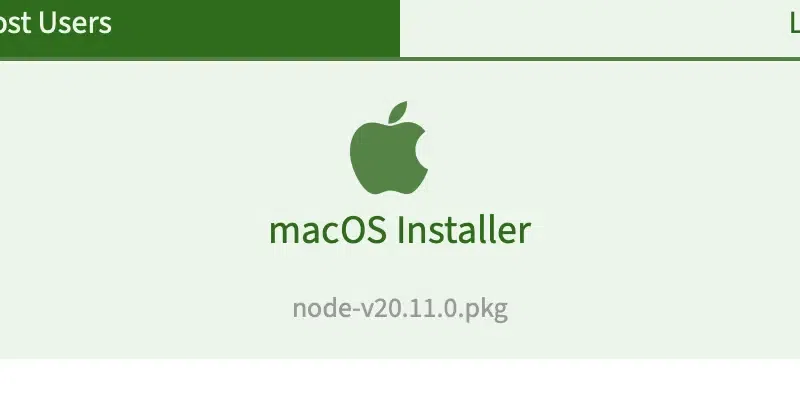
get the installer of node js
3. Once the installer is downloaded successfully install it and now again check the node.js for this follow the first step and then “Goto step 3”.
Step 3: Install Appium
1. Once the node, npm is installed then run any one of the following commands on the terminal to install the appium.
npm install -g appium
Or
npm i –location=global appium
The above command will download and install Appium on your system
Step 4: Check whether Appium is installed or not
1. Once the installation is done just check the appium and run the following command on the terminal:
appium –version
If the version is displayed then congratulations you have successfully installed the appium on your system. Else any error message then just follow the above steps and try it again.
Install Appium Using Appium Desktop GUI
Step 1: Open the Appium Desktop GitHub page
- Here they say =”appium Desktop is unsupported, no longer maintained, and has known security vulnerabilities.
- It is advised not to use it at all. See the README for more information. Use at your own risk.”
Note: New beta versions are released often. So, Even if you see a newer version of Appium on Github, please go ahead and download that version. The steps given in this article will be the same (only the screenshot contents might change).

Github Appium
Step 2: Open the Appium server installer
1. Once you have downloaded the appium as shown above now click on the installer.

open installer
2. Drag Installer.
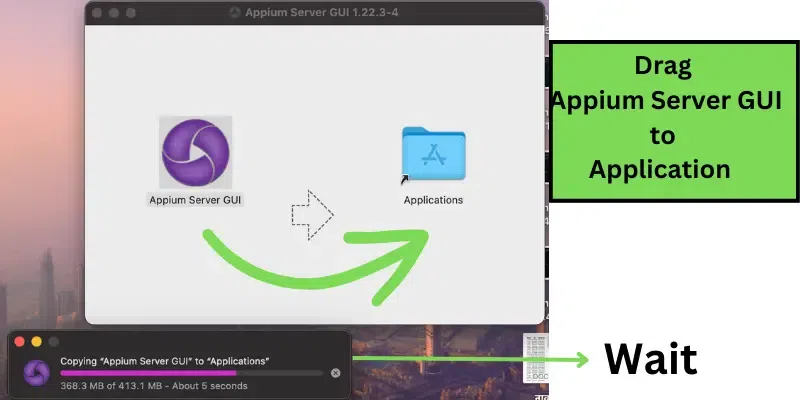
complete the installer
Step 3: Open the Appium desktop

Appium is started successfully
Step 4: Change Port number (optional)
If you want to change the port number then you can change it easily.

click pause button
Click that button as shown above and then the below screen will open.
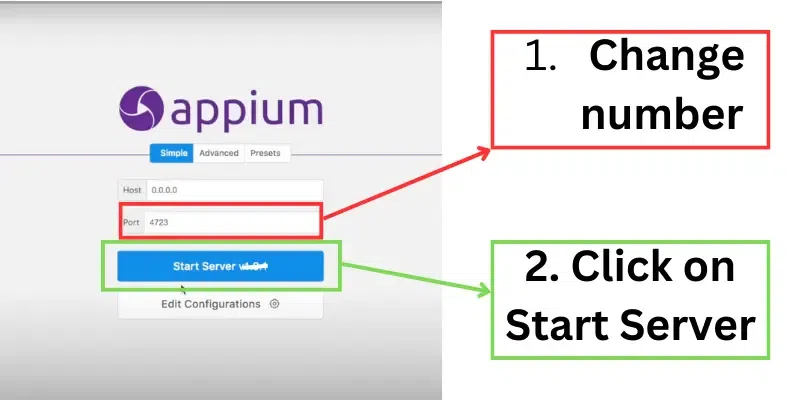
Re-start the Server with different port number
Note: Changing the port number of appium is safe so you can change it but if the server is on through the terminal and you are still trying to run the server using GUI then it will raise an error for this you can stop anyone or change the port number
Install Appium with Android Studio
Step 1: Install node and npm
1. Check whether the node is already installed on your system or not.
2. Click command + space to open spotlight search and search the terminal and open the terminal past the following command on the terminal:
node –version
3. If the node is not installed then you will get this kind of message:
-bash: node: command not found
Otherwise, you will get the version of node “Goto step 2”.
3. Now check for npm:
npm –version
If the npm is not in your system then you will get this kind of message:
env: node: No such file or directory
3. Otherwise, you will get the version of npm. Now, “Goto step 2”.
Install node.js
4. If you have brewed in your system then run the following command on the terminal to install node.js.
brew install node
Else Search:
search for node.js
5. You can just open the first website and then get the macOS installer.
installer
6. Once the installer is downloaded successfully just install it and now again check the node.js for this follow the first step
and then “Goto step 2”.
Step 2: Install Appium
1. Once the node, npm is installed then run any one of the following commands on the terminal to install the appium:
npm install -g appium
Or
npm i –location=global appium
The above command will download and install Appium on your system.
Step 3: Check whether Appium is installed or not
1. Once installation is done just check the appium and run the following command on the terminal
appium –version
2. If the version is displayed then congratulations you have successfully installed the appium on your system.
3. Else any error message then just follow the above steps and try it again.
Step 4: Install JAVA JDK
1. First, check the Java is already installed or not.
java -version

java check
2. Install in case it is not installed.
Step 5: Install Android Studio
If you have Android Studio already installed then skip this step else check.
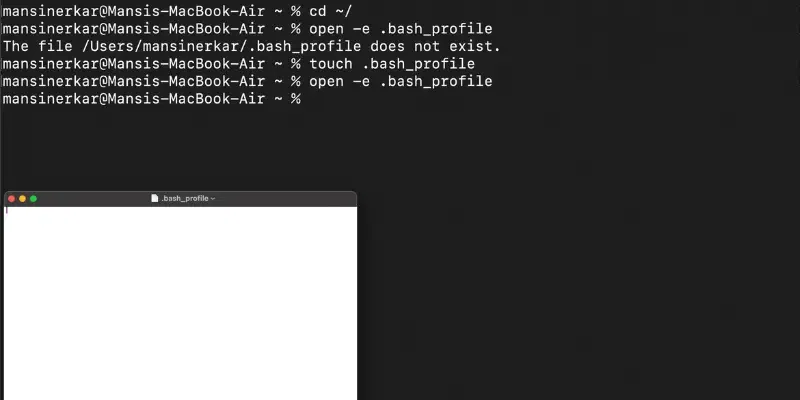
Step 6: Set JAVA_HOME and ANDROID_HOME in the .bash _profile file
1. Navigate to the home directory.
cd ~/
2. Open the bash profile file:
open -e bash_profile
3. Create a bash profile:
touch .bash_profile
4. Open bash profile:
open -e .bash_profile
bash commands
export JAVA_HOME=($/us/libexec/java_home)
export ANDROID_HOME=${HOME}/Library/Android/sdk
export PATH=”${JAVA_HOME}/bin:${ANDROID_HOME}/tools:${ANDROID_HOME}/platform-tools:${PATH}”
5. Save the .bash_profile file using command+S.
6. Use the following command:
source .bash_profile
7. Let’s check the installation path of java_home and Android_home:
echo $JAVA_HOME
echo $ANDROID_HOME

check environment variable
Step 7: Run appium doctor to verify the installation
1. Command to install appium-doctor:
npm install -g appium-doctor

2. Command to get appium-doctor help:
appium-doctor -h

appium help
3. Command to check Android setup:
appium-doctor –android

Android
Ignore warnings if you get them.
Step 8: Installation done
Let’s see how to configure the appium in Android Studio.
If you are new to Android application testing using Appium then don’t worry this article will help you from the basics
Step 1: Start Android Studio
Step2: Create the VD(using Virtual Device Manager)

virtual device manager
1. Open Android Studio then click on the tree dots which are present on the right corner of the screen and then navigate to the Virtual Device Manager.
2. Click on the “Create virtual Device”.

Create VD
3. Now, Select Device.

4. You can select any version as a virtual device.
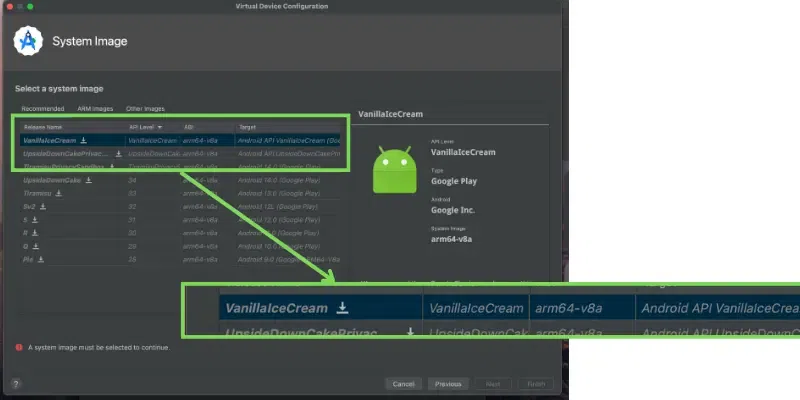
select the proper version
5. Accept the terms and conditions.
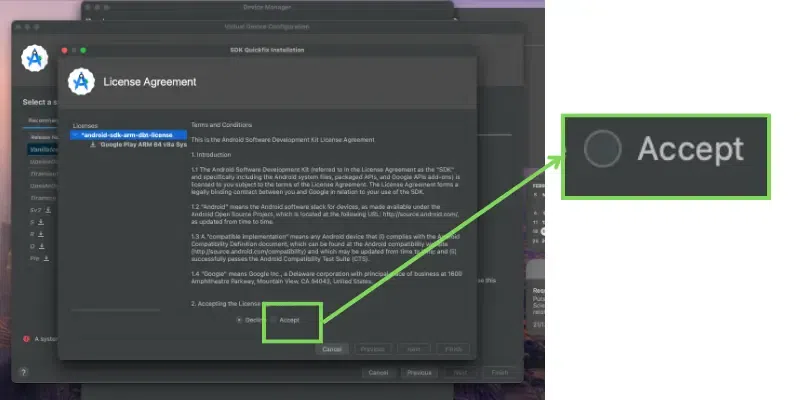
accept the terms and conditions
6. Let it finish the Downloading.

let it download
Step 3: Get the APKthe file from the appium.io to test the application
You can use your existing file too.
Step 4: Start Appium

start Appium
Step 5: Start Inspector Session
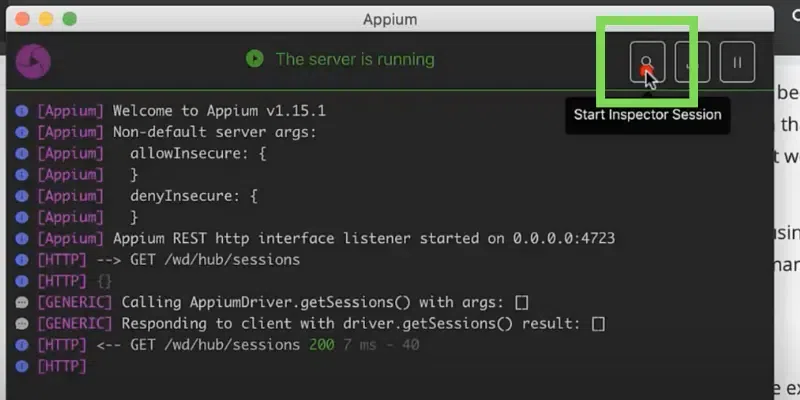
Start inspector Session
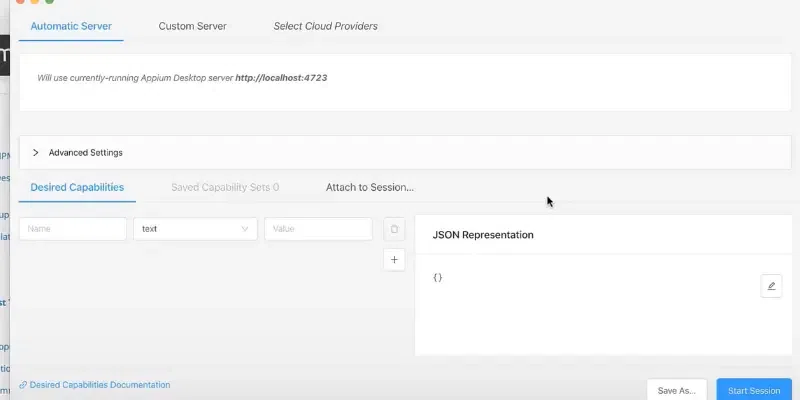
Automatic Server
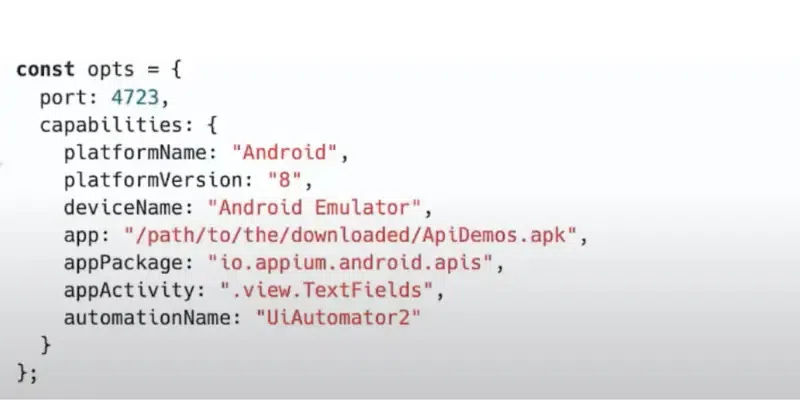
Now in desired capabilities, we need to provide the information like key value to connect the tester with the application.
add desired capabilities

Add more

Done
1. Now click on the start session which is available in the bottom right corner.
2. Now open the Android virtual device and appium screen.

Start session
3. Automatically the app will get started and Done.
Common Error of Appium
1. How To solve “An unknown server-side error occurred while processing the command. Original error: Xcode version 9.0 is not yet supported” Error?
“An unknown server-side error occurred while processing the command. Original error: Xcode version 9.0 is not yet supported”

version Error
To solve this error you just need to update the appium by reinstalling appium from the below link and follow the installation steps which are given above
https://github.com/appium/appium-desktop/releases
Conclusion:
In this article, we learn What is an appium and then we see how we can install it and also install the Homebrew. we also solve the appium version error.
Frequently Asked Questions:
1. How to start the Appium server?
Open the Terminal and run appium.
2. How to stop the Appium server?
Press Ctrl + C in the Terminal where Appium is running.
3. How to check if Appium is installed correctly?
Run appium --version in Terminal. It should display the installed version.
4. What if I encounter errors during installation?
Double-check all prerequisites and installation steps. Refer to the official Appium documentation or online resources for troubleshooting.
5. Are there alternatives to the methods mentioned?
Appium Desktop (no longer officially supported) can be used for basic setups. Other tools like Calabash or UI Automator (iOS) exist, but Appium is generally more popular and versatile.
Share your thoughts in the comments
Please Login to comment...