Appium is integral to UI Automation within different domains in Tech: Mobile, Web, and even Desktop. The platform aims to streamline Software Testing through the following goals as outlined by its creators:
- Make platform-specific automation capabilities available under a cross-platform, standard API.
- Allow easy access to this API from any programming language.
- Provide tools to enable convenient community development of Appium extensions.
Appium is a suitable choice for Mobile Developers who want to benefit from the automation of UI Testing due to its ease of use and versatility. This article seeks to define what App Activity is in the context of Appium and Android.
Understanding App Activity in Appium
Android
To understand what App Activity means in the Appium-Android connection, it is important to become familiar with the basic working mechanism of an Android app.
- Between a user first launching an app and then switching to a different one, the app goes through different stages which collectively form The Android App Lifecycle.
- When the user first interacts with an app, they are presented with an initial screen.
- This screen is what is known as an Activity.
- Think of it as what a window is to a desktop app on the Windows platform.
The Appium Connection
A typical Android app consists of multiple activities that represent the different screens it has. Just like a journey, the UI Automation process must start somewhere. This is where the App Activity comes into play.
- To begin the UI Automation process, Appium needs to know the starting point of the process, that is where it should begin its UI Testing process.
- When configuring the Appium Test Script, the developer typically configures the Appium server and provides the criteria used to run the Automation Script.
Importance of App Activity in Mobile App Testing
It is time to dive deeper into why App Activity is important in Appium. Here are some of the points of importance of App Activity in Appium:
1. Acts As The Entry Point
For Appium to test the app effectively, it needs to know where to start. Not providing the App Activity would be similar to driving to a destination without knowing where to start. The App Activity tells Appium where to start when interacting with the Android app.
2. Focus On One Screen
During testing, it may not be necessary to go through all of the screens but focus on only one of them. Remember that each Activity in Android represents a screen and thus to focus on one screen, the activity needs to be specified. This allows Appium to know which screen it needs to be focusing on.
3. Promotes Focused Testing
Similar to the previous point, Appium needs to know exactly which screen it is testing. Think of the App Activity as a unique identifier for each screen (Activity). By providing an App Activity, Appium will be aware of the exact screen it needs to test and test it accordingly.
4. Encourages Streamlined Navigation
When an App Activity is not specified, Navigation can become challenging as Appium is likely to start executing in a random or default screen. This may cause inconsistencies in the Navigation structure of your test and thus provide inaccurate results. Specifying an App Activity is useful in allowing Appium to execute more linearly and thus provide accurate test results.
5. Allows for Context Switching
By nature, Native Android apps largely involve Context in their lifecycle. This is because they need to be aware of the current context and handle them correctly, for example when switching between a Native context and a Web context. An App Activity helps Appium work better by providing it with context, that is allowing it to handle different scenarios (contexts) accordingly.
6. Optimizes the Performance
For larger Android apps, an App Activity optimizes the test process for performance by specifying the destination screen. This greatly improves the test speeds as there is no time spent navigating through unnecessary screens when the App Activity is not specified. This may be negligible in smaller Android apps but is still recommended for best practice.
7. It Caters for Dynamic Elements
Some of the Android apps have Dynamic Elements that depend on the screen (Activity) being navigated on. For example, an E-Commerce app is likely to have its Shopping Cart behave differently depending on the screen in which the user is located. Given that Appium conducts UI Tests, it is important to capture the starting point of the test to reflect the real-world behavior of the dynamic elements and achieve accurate test results.
How App Activity Works in Appium?
As we now know why we should include App Activity in our Appium Tests, let us now explore the process in which App Activity works in Appium:
1. The Configuration
Before the Appium Test can be executed, it is configured using UIAutomator2. This is done by use of Options where different attributes are used to define various preferences in preparation for the UI Test. This can be done using any language but Kotlin is the best for Android.
2. The Attributes
As mentioned earlier, every kind of preference is defined using the Attributes. They are simply methods that are called from the UIAutomator2Options class. The attributes are usually sent to the server during the test’s execution where the test is handled based on the specifications provided.
3. The App Activity Attribute
To specify the Android app’s Activity for testing, the .setAppActivity() attribute is used. By including it, Appium will be aware of where to start when executing the test. It utilizes the fully qualified name of the Android app’s Main Activity for it to work effectively, for example: com.example.sampleapp.MainActivity
4. The Launch
Now is the time to run the test. When the test is executed the Appium Server receives the Attributes and uses them to run the target Android app on a specified device or emulator under specific preferences. The app usually runs as it would in a real-world scenario.
5. Navigating to The Specified Activity
During the launch, Appium navigates to the screen (Activity) that was specified in the appActivity capability. This is because as previously mentioned, that screen will be the first screen Appium navigates to. This promotes linearity during the Navigation process and makes the test run smoothly among other benefits listed above.
6. The Automation Steps
When the test has been run and Appium is on the desired screen, it executes the automated tasks set during configuration. They may include automated interactions with the UI elements that were included in the test scripts. The appActivity attribute allows Appium to focus on only these tasks on the right screen.
7. Context Switching
As mentioned in the previous section, Native Android apps typically interact with different contexts. By setting the App Activity, Appium is now capable of switching contexts as needed. This coupled with the automated tasks mimics the real-world use case of the Android app thus providing accurate test results.
Configuring App Activity in Appium
Configuring the App Activity in Appium is a straightforward process that is easily replicable. To demonstrate the application of App Activity in Appium, here is the documentation of a sample UI Test using UIAutomator2 in Android:
1. Installing The Dependency
To incorporate Appium into an Android app, here is the dependency that needs to be implemented in the build.gradle.kts (app) file:
Kotlin
implementation("io.appium:java-client:9.1.0") {
exclude(group = "com.google.guava")
}
implementation("com.google.guava:guava:30.1-jre")
|
To prevent version conflicts, Guava has been excluded from the Appium dependency and has been set up on its own instead.
2. Setting Up Appium
As documented by Appium, the Appium Server should be installed using the npm i -g appium command after which its installation can be confirmed using the appium command to get the following output:

The output should begin with this line.
Once the Appium Server has been set up, it is time to install the UIAutomator2 Driver. It will be used to perform the Automated UI Test. To install it, the appium driver install uiautomator2 command is used and when appium is run to start the Appium Server again, part of its output should contain:

This output confirms the installation of the UIAutomator2 Driver.
3. Setting Up The Options
Once everything has been correctly set up and the Appium Server is up and running, it is time to write out the attributes that represent the specifications for the Appium Test. Here is an example of such a configuration:
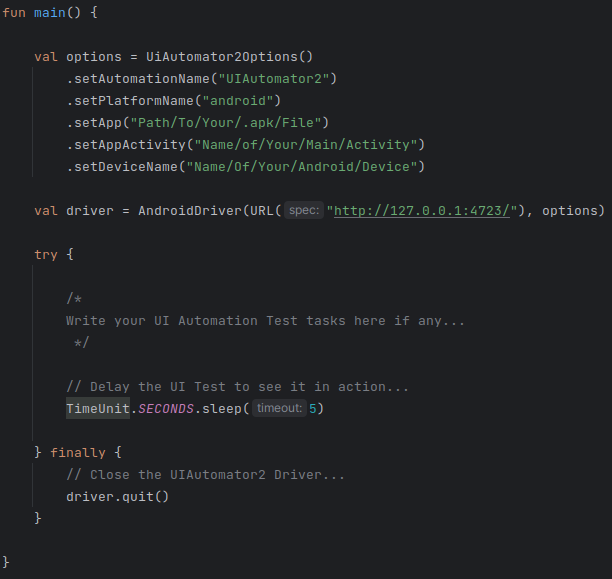
Write this script in a separate .kt file.
In the example displayed above, here are the attributes that have been used:
- setAutomationName: It is used to define the UI Test Automation Tool being used, in this case, UIAutomator2.
- setPlatformName: It is used to declare the target platform of the UI Test, which in this case is Android.
- setApp: It is used to locate the .apk file to be tested using its absolute path.
- setAppActivity: It is the attribute used to select the main Activity of the UI Test, that is the Activity that the test will begin from.
- setDeviceName: If the UI Test is done using a physical Android Device, then the device name is specified using this attribute. The name can be obtained by checking the displayed name under Device Manager on the right tab of Android Studio. If a virtual device is used, the command adb devices can be used to check its id alongside the setUdid attribute.
To connect the Appium configuration to the Appium Server, use the AndroidDriver class and define the URL displayed in the Appium Server’s log after Appium was previously run to start the Appium Server. The URL is typically http://127.0.0.1:4723/ as it represents the host’s local address. The driver variable can also be used to perform interactive actions on the screen during the UI Test by calling functions such as .findElement() to locate and interact with UI Elements. For simplicity, the example used has simulated the startup and closure of the Android app using TimeUnit introducing a 5-second delay during the app’s launch and termination. Once the tests have been run, the driver is closed using .quit() to preserve limited resources.
4. Running The Test
Finally, the test is run by clicking the green icon beside the fun main(). The script is executed and the Android app should be launched and any UI Tests conducted automatically. If the test is successful, the following should be the output on the console:

If any error is encountered then it will be displayed instead.
To confirm the execution of the UI Test, the Appium Server should also have 200 displayed within its logs as it represents a successful network request between the client (Android app) and itself, which is equivalent to the Status Code 200 (OK).

If the UI Tests are unsuccessful then different Status Codes will be displayed depending on the cause of failure.
Examples of App Activity Usage in Appium Testing
Here are a few examples to demonstrate the use of App Activity in Appium Testing:
1. When Testing Different User Flows
Sometimes the Android app may have different flows that a user can go through. This includes Mobile Games which have different flows for different users depending on their game level for example. To do this, we can use a set of conditional statements:
Kotlin
if (userFlow.equals("flowA")) {
capabilities.setCapability("appActivity", "com.example.sampleapp.ActivityA")
} else if (userFlow.equals("flowB")) {
capabilities.setCapability("appActivity", "com.example.sampleapp.ActivityB")
}
|
2. Navigating To A Specific Screen
To allow the test to be executed on a specific screen, the Appium Screen can be configured like this:
Kotlin
capabilities.setCapability("appActivity", "com.example.sampleapp.LoginActivity")
|
The test here will thus execute at the Login Screen that is represented by LoginActivity. This eliminates any redundant Navigation.
3. When Testing Specific Functionality
Not only is it possible to test the specified screen but also possible to test specific functionality. For example, the Login/Logout functionality on a specified screen could be tested as shown:
Kotlin
driver.findElementById("logoutButton").click()
capabilities.setCapability("appActivity", "com.example.sampleapp.LoginActivity")
|
Best Practices for Managing App Activity in Appium
To ensure maximum benefits are gotten out of incorporating App Activity in our Appium Test, here are some of the Best Practices that are worth implementing:
1. Understanding The Android App’s Structure
Before diving into the test, it is important to understand the structure of the Android app. This helps understand what to test as well as what Activities are involved. This also aids in configuring the UI Test.
2. Accommodate Cross-Platform Testing
If the app supports both Android and iOS, then it may be useful to configure the UI Test to reflect that. This could be done by specifying the Activity settings for each. This will result in seamless testing despite the platform.
3. Documentation
Documentation helps in a variety of ways. These include promoting the readability of the UI Tests to newer developers as well as staying updated with any changes to the test configurations. Ensure that the documentation is well-structured and easily readable.
4. Implement Error Handling
A good practice could be to implement error-handling mechanisms. These are usually set up when the Android app is anticipated to encounter different types of errors even during testing. When correctly done, it provides a better and more seamless testing experience.
5. Review and Update
As the Android app evolves keep updating the test configurations via the Appium Script. A good update to consider could be the Activity Settings. This aids in maintaining consistency during testing.
6. Encapsulate The Desired Capabilities
When configuring the UI Test, it is good practice to do it in a separate Class or something similar. This type of encapsulation separates the test configurations from other parts of the test structure. The result of this would be a highly reusable and maintainable Appium Test configuration.
7. Utilize Descriptive Nomenclature
In addition to Documentation, the use of descriptive names for our Activities helps support readability. At first glance, any developer should be able to understand what a given Activity represents. This could be easily done by naming them based on what they do or represent for example: NotificationsActivity as being in charge of the Notifications functionality of the app.
Conclusion
Appium is instrumental in mobile app testing by interacting directly with the app’s components to simulate real-life user flows. It takes advantage of the appActivity attribute to identify the activity (screen) it begins its testing process. This article has discussed the definition of appActivity in Appium, how the two interact, as well as best practices when configuring appActivity in Appium during Mobile App Testing through a sample UI Test using Appium and UIAutomator2.
Share your thoughts in the comments
Please Login to comment...