How to handle Basic Auth in Postman using Express.
Last Updated :
20 Dec, 2023
Authentication plays an important role in web development and API testing by making sure that only authorized individuals can access sensitive information or perform specific actions. Postman is a tool used for API development and testing. It offers support for managing different authentication methods such as Basic Auth and OAuth. In this article, we will delve into the ways of handling authentication in Postman.
Postman is an API(application programming interface) development tool that helps to build, test and modify APIs. Almost any functionality that could be needed by any developer is encapsulated in this tool. It can make various types of HTTP requests(GET, POST, PUT, PATCH), save environments for later use, and convert the API to code for various languages(like JavaScript, and Python).
Prerequisites:
Steps to use basic authentication API:
Step 1: In the first step, we will create the new folder by using the below command in the VScode terminal.
mkdir folder-name
cd folder-name
Step 2: After creating the folder, initialize the NPM using the below command. Using this the package.json file will be created.
npm init -y
Step 3: Install the following packages using npm.
npm install express
npm install bcrypt
npm install jsonwebtoken
npm install mongoose
npm install dotenv
Project Structure:

The updated dependencies in package.json file will look like:
"dependencies": {
    "bcrypt": "^5.1.1",
    "dotenv": "^16.3.1",
    "express": "^4.18.2",
    "jsonwebtoken": "^9.0.2",
    "mongoose": "^7.6.5",
}
Step 4: Create a Schema inside a file named “user.js” using mongoose and put it inside a models folder.
Step 5: Next to connect mongoDB database to save user data, Create a config file named “configdb.js” inside a folder named config.
Step 6: Next create a controller folder and inside it create a file “userController.js” and write the controllers for the login and registration pages.
Step 7: Create a routes folder and inside it create a file named “userRoutes.js” and create routes inside it.
Step 8: create a “.env” in your root directory and put the following content in it.
PORT = 8000 //port you want want to run your http server
URI = "mongodb://localhost:27017" //your mongoDB connection string
JWT_SECRET_KEY = "dsdtgrt8t7r45etewfditw4r" //Any random string
Step 9: Create a new file name “app.js” in the root directory and inside it create a basic http server and connect your database with the application.
Example: Write the following code in respective files.
Javascript
import mongoose from "mongoose";
const userSchema = new mongoose.Schema({
name: { type: String, required: true, trim: true },
email: { type: String, required: true, trim: true },
password: { type: String, required: true, trim: true },
tc: { type: Boolean, required: true },
});
const userModel = mongoose.model("user1", userSchema);
export default userModel;
|
Javascript
import mongoose from "mongoose";
const connectdb = async (DATABASE_URI) => {
try {
const DB_OPTIONS = {
dbName: "mydb",
};
await mongoose.connect(DATABASE_URI, DB_OPTIONS);
} catch (err) {
console.log(err);
}
};
export default connectdb;
|
Javascript
import userModel from "../models/user.js";
import transporter from "../config/emailConfig.js";
import bcrypt from "bcrypt";
import jwt from "jsonwebtoken";
import dotenv from "dotenv";
dotenv.config();
class userControl {
static userRegistration = async (req, res) => {
const { name, email, password, confirmPassword, tc } = req.body;
const user = await userModel.findOne({ email: email });
if (user != null) {
res.send({ status: "error", message: "email already exist" });
} else {
if (name && email && password && confirmPassword && tc) {
if (password === confirmPassword) {
let doc;
try {
const salt = await bcrypt.genSalt(10);
const hashPassword = await bcrypt.hash(password, salt);
doc = new userModel({
name: name,
email: email,
password: hashPassword,
tc: tc,
});
await doc.save();
const saved_user = await userModel.findOne({ email: email });
const token = jwt.sign(
{ userId: saved_user._id },
process.env.JWT_SECRET_KEY,
{ expiresIn: "5d" }
);
res.send({
status: "success",
message: "registration success",
token: token,
});
} catch (err) {
console.log(err);
res.send({ status: "error", message: "enable to register" });
}
} else {
res.send({ status: "error", message: "password donot match" });
}
} else {
res.send({ status: "error", message: "all fields required" });
}
}
};
static userLogin = async (req, res) => {
try {
const { email, password } = req.body;
if (email && password) {
const user = await userModel.findOne({ email: email });
if (user != null) {
const isMatch = await bcrypt.compare(password, user.password);
if (isMatch) {
const token = jwt.sign(
{ userId: user._id },
process.env.JWT_SECRET_KEY,
{ expiresIn: "10d" }
);
res.send({
status: "success",
message: "login success",
token: token,
});
} else {
res.send({
status: "error",
message: "your credentials are wrong",
});
}
} else {
res.send({
status: "error",
message: "your credentials are wrong",
});
}
} else {
res.send({
status: "error",
message: "please enter the required field",
});
}
} catch (err) {
console.log(err);
}
};
export default userControl;
|
Javascript
import express from "express";
import userControl from "../controllers/userController.js";
const router = express.Router();
router.post("/register", userControl.userRegistration);
router.post("/login", userControl.userLogin);
export default router;
|
Javascript
import dotenv from "dotenv";
import express from "express";
import connectdb from "./config/connectdb.js";
import userRoutes from "./routes/userRoutes.js";
dotenv.config();
const app = express();
app.use(express.json());
app.use("/api/user/", userRoutes);
const port = process.env.PORT;
const uri = process.env.URI;
connectdb(uri);
app.listen(port, () => {
console.log("app is running...");
});
|
Step to run your application by using following command:
node app.js
Basic Auth in Postman:
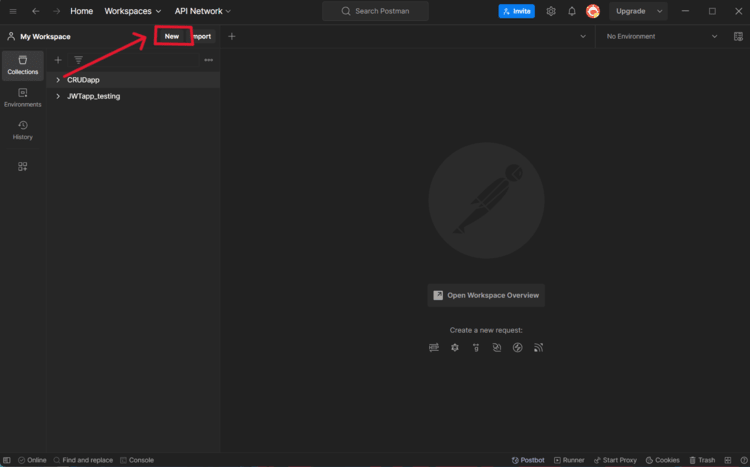
Step 1: Open Postman and create a new request by clicking the “new” button on the top left corner
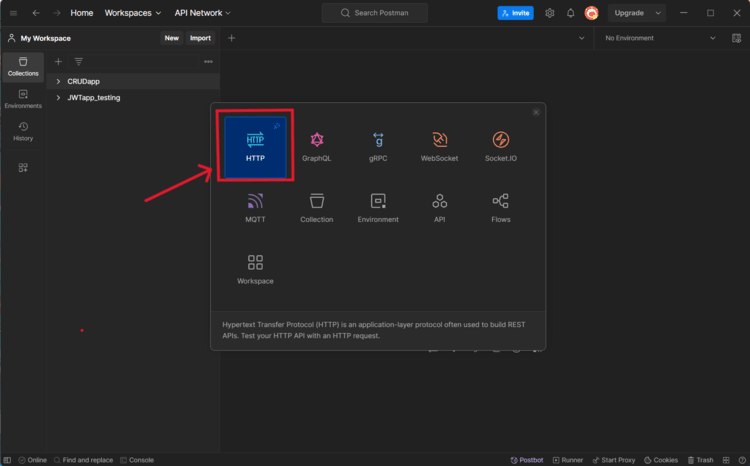
Step 2: Now select the “HTTP” option or type of technology you are using to build your API.
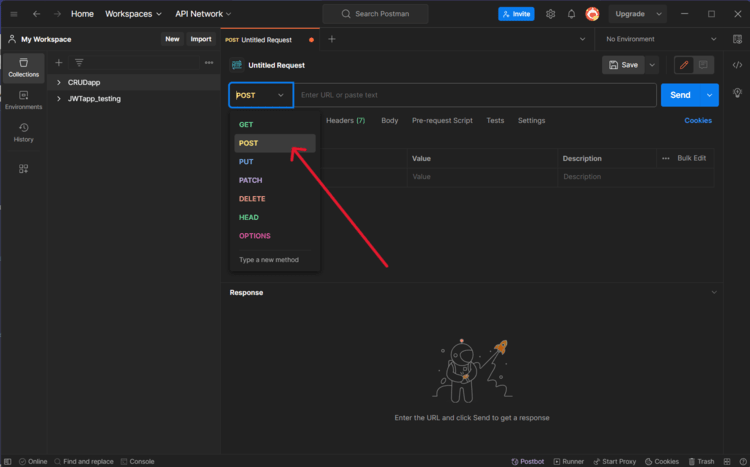
Step 3: Then select the “POST” request in the type of request.
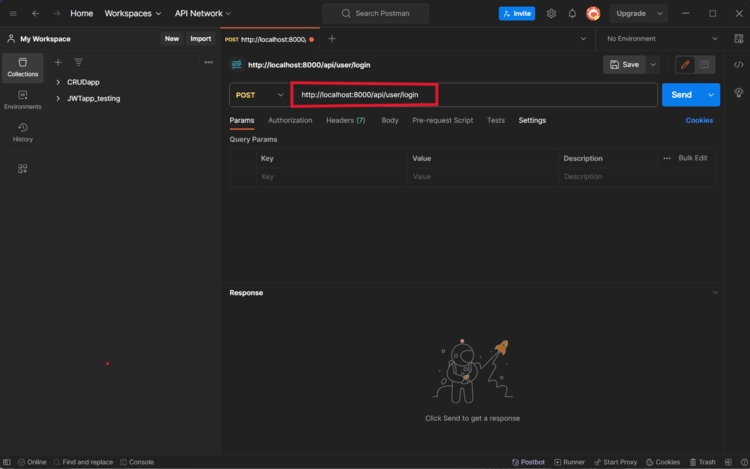
Step 4: Enter your authentication page endpoint in the URL bar.
For example: “http://localhost:8000/api/user/login”
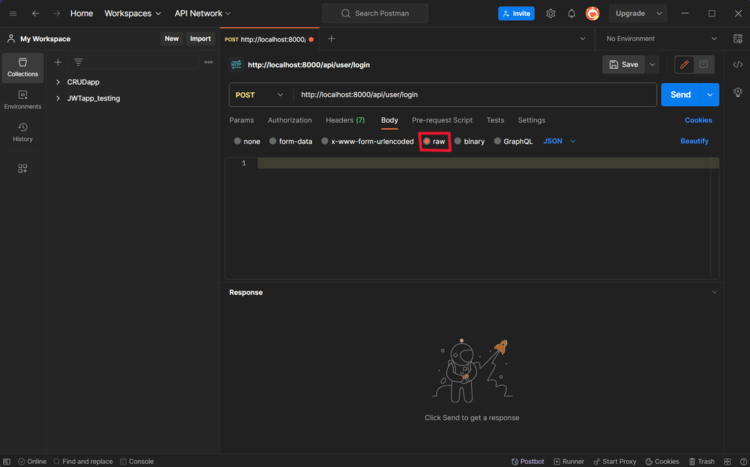
Step 5: Now go to the body section and select “raw” to send the data and check authentication.
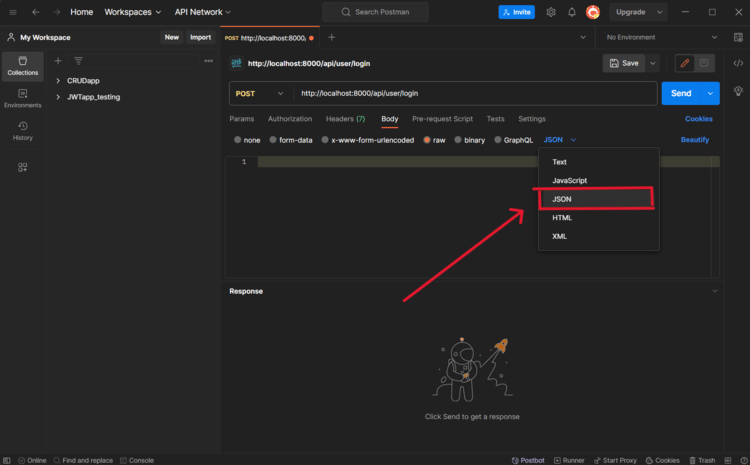
Step 6: Select JSON as the format to sending the data to backend.
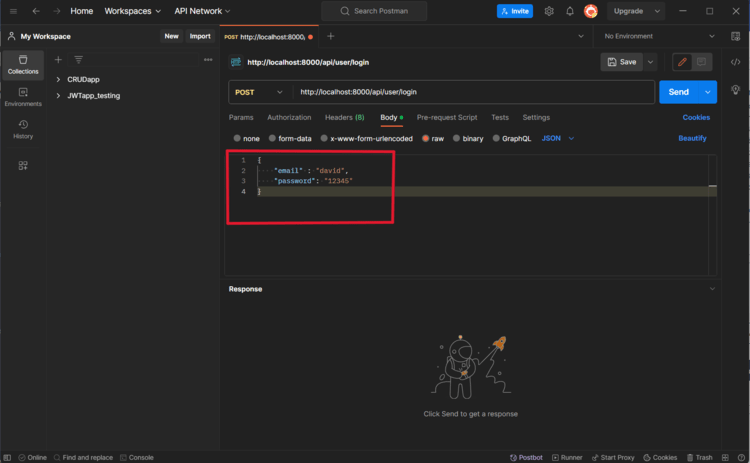
 Step 7: Enter your authentication details in the JSON format.
for example:
Javascript
{
"email" : "david",
"password": "12345"
}
|
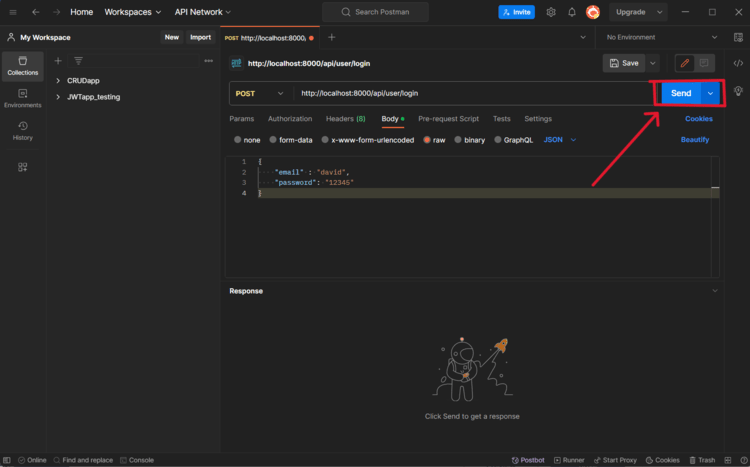
Step 8: Now click on “send” button to send the request to backend.
Effectively handling authentication mechanisms like Basic Auth in Postman is crucial for API development and testing. By following the above steps developers can test their application authentication endpoint. Postman provide a user friendly interface for developers to do streamline authentication testing.
Share your thoughts in the comments
Please Login to comment...