How to edit an existing GitHub project in PyCharm?
Last Updated :
06 Dec, 2023
PyCharm, a renowned integrated development environment (IDE), has earned its place as a favorite among Python developers. Developed by JetBrains, it is tailored to meet the specific needs of Python programmers. One of the many features that make PyCharm indispensable for Python developers is its seamless integration with Version Control systems. In this article, we will explore the integration of Version Control in PyCharm, highlighting the essential aspects that empower developers to efficiently manage their Python projects and collaborate with others.
How to edit an existing project in PyCharm?
Editing an existing project in PyCharm is a fundamental skill for developers looking to make changes or improvements to their Python projects. Here’s a step-by-step guide to walk you through the process:
Step 1: Clone the Repository From GitHub
Before you can start editing an existing project, you need to get your hands on the project’s source code. To do this, you can clone the GitHub repository where the project is hosted. Use the following command in your terminal:
git clone <repository_URL>
It’s important to note that if you haven’t already configured your Git identity with your name and email address, you should do this first. You can set your name and email using the following commands:
git config --global user.name "Your Name"
git config --global user.email "your.email@example.com"
Step 2: Open PyCharm
Launch the PyCharm Integrated Development Environment (IDE) on your computer. Upon launching, you should be greeted with the PyCharm welcome screen.
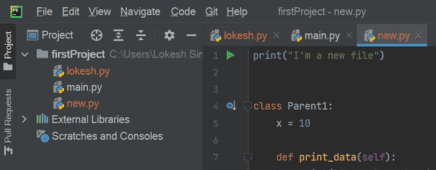
PyCharm
Step 3: Open Cloned Project Directory
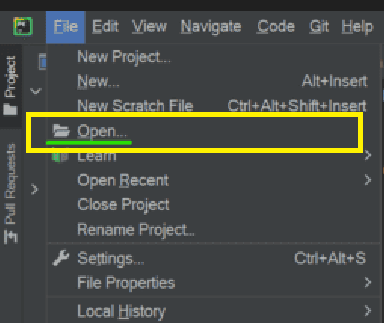
Assuming you are on the welcome screen, you can proceed by clicking the “Open” button. This action will prompt a file explorer dialog. Use this dialog to navigate to the directory where your existing project is located. Once you’ve located the project folder, select it and click “Open.”
PyCharm, by default, opens the most recently worked-on project when you launch the application. If the project you want to edit was the last one you were working on, it should already be open.
Open Project
Step 4: Configure Project Interpreter (if needed)
In some cases, your project may rely on a specific Python interpreter or virtual environment. If this is the case, PyCharm will prompt you to configure it. You have the option to choose an existing interpreter or create a new virtual environment tailored to your project’s requirements.
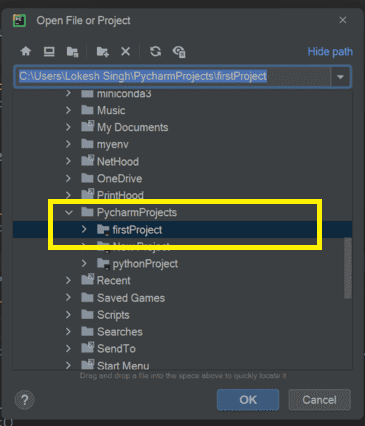
Select Your Folder
Step 5: Open Project
After you’ve selected the project folder and, if necessary, configured the interpreter, PyCharm will proceed to open your existing project. Upon doing so, you’ll gain access to the project’s files and directory structure, all neatly displayed in the Project tool window.
-(1).png)
Navigate to your clone Project Directory and after selecting press “OK”.
Step 6: Edit Files
Once you have cloned the project from GitHub, you can start working on it. To do so, navigate through your project’s files and directories in the Project tool window, typically located on the left side of your PyCharm interface. You can open and edit files simply by double-clicking on them. This opens the selected file in the PyCharm code editor, allowing you to make changes.
Step 7: Save Changes
It’s crucial to save your changes regularly to ensure that your progress is not lost. You can save your work by pressing Ctrl + S (or Cmd + S on macOS) or by using the “File > Save” option in the top menu. PyCharm also often auto-saves your changes, but it’s a good practice to save manually, especially before running your code or switching between different files.
Click on ok
Step 8: Push Changes in GitHub from PyCharm (If needed)
To push the changes of your project to GitHub from PyCharm, you can utilize various Git commands in the PyCharm Terminal. Here’s a detailed explanation of the process:
- First Check the Status .
- Then Add Changes to Staging Area.
- After that Commit the Changes.
- As per your convenience Set Up the Remote Repository.
- If needed Set the Default Branch for repository
- After finally Push the Changes to GitHub.
git status
git add "filename"
git commit -m "Your commit message"
git remote add origin git@github.com:Github_username/github_reponame.git
git branch -M main
git push -u origin main
If you are not creating a new repository and have already set up your remote repository, you can use a shorter version to push your changes:
- Add Changes to Staging Area.
- Commit the Changes.
- Push the Changes.
git add "filename"
git commit -m "Your commit message"
git push
These steps allow you to push changes to your GitHub repository directly from your PyCharm terminal.
To keep your local repository up to date with changes made by other collaborators on GitHub, you should periodically pull those changes. You can do this by right-clicking the repository in PyCharm and selecting “Pull,” or by using the “Pull” button in the Git tool window. This ensures that your local codebase reflects the latest changes made by others, allowing you to work with the most current code in your existing project in PyCharm.
Share your thoughts in the comments
Please Login to comment...