Kubernetes cluster is a set of nodes that execute applications within containers. Clusters consist of a master node and several worker nodes. These nodes could be physical computers or virtual machines. It depends on the configuration of the cluster. The master node manages and coordinates the worker node. The worker nodes are responsible for executing tasks and running containerized applications by the master node’s directions.
steps needed to deploy Kubernetes on CentOS. We will install container runtime, install Kubernetes on CentOS, create Kubernetes Cluster, and connect Worker nodes to the cluster.
Install Container Run Time On Master Node And Each Worker Node
First of all, for installing Kubernetes, we need to have one of the container runtime services. In this tutorial, we will use Containerd. Containerd is a container runtime that manages the lifecycle of a container virtual machine. It is a process, which creates, starts, stops, and destroys containers. It is also can download container images from container registries, mount storage, and enable networking for a container.
There are no containerd packages in the default CentOs repository and because of that, we need to add this package. For adding it we need to execute the following command.
sudo yum install -y yum-utils && sudo yum-config-manager --add-repo
https://download.docker.com/linux/centos/docker-ce.repo
After adding containerd package to the repository we can install cntainerd service using the “yum” package management tools. For that, we will run the following command, where “yum-utils” – dependency for correct work containerd. And after successful installation, we need to remove auto-generated the config file “config.toml”. This is necessary to avoid errors when starting kubernetes in feature.
sudo yum install -y yum-utils containerd.io
&& rm -I /etc/containerd/config.toml
For now, the containerd was successfully installed but it has not yet been launched. Also, we need to enable our service to autostart after a system reboot. For that, we need to run the following command.
sudo systemctl enable containerd && sudo systemctl start containerd
After executing the previous command we will check that service is active and successfully running. This command will show you the status of your service.
sudo systemctl status containerd
.png)
Install And Configure Kubernetes On Master Node And Each Worker Node.
First of all, we need to add the Kubernetes package to the CentOs directory, because it is also absent in the default CentOS package. For this, we create a new file (use Vim or Nano text editor) and add the following content to the file.
In this example, we will use a nano text editor. First of all install nano editor if it is not already installed and then create the file.
sudo yum install nano -y
sudo nano /etc/yum.repos.d/kubernetes.repo
Paste following content to the file.
[kubernetes]
name=Kubernetes
baseurl=https://packages.cloud.google.com/yum/repos/kubernetes-el7-x86_64
enabled=1
gpgcheck=1
repo_gpgcheck=1
gpgkey=https://packages.cloud.google.com/yum/doc/yum-key.gpg
https://packages.cloud.google.com/yum/doc/rpm-package-key.gpg
Explanation About the Above Code
- Baseurl: URL from where the package manager pulls the Kubernetes packages.
- enabled: Indicate that repository is enabled and can be used for package installations and updates.
- gpgcheck: Indicate that the package manager will verify the GPG signatures of the packages.
- repo_gpgcheck: Ensures that the repository is trusted and gpgkey should be checked.
- gpgkey: URLs where the GPG keys located
Once pasted, press Ctrl+O, then Enter to save it. Then press Ctrl+X to exit.
After adding the Kubernetes package to the CentOs directory we can now install kubernetes services. For that, we need to execute the following command.
sudo yum install -y kubelet kubectl kubeadm
Where kubelet is needed for running and managing containers in s Kubernetes cluster. Kubectl needed to cooperate with a Kubernetes cluster. Kubeadm is needed for bootstrapping the new cluster. After the execution command, you will see that all three services are successfully installed.

In the next step, we will change our VMs’ names. This is necessary for a convenient understanding of our hostname. On Master Node we need to execute the following command:
sudo hostnamectl set-hostname master-node
On Worker Node-1 we need to execute the following command:
sudo hostnamectl set-hostname worker-node-1
On Worker Node-2 we need to execute the following command:
sudo hostnamectl set-hostname worker-node-2
Change your “hosts” file and add IP address and your new hostname from previous commands to the end of the file.
sudo nano /etc/host
In order to be sure that nothing will interfere with the Kubernetes work, we need to disable the swap. Because kubernetes will manage memory when running containers.
sudo sed -i '/swap/d' /etc/fstab
sudo swapoff -a
Also, we need to disable SELinux to avoid any potential conflicts or issues that may arise during the installation process. For that execute the following commands.
sudo setenforce 0
sudo sed -i 's/^SELINUX=enforcing$/SELINUX=permissive/' /etc/selinux/config
After the previous command, we also need to enable br_netfilter kernel module so that the packets, that passing through the bridge, will beprocessed by iptables for filtering and for port forwarding, and the kubernetes pods across the cluster could communicate with each other.
echo '1' > /proc/sys/net/ipv4/ipforward
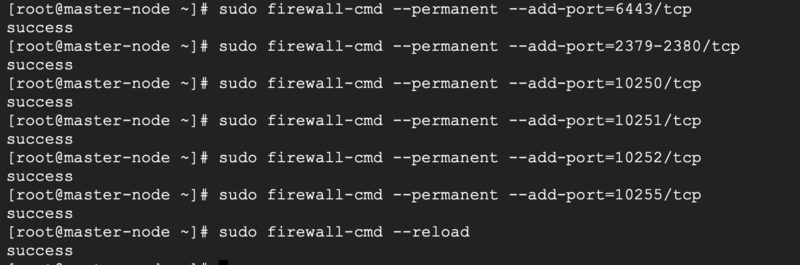
Fire Wall Rules on Master Node
For persistent communication between virtual machines, pods, and containers, we need to add new firewall rules.
sudo firewall-cmd --permanent --add-port=6443/tcp
sudo firewall-cmd --permanent --add-port=2379-2380/tcp
sudo firewall-cmd --permanent --add-port=10250/tcp
sudo firewall-cmd --permanent --add-port=10251/tcp
sudo firewall-cmd --permanent --add-port=10252/tcp
sudo firewall-cmd --permanent --add-port=10255/tcp
sudo firewall-cmd --reload
Fire Wall On Worker Node
As well as we need to add firewall to worker nodes also.
sudo firewall-cmd --permanent --add-port=10251/tcp
sudo firewall-cmd --permanent --add-port=10255/tcp
sudo firewall-cmd --reload
Deploy Kubernetes Cluster
The first thing we have to do is initialize a cluster.On Master Node execute the following command.
sudo kubeadm init --pod-network-cidr=192.168.0.0/16
Where “–pod-network-cidr” defines the IP address range that is assigned to individual pods within the cluster.
Network Used
In this tutorial, we use the Calico virtual network. If 192.168.0.0/16 is already in use within your network or you want to use custom virtual network, you must select a different pod network CIDR, replacing 192.168.0.0/16 in the above command You can choose it on official Kubernetes web site. After executing the command we will see that our Kubernetes control plane has initialized successfully.
Also, we need to enable for auto start service after rebooting and check the kubelet status to make sure that the service status is Active.
sudo systemctl enable kubelet && sudo systemctl status kubelet

For managing the Kubernetes cluster we need to create a folder to store kubernetes configuration files, copy already generated (from previous command) config file, and then change permissions.For that, we need to execute the following commands.
mkdir -p $HOME/.kube
sudo cp -i /etc/kubernetes/admin.conf $HOME/
.kube/config && sudo chown $(id -u):$(id -g) $HOME/.kube/config
- mkdir: create new folder
- cp: copy configuration file to the folder from the previous command.
- chown $(id -u):$(id -g): set the user and group ownership to the current user.
After adding the configuration file we need to set up the network pod. Pods in the cluster are connected to each other via Pod Network.For this scenario, we use the Calico pod network. Use the following commands to download and install Calico the Pod Network.
If you use a different virtual network, please change “https://raw.githubusercontent.com/projectcalico/calico/v3.25.1/manifests/calico.yaml -O” and “calico. yaml” in the second command to yours.
curl https://raw.githubusercontent.com/projectcalico
/calico/v3.25.1/manifests/calico.yaml -O
sudo kubectl apply -f calico.yaml
After applying the configuration file from the previous command we can check the status of our node. To verify status of our node, we will run the following command on Master Node.
sudo kubectl get nodes
Also, let’s confirm that each service has a running status.
sudo kubectl get pods --all-namespaces
As we can see the status of our Master Node is Ready and all our services have running status.
Join Worker Node to the Cluster
For this, we need to generate a join command. To get it, execute the following command on Master Node.
sudo kubeadm token create --print-join-command
After that, run generated result command from the previous step on each Worker Node.
As we can see our Worker node is successfully connected. And we can check the status of our Worker node on the Master node. For that, we need to execute the following command on the Master node.
sudo kubectl get nodes
Share your thoughts in the comments
Please Login to comment...