Kubernetes is an open-source container orchestration framework that was originally developed by Google.Container orchestration is automation. It can facilitate you to deploy the identical application across different environments like physical machines, virtual machines or cloud environments, or perhaps hybrid deployment environments and makes it easier for the management, scaling, and networking of containers.
The original name for Kubernetes (originates from Greek) within Google was Project 7. Within the year 2014 Kubernetes was released for the primary time and made open-sourced too after using it to run production workloads at scale for quite a decade. Also, pure open-source Kubernetes is free and might be downloaded from its repository on GitHub.
It is pronounced as “koo-burr-NET-eez”. It’s also referred to as k8s (k – eight characters – s), derived by replacing the eight letters with the digit 8.
Containers in Kubernetes
Kubernetes is an container orcherstration platform by which you can automate the deployment of the application , scaling of the application by depending on the traffic. Container are light in weight which can be portable very easily form one server to the another server very easily following makes ideal for running containerized applications in production.
- Load Balancing
- Service Discovery
- Self-healing
- Horizontal scaling
Containerization Using Kubernetes
Containerization Using Kubernetes is the way of deploying you microservices or monolithic application using container orchestration tool kubernetes. Kubernetes is the best tool to deploy the application in the form of containers because it offers so many features like load balancing, self healing and scaling.
Containerize an application first you need to build the image of the application which can be done by using the docker and it contains all the dependencies required for the application to deploy into the production server after building the image know you need to push the image into the docker-hub registry from where other or kubernetes can pull the image.
Know you need to create the manifest file in the kubernetes to deploy your application in the form of container you can deploy the application by using which kind you want for examples you can use the Deployment.yaml, Demonset.yaml and so on.
Following is the sample manifest file of deployment
apiVersion: apps/v1
kind: Deployment
metadata:
  name: my-deployment
spec:
  replicas: 3
  selector:
    matchLabels:
      app: my-app
  template:
    metadata:
      labels:
        app: my-app
    spec:
      containers:
      - name: my-app
        image: my-app:latest
Using the kubectl apply command, you can deploy your application to Kubernetes after creating the deployment manifest. The resources required to execute your application, including as pods, kubernetes services, and deployments, will then be created by Kubernetes.
kubernetes Container Types
Following are the some of the types of containers supported by the kubernetes:
- Docker containers: Docker is the mostly used container runtime and also it is the default container runtime until the kubernetes deprecated docker.
- Podman containers: Podman is the similar to the Docker which is used to run and manage the containers and It is available on Linux and Windows.
- CRI-O containers: CRI-O is a container runtime that is optimized for Kubernetes. It is the default container runtime for Red Hat OpenShift.
- Containerd containers: Containerd in simple terms is a container runtime that is, Containerd is a software responsible for running and managing containers on a host system.
Along with LXC and rkt, Kubernetes also supports various container runtimes. These container runtimes are not as popular, though, as the ones mentioned above.
Container Technology
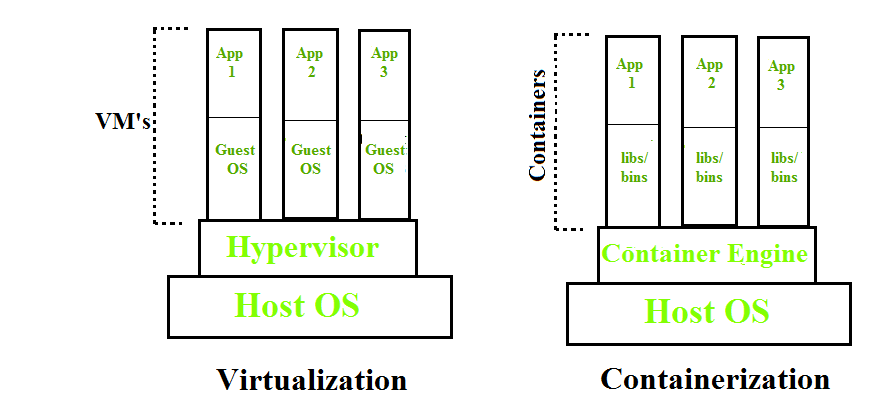
Containerization is OS-based virtualization that creates multiple virtual units in the userspace, known as Containers. Containers share the same host kernel but are isolated from each other through private namespaces and resource control mechanisms at the OS level. Container-based Virtualization provides a different level of abstraction in terms of virtualization and isolation when compared with hypervisors. Hypervisors use a lot of hardware which results in overhead in terms of virtualizing hardware and virtual device drivers. A full operating system (e.g -Linux, Windows) runs on top of this virtualized hardware in each virtual machine instance.
But in contrast, containers implement isolation of processes at the operating system level, thus avoiding such overhead. These containers run on top of the same shared operating system kernel of the underlying host machine and one or more processes can be run within each container. In containers you don’t have to pre-allocate any RAM, it is allocated dynamically during the creation of containers while in VMs you need to first pre-allocate the memory and then create the virtual machine. Containerization has better resource utilization compared to VMs and a short boot-up process. It is the next evolution in virtualization.
Containers can run virtually anywhere, greatly easy development and deployment: on Linux, Windows, and Mac operating systems; on virtual machines or bare metal, on a developer’s machine or in data centers on-premises; and of course, in the public cloud. Containers virtualize CPU, memory, storage, and network resources at the OS level, providing developers with a sandboxed view of the OS logically isolated from other applications. Docker is the most popular open-source container format available and is supported on Google Cloud Platform and by Google Kubernetes Engine.
Container images
Image is an executable package of software that includes everything needed to run an application. This image informs how a container should instantiate, determining which software components will run and how. Container is a virtual environment that bundles application code with all the dependencies required to run the application. The application runs quickly and reliably from one computing environment to another.
Container registries, which are centralised repositories of container images, are where container images are kept. Docker Hub, Amazon Elastic Container Registry (ECR), and Google Container Registry (GCR) are a few well-known container registries.
Kubernetes Pods
A pod is the smallest unit that exists in Kubernetes. It is similar to that of tokens in C or C++ language. A specific pod can have one or more applications. The nature of Pods is ephemeral this means that in any case if a pod fails then Kubernetes can and will automatically create a new replica/ duplicate of the said pod and continue the operation. The pods have the capacity to include one or more containers based on the requirement. The containers can even be Docker containers. The Pods in Kubernetes provide environmental dependencies which include persistent storage volumes which means it is permanent and is available to all pods in the said cluster and even configuration data that is required to run the container within the pod.
To know more about kubernetes pods refer to Kubernetes – Pods
Features of Kubernetes Containers
Following are the various features or characteristics of Kubernetes:
- Multi-Host Container Scheduling: Done by Kube-scheduler, it assigns containers, also referred to as pods in Kubernetes to nodes at runtime. It accounts for resources, quality of service, and policies before scheduling.
- Scalability and availability: The Kubernetes master is often deployed during a highly available configuration. Multi-region deployments are available as well.
- Flexibility and modularization: Kubernetes includes a plug-and-play architecture that permits you to increase it when you need to. There are specific add-ons from network drivers, service discovery, container runtime, visualization, and command. If there are tasks that you need to perform for your environment specifically, you’ll be able to create an add-on to suit your needs.
- Registration: New worker nodes can register themselves with the Kubernetes master node.
- Service discovery: Service discovery allows for automatic detection of new services and endpoints via DNS or environment variables.
- Persistent storage: It is a much-requested feature when working with containers. Pods can use persistent volumes to store data and therefore the data is retained across pod restarts and crashes.
- Maintenance: When it involves Kubernetes maintenance and upgrades, Kubernetes features are always backward compatible for some versions. All APIs are versioned and when upgrading or running maintenance on the host, you’ll unschedule the host so that no deployments can happen thereon. Once you’re done, you’ll simply turn the host back on and schedule deployments or jobs.
- Logging and Monitoring: In terms of logging and monitoring, application monitoring or health checks are also built-in, TCP, HTTP, or container exact health checks are available out of the box. There are also health checks to give you the status of the nodes and failures monitored by the node controller. Kubernetes status can also be monitored via add-ons like Metrics Server, cAdvisor, and Prometheus. And lastly, you can use the built-in logging frameworks or if you choose, you can bring your own.
- Secrets Management: Sensitive data is a first-class citizen in Kubernetes. Secrets mounted to data volumes or environment variables. They’re also specific to a single namespace so aren’t shared across all applications.
Architecture of Kubernetes
The architecture of Kubernetes includes a master node and one or more worker nodes.
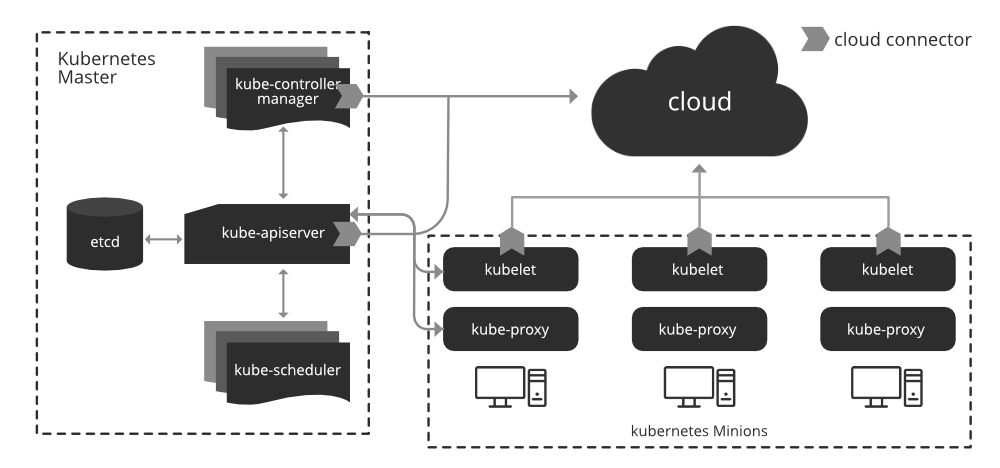
Understanding the Master node:
- Kube-apiserver: a frontend of the cluster that allows you to interact with the Kubernetes API and connects to the etcd database.
- Kube-scheduler: schedules pods on specific nodes supported labels, taints, and tolerations set for pods
- etcd: a database, stores all cluster data which includes job scheduling info, pod details, stage information, etc.
- Kube – controller – manager: manages the current state of the cluster
- cloud – controller – manager: interacts with outside cloud manager
Different optional add-ons: DNS, Dashboard, cluster-level resource monitoring, cluster-level logging
Understanding the Worker node:
We wouldn’t get anywhere without Worker Nodes, though. These Worker Nodes are the Nodes where your applications operate. The Worker Nodes communicate back with the Master Node. Communication to a Worker Node is handled by the Kubelet Process.
- kubelet: passes requests to the container engine to ensure that pods are available
- Kube-proxy: runs on every node and uses iptables to provide an interface to connect to Kubernetes components
- container – runtime: take care of actually running container
- network agent: implements a software-defined networking solution
Containers of an application are tightly coupled together in a Pod. By definition, a Pod is the smallest unit that can be scheduled as deployment in Kubernetes. Once Pods have been deployed, and are running, the Kubelet process communicates with the Pods to check on state and health, and therefore the Kube-proxy routes any packets to the Pods from other resources that might be wanting to communicate with them.
Installing of Kubernetes
In this section, we will learn how to install Kubernetes on the Linux platform. So, follow the given steps for installing the Kubernetes:
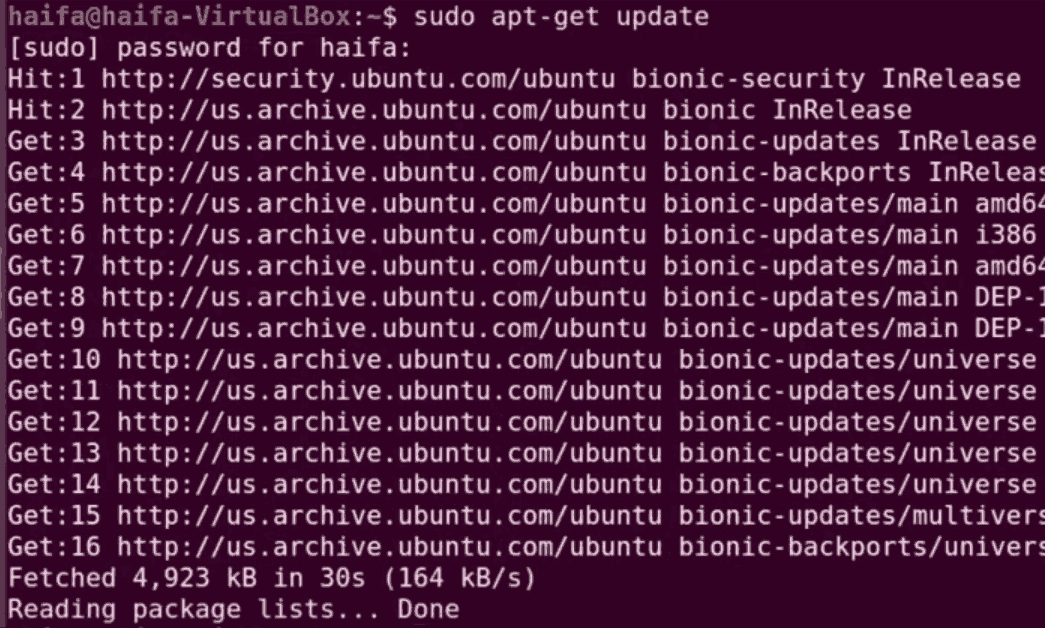
Step 1: First of all, we have to update our apt-get repository.
sudo apt-get update
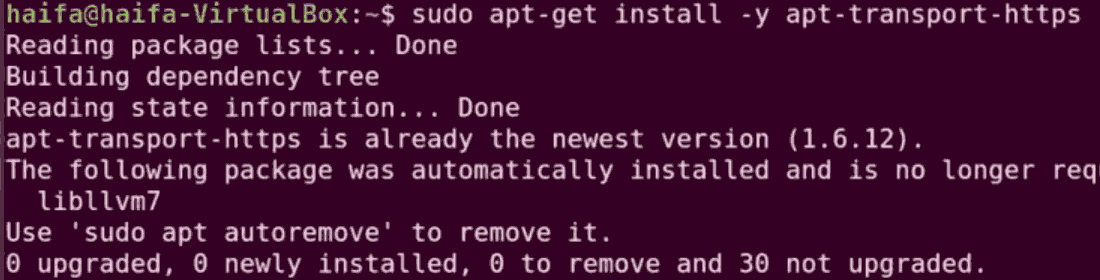
Step 2: Install apt transport HTTPS. This is basically used to make repositories while HTTPS.
sudo apt-get install -y apt-transport-https
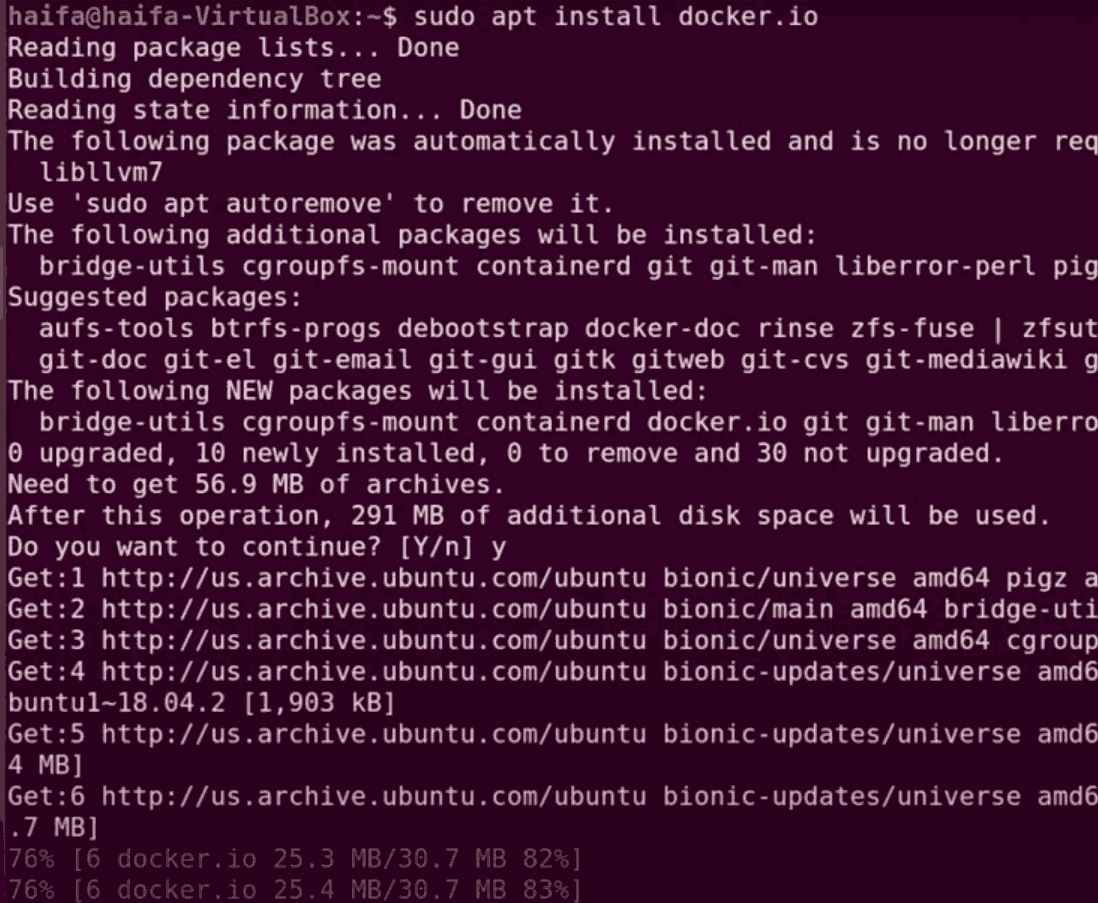
Step 3: Install the docker dependency
sudo apt install docker.io
Step 4: After installing the docker we have to start and enable the docker.
sudo systemctl start docker
sudo systemctl enable docker

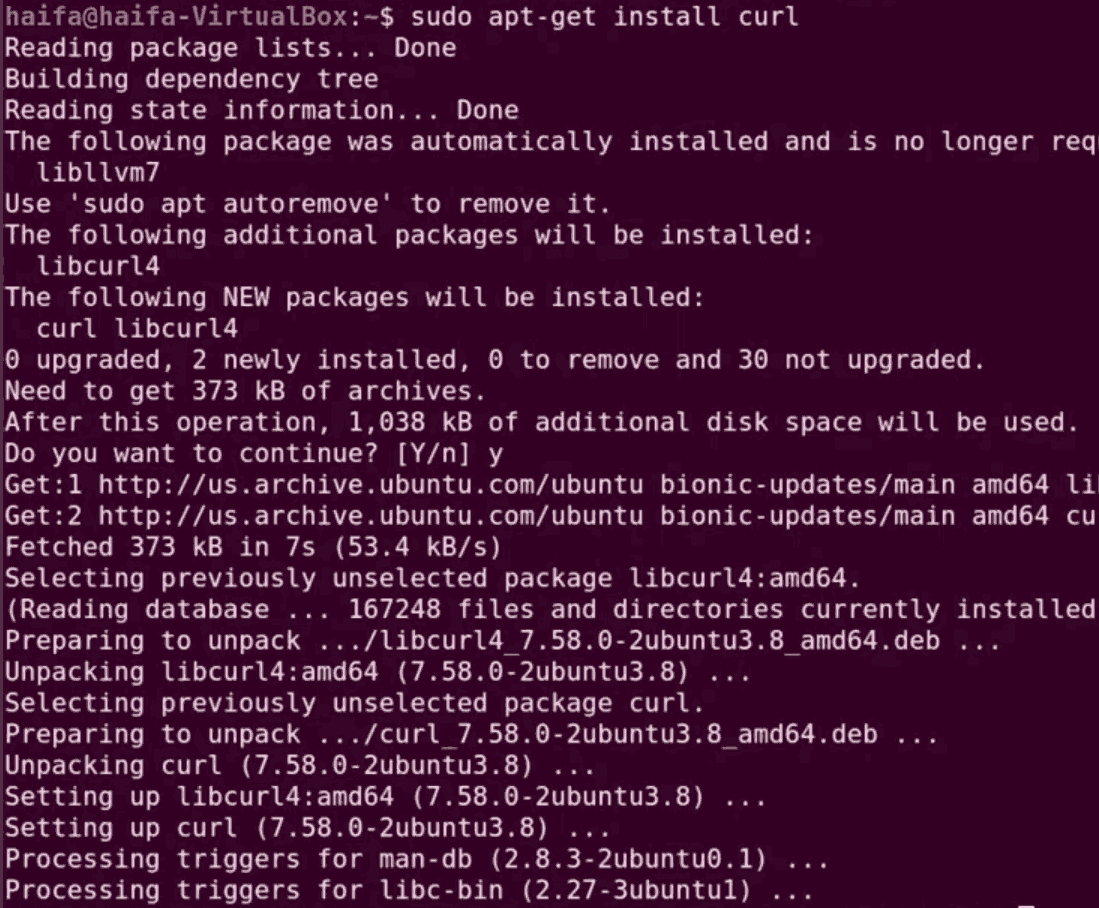
Step 5: We have to install the necessary components for Kubernetes. Before that, we have to install the curl command because the curl command is used to send the data using URL syntax. Let’s install the curl command by:
sudo apt-get install curl
Step 6: Download an add key for Kubernetes installation from a URL.
sudo curl -s https://packages.cloud.google.com/apt/doc/apt-key.gpg | sudo apt-key add

Step 7: We have to add a repository in a certain location.
echo “deb https://apt.kubernetes.io/ kubernetes-xenial main” | sudo tee -a /etc/apt/sources.list.d/kubernetes.list
Step 8: Now check for any updates available.
sudo apt-get update

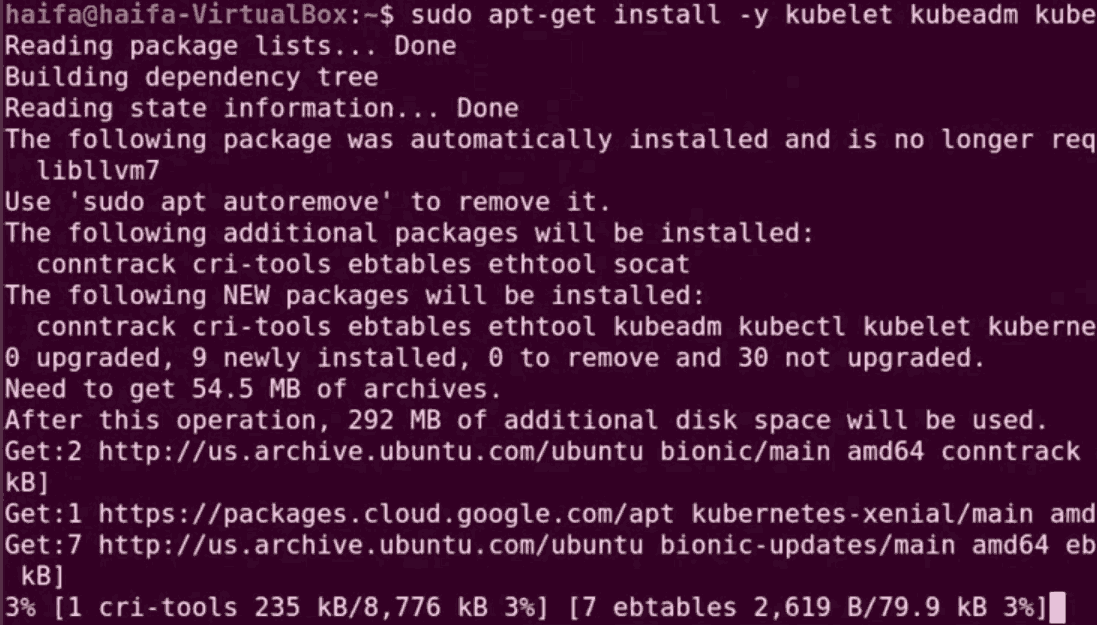
Step 9: Now we are going to install Kubernetes components.
sudo apt-get install -y kubectl kubeadm kubelet kubernetes-cni docker.io
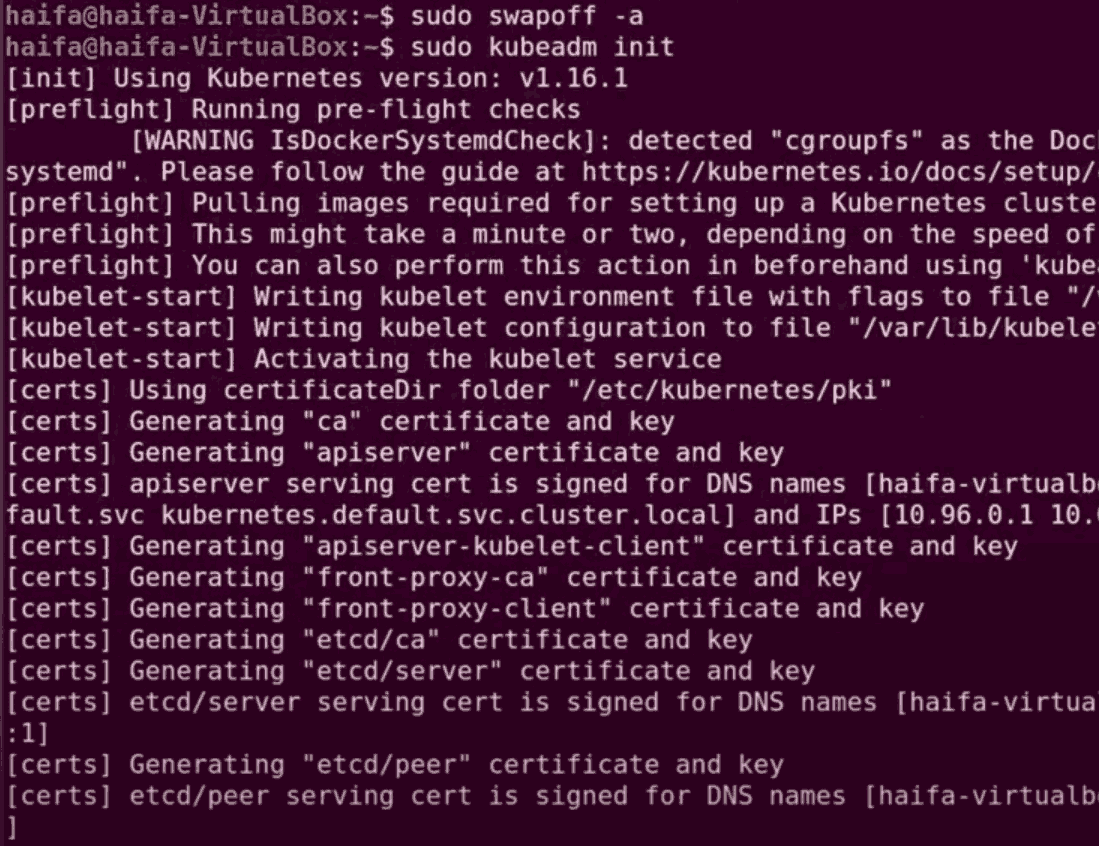
Step 10: We have to initialize the master node and to do this we have to first use a swapoff command to disable the swapping on other devices.
sudo swapoff -a
Step 11: Go ahead with the initialization.
sudo kubeadm init
Step 12: To start using your cluster, you need to run the following as a regular user:
mkdir -p $HOME/.kube
sudo cp -i /etc/kubernetes/admin.conf $HOME/.kube/config
sudo chown $(id -u):$(id -g) $HOME/.kube/config

Step 13: To deploy paths, use the following command:
sudo kubectl apply -f https://raw.githubusercontent.com/coreos/flannel/master/Documentation/k8s-manifests/kube-flannel-rbac.yml

Step 14: To see all the pods you have, use the command:
sudo kubectl get pods --all-namespaces

Advantages Of Kubernetes Containers
- Scalability: Kubernetes allows for easy scaling of applications by increasing or decreasing the number of replicas of a particular service.
- High availability: Kubernetes provides features such as self-healing and automatic failover, which help ensure that applications remain available even in the event of a node failure.
- Portability: Kubernetes is designed to be platform-agnostic, which means that applications can be deployed on any infrastructure, whether it be on-premises, in the cloud, or at the edge.
- Automation: Kubernetes automates many of the tasks associated with deploying and managing applications, such as rolling updates, service discovery, and load balancing.
- Flexibility: Kubernetes allows for the use of multiple orchestration patterns, such as blue-green deployment, canary releases, and A/B testing, which gives developers more flexibility in how they deploy their applications.
Advantages Of Kubernetes Containers
- Complexity: Kubernetes can be complex to set up and manage, especially for organizations that are new to container orchestration.
- Steep learning curve: There is a steep learning curve for understanding how to use Kubernetes effectively, and for troubleshooting issues that may arise.
- Limited native support for certain technologies: Kubernetes does not natively support certain technologies, such as Windows containers, which can create challenges for organizations that use these technologies.
- Networking complexity: Kubernetes networking can be complex, especially when working with multiple clusters or when trying to integrate with existing network infrastructure.
- Higher resource requirements: running a Kubernetes cluster can consume more resources than running a traditional application, which can make it more expensive to operate.
FAQs On Kubernetes Containers
1. Difference Between Kubernetes Container vs Docker Container
Difference between Docker vs kubernetes:
- Docker container:Docker is a container runtime engine that allows you to build, run, and manage containers.
- Kubernetes container: Kubernetes is a container orchestration platform that automates the deployment, scaling, and management of containerized applications.
2. Difference Between Kubernetes Containers vs Pods
- Kubernetes Containers:Containers are the basic unit of computing in Kubernetes.
- Kubernetes Pods: Groups of one or more containers are called pods. They are Kubernetes’ smallest deployable units.
3. Kubernetes Container Logs
Container logs produced by Kubernetes-based containerized applications are known as Kubernetes container logs. These logs can be used for tracking application activity, performance monitoring, and troubleshooting.
Like Article
Suggest improvement
Share your thoughts in the comments
Please Login to comment...