How to Deploy Diabetes Prediction model as FastAPI
Last Updated :
21 Mar, 2024
In this article, we will delve into the process of deploying diabetes prediction models using FastAPI, an acronym for “Application Programming Interface.” FastAPI enables us to predict the likelihood of diabetes in any individual with remarkable precision and efficiency. After developing and setting up this API, the subsequent crucial step involves seamlessly integrating it with our user interface (UI) model, thus empowering us to make accurate and swift diabetes predictions for enhanced healthcare decision-making.
Deploy Diabetes Prediction model as FastAPI
Below are the steps by which we can deploy the diabetes prediction model as FastAPI in Python:
Step 1: Install the Necessary Libraries
We need to install a set of essential libraries to create the FastAPI-based diabetes prediction model. Here’s a step-by-step guide to ensure you have the required tools in your environment:
In building a FastAPI for machine learning models, we rely on several key libraries. FastAPI, serves as the core framework for creating web services, while “uvicorn” efficiently handles HTTP requests for the FastAPI application. The “scikit-learn” library empowers the development of predictive models and data preprocessing, while “requests” facilitates interaction with the FastAPI through HTTP requests. Additionally, “pypi-json,” though less common, can prove useful for handling JSON data exchanged between the API and clients. These libraries collectively lay the foundation for a robust FastAPI that seamlessly integrates with machine learning models.
pip install fastapi
pip install uvicorn
pip install scikit-learn
pip install requests
pip install pypi-json
By following these steps, you’ll set up the necessary environment and tools to create a FastAPI-based API for diabetes prediction. This API can be integrated into your user interface, allowing you to predict the likelihood of diabetes in individuals with ease.
Step 2: Download CSV File
First download the diabetes.prediction.sav file.
Step 3: Create Virtual Environment
First create the virtual environment which is should be our first step to start to create any project and then enter in virtual environment
Step 4: File structure
Below is the required file folder format that we have to make to make our project.
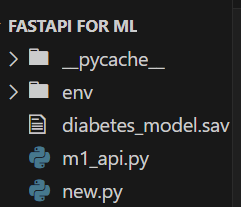
File Structure
Step 5: Write FastAPI Code (m1_app.py)
Import Necessary Libraries:
- The code starts by importing the necessary libraries, including FastAPI for creating a web API, Pydantic for data validation, and the
pickle module for loading a pre-trained machine learning model.
Create a FastAPI App:
- An instance of a FastAPI application is created, named
app. This will serve as the foundation for defining API routes and handling HTTP requests.
Define a Pydantic Model:
- A Pydantic data model named
ModelInput is defined. It specifies the expected format of the input data, including attributes such as ‘Pregnancies,’ ‘Glucose,’ ‘BloodPressure,’ etc., with their respective data types.
Load a Pre-trained Machine Learning Model:
- The code opens and loads a pre-trained machine learning model from a file named ‘diabetes_model.sav‘ using the
pickle module. This model is used to make predictions based on input data.
Define a POST Endpoint for Diabetes Prediction:
- A POST endpoint ‘/diabetes_prediction‘ is defined. It expects input data conforming to the
ModelInput Pydantic model. The input data is used to make a prediction using the loaded machine learning model, and the result is returned as a string indicating whether the person is diabetic or not.
Python3
from fastapi import FastAPI
from pydantic import BaseModel
import pickle
app = FastAPI()
class ModelInput(BaseModel):
Pregnancies: int
Glucose: int
BloodPressure: int
SkinThickness: int
Insulin: int
BMI: float
DiabetesPedigreeFunction: float
Age: int
with open('diabetes_model.sav', 'rb') as model_file:
diabetes_model = pickle.load(model_file)
@app.post('/diabetes_prediction')
def diabetes_pred(input_parameters: ModelInput):
preg, glu, bp, skin, insulin, bmi, dpf, age = (
input_parameters.Pregnancies, input_parameters.Glucose,
input_parameters.BloodPressure, input_parameters.SkinThickness,
input_parameters.Insulin, input_parameters.BMI,
input_parameters.DiabetesPedigreeFunction, input_parameters.Age
)
input_list = [preg, glu, bp, skin, insulin, bmi, dpf, age]
prediction = diabetes_model.predict([input_list])
if prediction[0] == 0:
return 'The Person is not Diabetic'
else:
return 'The person is Diabetic'
|
after write the code run the command
uvicorn m1_app:app
Then your API is successfully generated for check the API is generated or not create a new file
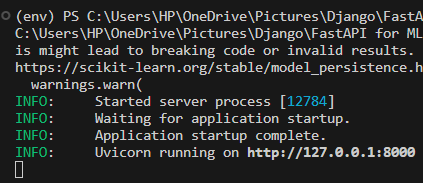
FastAPI run successfully
Step 6: Write Python File (new.py)
In this step, we are writing our code that will be used to receive the response and also to convert our input format to required json format.
new.py
- Import Libraries: The code begins by importing the ‘json‘ and ‘requests’ libraries. These libraries will be used for working with JSON data and making HTTP requests.
- Define URL: The ‘url‘ variable is set to ‘http://127.0.0.1:8000/diabetes_prediction‘, which is the endpoint where a diabetes prediction model is hosted. This URL will be used to send data to the model for prediction.
- Prepare Input Data: The ‘input_data_for_model‘ dictionary contains several input features for the diabetes prediction model, such as ‘Pregnancies,’ ‘Glucose,’ ‘BloodPressure,’ and so on. These values will be used as input to the model for making predictions.
- Convert to JSON: The ‘input_data_for_model‘ dictionary is converted into a JSON-formatted string using the ‘json.dumps()’ function and stored in the ‘input_json‘ variable. This step is necessary because the model expects the input data in JSON format.
- Make a POST Request: A POST request is sent to the specified ‘url’ with the JSON data in the ‘input_json’ variable. The response from the model is stored in the ‘response’ variable, and the content of the response is printed to the console using ‘print(response.text)’.
After writing the code put the values of the parameter according to dataset and simply run the file then you can get your result the person is diabetic or not .
Python3
import json
import requests
input_data_for_model = {
"Pregnancies": 6,
"Glucose": 148,
"BloodPressure": 72,
"SkinThickness": 35,
"Insulin": 0,
"BMI": 33.6,
"DiabetesPedigreeFunction": 0.627,
"Age": 50
}
input_json = json.dumps(input_data_for_model)
response = requests.post(url, data=input_json)
print(response.text)
|
Output :
"The Person is Diabetic" or "The Person is not Diabetic"
its gives output according to the input values.
Video Demonstration
Conclusion
In this article, we explored the process of creating a diabetes prediction FastAPI. With the integration of this API into any web application, we can establish an efficient and reliable diabetes prediction system. This system enables us to quickly determine whether a person is diabetic or not through a few simple steps. This API proves to be highly valuable in enhancing the accuracy and user-friendliness of our prediction models. Furthermore, leveraging the same FastAPI approach for diabetes prediction, we can easily extend our capabilities to create prediction APIs for other domains. All it takes is generating a sav file for the specific model and utilizing that sav file to develop an API for that particular model..
Share your thoughts in the comments
Please Login to comment...