How to Create Store in React Redux ?
Last Updated :
18 Apr, 2024
React Redux is a JavaScript library that is used to create and maintain state in React Applications efficiently.
Here React Redux solves the problem by creating a redux store that stores the state and provides methods to use the state inside any component directly or to manipulate the state in a defined manner.
The Redux toolkit acts as a wrapper around Redux and encapsulates its necessary functions. Redux toolkit is flexible and provides a simple way to make a store for large applications. It follows the SOPE principle which means it is Simple, Opinionated, Powerful, and Effective.
How to Build Redux Store and Manage Complex State in ReactJS
After installing the required modules.
- First, create a store using the configureStore method provided by the redux toolkit inside the store.js file. This will be your store but we haven’t created reducers.
- Now wrap up the whole application using provider which provide the store we created to the application.
- Now create slices for the store, use createSlice method from toolkit to create a slice which contains..
- Name of slice
- Initial states
- Reducer which then contains action
- Export the reducer and actions
- Imort redcuer inside store to register it.
- Now its time to use it, select the state inside component using hook and import corresponding actions.
- When update required, dispatch the action, this will update the state in store and inside component.
Steps to Create a React Application And Installing Module:
Step 1: Create a React application using the following command:
npx create-react-app redux_store
Step 2: After creating your project folder i.e. project_name, move to the folder using the following command:
cd redux_store
Step 3: Install React Redux Module:
npm install @reduxjs/toolkit react-redux
Project Structure:
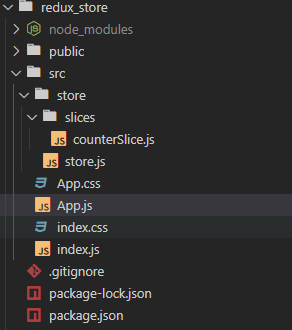
project structure
The updated dependencies in package.json file will look like.
"dependencies": {
    "@reduxjs/toolkit": "^2.2.2",
    "react": "^18.2.0",
    "react-dom": "^18.2.0",
    "react-redux": "^9.1.0",
    "react-scripts": "5.0.1",
    "web-vitals": "^2.1.4"
  }
Wrap App with Redux Provider
- Inside index.js import store from store.js and provider from react redux
Syntax:
<Provider store={store}>
    <App />
 </Provider>
Create Redux Store
- Now create a folder store.js and create a store inside it.
- Also export it, currently it does not include any reducer, we will register the reducers once they created.
Syntax:
export const store = configureStore({
  reducer: {
  },
})
Create Redux State Slice Reducer
- Now create a slice, this include reducer and initial state. Also name should be unique. To create slice create another file slice.js.
- After that export slice reducer and actions
Syntax:
export const counterSlice = createSlice({
  name: ' ',
  initialState:    ,
  reducers: {
action_name: (state) => update the state;
  },
})
Register State Slice in Store
- Just import the slice reducer inside store and register it inside the store.
Syntax:
reducer: {
    counter: reducer_Name,
 }
Use Redux State in React Component
- Now select the state inside your component using hook:
Syntax:
const state = useSelector( ( state ) => state.slice_name.value )
Now to update the state we have to dispatch the actions we defined earlier
const dispatch = useDispatch( )
dispatch(action_name( ) )
Exaplanation:
- Below you can see the two button increment and decrement.
- This button will dispatch the increment and decrement action to the store.
- Reducer inside store will update the value of counter according to the action. Here counter is a state.
- And this state available throughout the application and can be manipulated from any component.
Example:
JavaScript
import './App.css';
import {
    useSelector,
    useDispatch
} from 'react-redux'
import {
    decrement,
    increment
} from './store/slices/counterSlice'

function App() {

    const count = useSelector((state) => state.counter.value)
    const dispatch = useDispatch()

    return (
        <div className="App">
            <header className="App-header">
                <p>
                    Counter {count}
                </p>
                <button
                    onClick={() => dispatch(increment())}>
                    Increment
                </button>
                <button
                    onClick={() => dispatch(decrement())}>
                    Decrement
                </button>
            </header>
        </div>
    );
}

export default App;
import { configureStore } from '@reduxjs/toolkit'
import counterReducer from './slices/counterSlice'

export const store = configureStore({
    reducer: {
        counter: counterReducer
    },
})
import { createSlice } from '@reduxjs/toolkit'

export const counterSlice = createSlice({
    name: 'counter',
    initialState: {
        value: 0,
    },
    reducers: {
        increment: (state) => {
            state.value += 1
        },
        decrement: (state) => {
            state.value -= 1
        }
    },
})

export const { increment, decrement } = counterSlice.actions

export default counterSlice.reducer
import { configureStore } from '@reduxjs/toolkit'

export const store = configureStore({
    reducer: {
    },
})
import React from 'react'
import ReactDOM from 'react-dom'
import './index.css'
import App from './App'
import { store } from './store/store'
import { Provider } from 'react-redux'

ReactDOM.render(
    <Provider store={store}>
        <App />
    </Provider>,
    document.getElementById('root')
)
Start your application using the following command.
npm start
Output:
Output
Share your thoughts in the comments
Please Login to comment...