Helm is a popular Kubernetes native tool for automating the creation, packaging, configuration, and deployment of Kubernetes applications. It is used to combine all the configuration files that are needed for a cluster into a single reusable chart. A Helm chart is like a bundle of YAML files packaged together and made available in a registry so that other people who also use the same kind of deployment can use them in their cluster. In this article, we will see how to create a Helm chart from scratch for a complete React application.
Helm Charts
Helm enables us to bundle all our YAML files into a package that can be moved to a registry so that we, as well as other people, can use it in our clusters. These packages are called Helm Charts. We can create your Helm charts using Helm and push them to a Helm repository to make them available for others, or you can consume them, i.e., download and use existing Helm charts that other people have pushed and made available. This helps us avoid the tedious task of manually creating and configuring components that are standard across all clusters.
Why Helm Charts
Let’s say that you have deployed your application in the Kubernetes cluster and you want to deploy Elasticsearch additionally in your cluster that your application will use to collect its logs. To deploy Elastic Stick in your Kubernetes cluster, you will need a couple of components, like Statefulset, Configmap, Secret, a couple of services, etc. Creating all these files manually can be a tedious job, and since Elasticsearch deployment is pretty much standard across all clusters, other people will probably have to go through the same. That is where Helm charts come into the picture. The Helm chart is like a bundle of these YAML files packaged together and made available in a registry so that other people who also use the same kind of deployment could use them in their cluster.
Using Helm, you can create your Helm charts and push them to a Helm repository to make them available for others, or you can consume them, i.e., download and use existing Helm charts that other people have pushed and made available. Commonly used deployments like database applications, Elasticsearch, MongoDB, MySQL, or monitoring applications like Prometheus that all have a complex setup have Helm charts available in various Helm repositories. Hence, by using a simple Helm command, you can reuse the configuration that someone else has already made without additional effort.
Helm Chart Structure
Any Helm Chart directory is contained in the following files:
1. Chart.yaml
is basically a file that contains all the meta information about the chart. Here is an example chart.yaml file:
apiVersion: v2
name: example-chart
description: A Helm chart for Kubernetes
type: application
version: 0.2.0
appVersion: 1.0.0
2. values.yaml
values.yaml is file where all the values are configured for the template files, and these actually become the default values that you can override later. Here is a sample values.yaml file:
replicaCount: 1

image:
  repository: nginx
  pullPolicy: IfNotPresent
  tag: ""

nameOverride: ""
fullnameOverride: ""

serviceAccount:
  create: true
  annotations: {}
  name: ""

service:
  type: ClusterIP
  port: 80
3. charts folder
This directory will have Chart dependencies inside. If the Helm chart depends on other charts then those Chart dependencies will be stored here.
4. templates folder
This folder is basically where the template files are stored. When you execute “helm install <chartname>” command to actually deploy those YAML files into Kubernetes, the template files from here will be filled with the values from value.yaml .
Tutorial – How to Create Helm Charts?
In this tutorial we will create a Helm chart from scratch for a React application. Let us start with creating the react application, we will not discuss how to create a React application because that is not the aim for this tutorial.
Step 1: Create React application
We will not dive into the basics of creating a React application since that is not the aim for this tutorial. Enter the following to create a react application:
npx create-react-app my-app
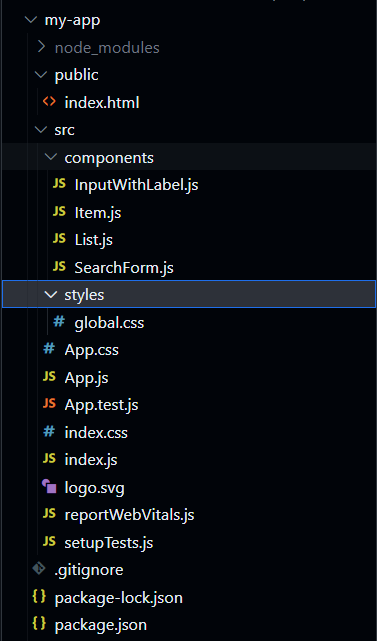
And this is how our project structure looks like:
Create a Components folder and create a List.js and enter the following code inside it:
import React from 'react'
import Item from './Item'

const List = ({ list, onRemoveItem }) =>
  list.map(item => (
    <div>
      <Item
        key={item.objectID}
        item={item}
        onRemoveItem={onRemoveItem}
      />
    </div>
  ));


export default List
Similarly create a InputWithLabel.js file inside components folder and enter the following code inside it:
import React from 'react';
const InputWithLabel = ({
id,
value,
type = 'text',
onInputChange,
isFocused,
children,
}) => {
const inputRef = React.useRef()
React.useEffect(() => {
if (isFocused) {
inputRef.current.focus()
}
}, [isFocused])
return (
<>
<label htmlFor={id}>{children}</label>
<input
ref={inputRef}
id={id}
type={type}
value={value}
onChange={onInputChange}
/>
</>
)
}
export default InputWithLabel;
create a Item.js file inside components folder and enter the following code inside it:
import React from 'react';

const Item = ({ item, onRemoveItem }) => (
    <div className="list">
      <span className="url">
        <a href={item.url}>{item.title}</a>
      </span>
      <span className="author">{item.author}</span>
      <span className="date">{item.created_at}</span>
      <span className="comments">{item.num_comments}</span>
      <span className="points">{item.points}</span>
      <span>
        <button type="button" onClick={() => onRemoveItem(item)} className="delete">
          Dismiss
        </button>
      </span>
    </div>
  );

export default Item;
And at last create a SearchForm.js file inside components folder and enter the following code inside it:
import React from 'react'
import InputWithLabel from './InputWithLabel'

const SearchForm = ({
    searchTerm,
    onSearchInput,
    onSearchSubmit,
  }) => (
    <form onSubmit={onSearchSubmit}>
      <InputWithLabel
        id="search"
        value={searchTerm}
        isFocused
        onInputChange={onSearchInput}
      >
        <strong  className="search">Search:</strong>
      </InputWithLabel>

      <button type="submit" disabled={!searchTerm} className="submit">
        Submit
      </button>
    </form>
  )

  export default SearchForm
And this is how our App.js looks like, paste the same code to your App.js:
import React from 'react'
import axios from 'axios'
import List from './components/List'
import SearchForm from './components/SearchForm'
import './styles/global.css'

const API_ENDPOINT = 'https://hn.algolia.com/api/v1/search?query='

const useSemiPersistentState = (key, initialState) => {
  const [value, setValue] = React.useState(
    localStorage.getItem(key) || initialState
  );

  React.useEffect(() => {
    localStorage.setItem(key, value)
  }, [value, key])

  return [value, setValue]
};

const storiesReducer = (state, action) => {
  switch (action.type) {
    case 'STORIES_FETCH_INIT':
      return {
        ...state,
        isLoading: true,
        isError: false,
      };
    case 'STORIES_FETCH_SUCCESS':
      return {
        ...state,
        isLoading: false,
        isError: false,
        data: action.payload,
      };
    case 'STORIES_FETCH_FAILURE':
      return {
        ...state,
        isLoading: false,
        isError: true,
      };
    case 'REMOVE_STORY':
      return {
        ...state,
        data: state.data.filter(
          story => action.payload.objectID !== story.objectID
        ),
      };
    default:
      throw new Error();
  }
}

const App = () => {
  const [searchTerm, setSearchTerm] = useSemiPersistentState(
    'search',
    'Kubernetes Helm'
  )

  const [url, setUrl] = React.useState(
    `${API_ENDPOINT}${searchTerm}`
  )

  const [stories, dispatchStories] = React.useReducer(
    storiesReducer,
    { data: [], isLoading: false, isError: false }
  )

  const handleFetchStories = React.useCallback(async () => {
    dispatchStories({ type: 'STORIES_FETCH_INIT' });

    try {
      const result = await axios.get(url);

      dispatchStories({
        type: 'STORIES_FETCH_SUCCESS',
        payload: result.data.hits,
      });
    } catch {
      dispatchStories({ type: 'STORIES_FETCH_FAILURE' })
    }
  }, [url])

  React.useEffect(() => {
    handleFetchStories()
  }, [handleFetchStories])

  const handleRemoveStory = item => {
    dispatchStories({
      type: 'REMOVE_STORY',
      payload: item,
    })
  }

  const handleSearchInput = event => {
    setSearchTerm(event.target.value);
  }

  const handleSearchSubmit = event => {
    setUrl(`${API_ENDPOINT}${searchTerm}`)

    event.preventDefault();
  }

  return (
    <div>
      <h1 className="title">Welcome to Tech Blogs!</h1>

      <SearchForm
        searchTerm={searchTerm}
        onSearchInput={handleSearchInput}
        onSearchSubmit={handleSearchSubmit}
      />

      <hr className="divider"/>

      {stories.isError && <p>Something went wrong ...</p>}

      <div className="header">
        <p className="url">Title</p>
        <p className="author">Author</p>
        <p className="date">Date</p>
        <p className="comments">Comments</p>
        <p className="points">Points</p>
        <p className="button">Delete</p>
      </div>

      {stories.isLoading ? (
        <p className="loading">Loading ...</p>
      ) : (
        <div className="display">
          <List list={stories.data} onRemoveItem={handleRemoveStory} />
        </div>
      )}
    </div>
  )
}

export default App;
Step 2: Running the React application
Since in the previous step we created the React application, let us check if it is working fine or not. For that since we are using axois library, enter the following command to install axios using npm:
npm i axios
After that enter the following command to run the React app on your local machine:
npm start
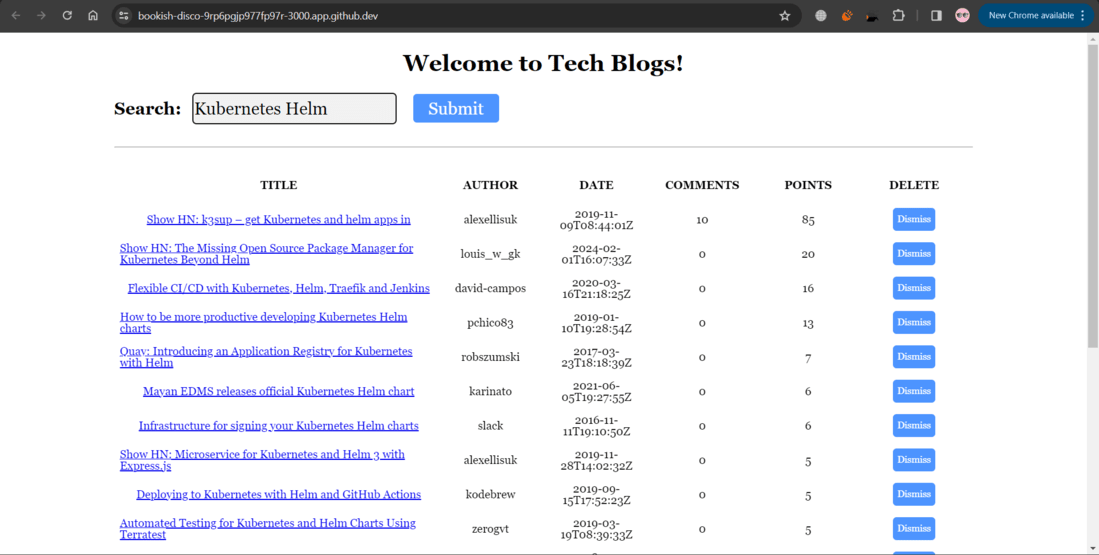
And we will get your website up and running:
Step 3: Creating a Dockerfile for the application
Now that we know our application is running fine, we should now Dockerize it. Let’s create a Dockerfile and enter the following code inside it:
# Pull official base image
FROM node:14.9.0 as build-deps

# A directory within the virtualized Docker environment
# Becomes more relevant when using Docker Compose later
WORKDIR /usr/src/app

# Copies package.json and package-lock.json to Docker environment
COPY package.json package-lock.json ./

# Installs all node packages
RUN npm install

# Copies everything over to Docker environment
COPY . ./

# Installs all node packages
RUN npm run build

# the base image for this is an alpine based nginx image
FROM nginx:1.19-alpine

# copy the build folder from react to the root of nginx (www)
COPY --from=build-deps /usr/src/app/build /usr/share/nginx/html

# expose port 80 to the outer world
EXPOSE 80

# start nginx
CMD ["nginx", "-g", "daemon off;"]
To understand what these Docker commands are doing, I have added comments to the individual commands.
Step 4: Building image and running the container
We have our Dockerfile ready, enter the following command to build that Dockerfile. Make sure to add your docker username and our own name for the image I like did:
docker build -t 1shubham7/react-helm-tutorial:1.0.0 .
This will give you a similar result and the image will be build.
-(1).png)
We now have an image called 1shubham7/react-helm-tutorial:1.0.0 , In order to run that image, enter the following command:
docker run -p 8080:80 1shubham7/react-helm-tutorial:1.0.0
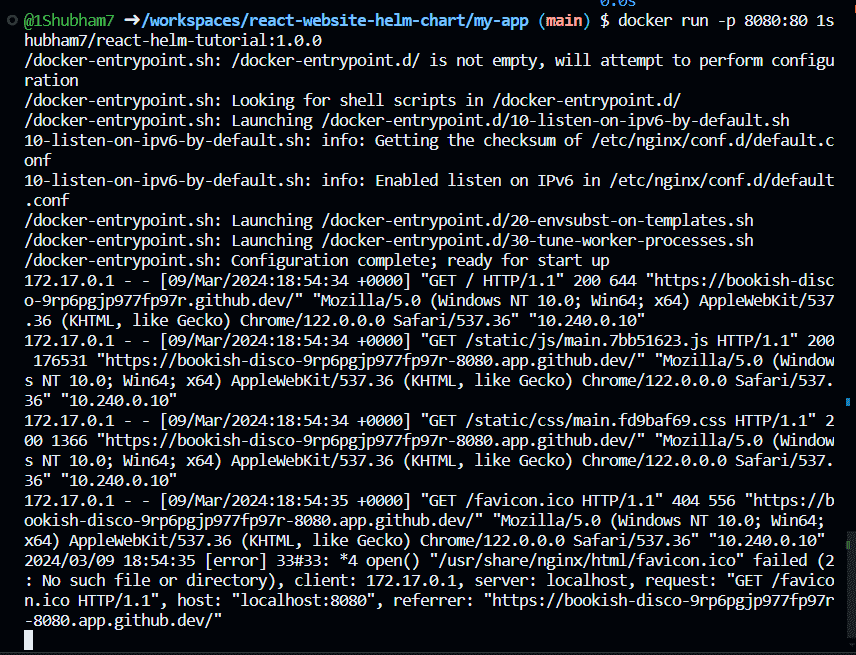
And this will take you to your default browser and your website will start running:
.png)
Step 5: Creating Helm charts
Create a new directory called charts:
mkdir charts
This is the command used to create a helm chart:
helm create [NAME]
I am naming my Helm chart as react-chart, therefore, I will enter the following command:
helm create react-chart
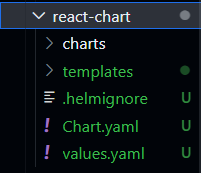
And this will create a react-chart for me:

Now when I look at my folder structure, I will see react-chart folder along with some files and folders inside it. This is how a basin Helm chart looks like:
Our Helm chart has a default configuration, but since we would require a different configuration we will make changes to values.yaml. This is because values.yaml is file where all the values are configured for the template files. Open your values.yaml and paste the following code inside it:
# Default values for react-chart.
# This is a YAML-formatted file.
# Declare variables to be passed into your templates.

replicaCount: 1

image:
  repository: 1shubham7/react-helm-tutorial
  pullPolicy: IfNotPresent
  # Overrides the image tag whose default is the chart appVersion.
  tag: "1.0.0"

imagePullSecrets: []
nameOverride: ""
fullnameOverride: ""

serviceAccount:
  # Specifies whether a service account should be created
  create: true
  # Automatically mount a ServiceAccount's API credentials?
  automount: true
  # Annotations to add to the service account
  annotations: {}
  # The name of the service account to use.
  # If not set and create is true, a name is generated using the fullname template
  name: ""

podAnnotations: {}
podLabels: {}

podSecurityContext: {}
  # fsGroup: 2000

securityContext: {}
  # capabilities:
  #   drop:
  #   - ALL
  # readOnlyRootFilesystem: true
  # runAsNonRoot: true
  # runAsUser: 1000

service:
  type: LoadBalancer
  port: 80

ingress:
  enabled: false
  className: ""
  annotations: {}
    # kubernetes.io/ingress.class: nginx
    # kubernetes.io/tls-acme: "true"
  hosts:
    - host: chart-example.local
      paths:
        - path: /
          pathType: ImplementationSpecific
  tls: []
  #  - secretName: chart-example-tls
  #    hosts:
  #      - chart-example.local

resources: {}
  # We usually recommend not to specify default resources and to leave this as a conscious
  # choice for the user. This also increases chances charts run on environments with little
  # resources, such as Minikube. If you do want to specify resources, uncomment the following
  # lines, adjust them as necessary, and remove the curly braces after 'resources:'.
  # limits:
  #   cpu: 100m
  #   memory: 128Mi
  # requests:
  #   cpu: 100m
  #   memory: 128Mi

livenessProbe:
  httpGet:
    path: /
    port: http
readinessProbe:
  httpGet:
    path: /
    port: http

autoscaling:
  enabled: false
  minReplicas: 1
  maxReplicas: 100
  targetCPUUtilizationPercentage: 80
  # targetMemoryUtilizationPercentage: 80

# Additional volumes on the output Deployment definition.
volumes: []
# - name: foo
#   secret:
#     secretName: mysecret
#     optional: false

# Additional volumeMounts on the output Deployment definition.
volumeMounts: []
# - name: foo
#   mountPath: "/etc/foo"
#   readOnly: true

nodeSelector: {}

tolerations: []

affinity: {}
The changes we made in the values.yaml file are that we changed the image repository to “1shubham7/react-helm-tutorial” and along with that we changed our tag value. Also we have set the type of Service to LoadBalancer rather than ClusterIP.
Step 6: Pushing image to DockerHub
Let us first login, in order to push our image to Docker Hub.
docker login

Enter the following command in order to push our 1shubham7/react-helm-tutorial:1.0.0 to DockerHub:
docker push 1shubham7/react-helm-tutorial:1.0.0

Step 7: Installing the Helm chart
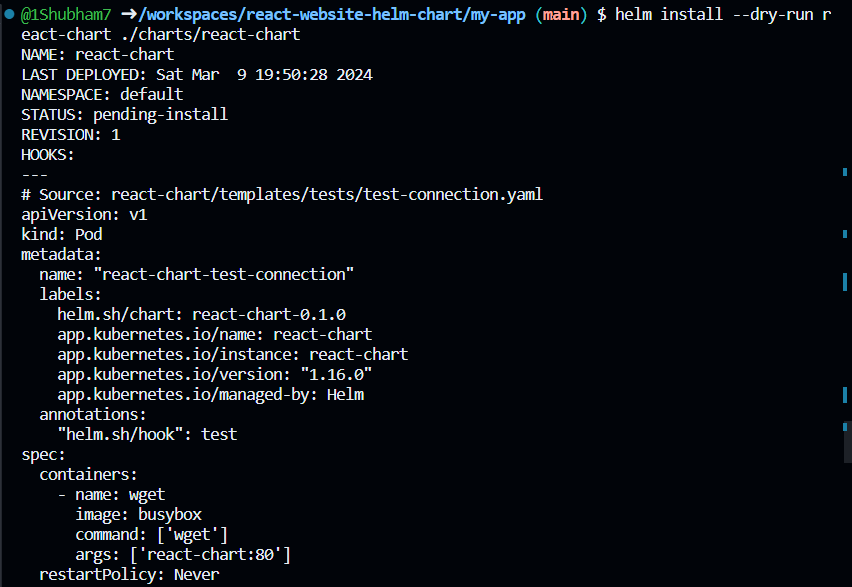
Now that our Helm chart is create and configured according to our application. We should do a dry run to check if it is fine and should be installed or not. Enter the following command for a Helm chart dry run:
helm install --dry-run react-chart ./charts/react-chart
You will get a similar result and since on checking the output looks correct, we can install the helm chart finally.
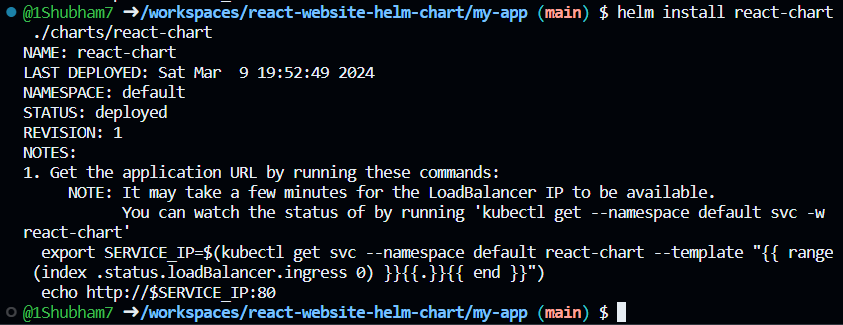
Enter the following command to install the “react-chart” helm chart:
helm install react-chart ./charts/react-chart
You will get a similar result and the Helm chart will be installed:
Step 8: Checking if all the components are present
Now that our Helm chart is installed, we don’t have to manually create configuration files creating Kubernetes components on our cluster. Helm does the heavy-lifting for us and provides us the components as we configure that in the Helm chart. Let’s check the list of Pods that are created:
kubectl get pods
We can see that we have a single Pod that was created by the Helm chart:

Similarly we can check the list of Services that are created:
kubectl get services
the “kubernetes” service is a default from Minikube and “react-chart” Service is created by our Helm chart:

You can also check the list of Helm charts we have in the cluster using the following command:
helm ls

Step 9: Running the application
To check if everything was installed correctly by the Helm charts, we can running the application on a Kubernetes cluster. I am using Docker Desktop for deploying the Kubernetes Cluster. Enter the following command to that fetches the IP address of the Service “react-chart” from our default namespace:
export SERVICE_IP=$(kubectl get svc --namespace default react-chart --template "{{ range (index .status.loadBal
ancer.ingress 0) }}{{.}}{{ end }}")

And we can check where our application is running using the following command:
echo http://$SERVICE_IP:80
This means that our application is running on http://localhost:80, go to http://localhost:80 can you will get your website running, this time on a Kubernetes cluster:
And with that we have completed our tutorial and our website is up and running. Pat yourself on the back because we have learned how to create Helm charts form scratch and how to use them.
Conclusion
In this article we discussed about how to create a Helm chart Helm chart from scratch. A Helm chart is like a bundle of YAML files packaged together and made available in a registry so that other people who also use the same kind of deployment could use them in their cluster. Using Helm you can create your own Helm Charts and push them to a Helm repository to make it available for others or you can consume i.e. download and use existing Helm Charts that other people pushed and made available. We hope that this article taught you about how to create Helm Chart from scratch. Make sure to follow other articles on GeeksforGeeks to know about more tools in DevOps.
Helm – FAQ’s
Why should we use Helm?
Helm has many use cases, one being that it can be used to provide a convenient way for packaging collections of Kubernetes YAML files and distributing them in public and private registry.
How to checkout the list of Helm charts in a cluster?
You can use the following command to check the list of Helm charts in a Kubernetes Cluster:
helm ls
What is the use of values.yaml in Helm charts?
values.yaml is file where all the values are configured for the template files, and these actually become the default values that you can override later.
Why do we need charts folder in Helm?
The charts directory contains Chart dependencies inside. If the Helm chart depends on other charts then those Chart dependencies are stored there.
How to create a Helm Chart?
You can create a Helm Chart using the following command:
helm create [NAME]
Share your thoughts in the comments
Please Login to comment...