How to create Class Component in React?
Last Updated :
30 Jan, 2024
JavaScript syntax extension permits HTML-like code within JavaScript files, commonly used in React for defining component structure. It simplifies DOM element manipulation by closely resembling HTML syntax. JSX facilitates the creation of reusable UI building blocks, defined as JavaScript functions or classes in React.
Prerequisites:
Steps to Create React Application And Installing Module:
Step 1: Create a React application using the following command:
npx create-react-app foldername
Step 2: After creating your project folder i.e. foldername, move to it using the following command:
cd foldername
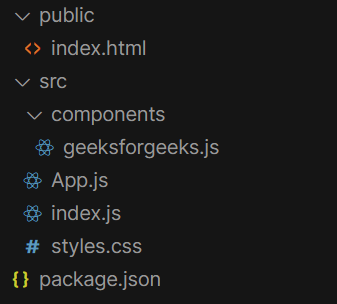
Step 3: After setting up React environment on your system, we can start by creating an App.js file and create a directory by the name of components in which we will write our desired function.
Project Structure:

The updated dependencies in package.json file will look like.
"dependencies": {
    "react": "^18.2.0",
    "react-dom": "^18.2.0",
    "react-scripts": "5.0.1",
    "web-vitals": "^2.1.4",
}
Example 1: In this example, we will demonstrate how to add a class component in our application.
Javascript
import GeeksforGeeks
from "./components/geeksforgeeks";
import "./styles.css";
export default function App() {
return (
<div className="App">
{
}
<GeeksforGeeks />
</div>
);
}
|
Javascript
import React from "react";
class GeeksforGeeks
extends React.Component {
render() {
return (
<div>
<h2>GeeksforGeeks</h2>
<p>
A computer science
portal for GeeksforGeeks
</p>
</div>
);
}
}
export default GeeksforGeeks;
|
Step to run the app:
npm start
Output:

Example 2: In this example, we will demonstrate how to add a class component in our application with a custom input by changing the contents of the header in the App.js file.
Javascript
import GeeksforGeeks
from "./components/geeksforgeeks";
import "./styles.css";
export default function App() {
return (
<div className="App">
{
}
<GeeksforGeeks data="GeeksforGeeks" />
<GeeksforGeeks data="A computer science portal" />
<GeeksforGeeks data="for geeks" />
</div>
);
}
|
Javascript
import React from "react";
class GeeksforGeeks
extends React.Component {
render() {
return (
<div>
<p>{this.props.data}</p>
</div>
);
}
}
export default GeeksforGeeks;
|
Step to run the app:
npm start
Output:

Share your thoughts in the comments
Please Login to comment...