How to Capitalize the First Letter of a String in Flutter?
Last Updated :
14 May, 2023
In Flutter we can create the extension and capitalize the first letter of the string. This is an extension method that extends the String class in Dart, providing a new method called capitalize().
The capitalize() method takes a string, capitalizes the first letter, and returns the modified string. It does this by using string interpolation to concatenate the first character, converted to uppercase using the toUpperCase() method, with the rest of the string, which is obtained using the substring() method with a starting index of 1.
How to Use?
Dart
String myString = "hello world";
String capitalizedString = myString.capitalize();
extension StringExtensions on String {
String capitalize() {
return "${this[0].toUpperCase()}${this.substring(1)}";
}
}
|
Step By Step Implementation
Step 1: Create a New Project in Android Studio
To set up Flutter Development on Android Studio please refer to Android Studio Setup for Flutter Development, and then create a new project in Android Studio please refer to Creating a Simple Application in Flutter.
Step 2: Import the material package
A material package gives us the essential functions and Parameters, Now call the runApp method that needs an Application in the main function.
import 'package:flutter/material.dart';

void main() {
  runApp(RunMyApp());
}
In the above code, runApp method calls the class RunMyApp, Now we have to create it.
Step 3: Creating Stateless Widget
Now we have to make a stateless widget because our application does not go to change its state and then return the MaterialApp widget which allows us the set the title and theme and many more of the application.
Shortcut: For creating a stateless or Stateful widget, you can create a stateless or stateful widget by just typing three alphabets ‘stl’ and you can see a stateless widget and then hit enter.
class RunMyApp extends StatelessWidget {
const RunMyApp({super.key});

@override
Widget build(BuildContext context) {
    String myString = "hello world"; //originally string
    String capitalizedString = myString.capitalize(); //capitalize string
  return MaterialApp();
 }
}
Step 4: Working with Scaffold Widget
Give the home property and there can be a scaffold widget with AppBar and body property. AppBar allows us to give the title of AppBar, color, leading, and trailing icon.
home: Scaffold(
appBar: AppBar(
  title: Text('Appbar'),
),
body:
),
Step 5: Display the string in the body of the app
Finally, we create a Text widget that displays the capitalizedString and originalString variable in the center of the screen using a TextStyle with a font size of 20 and FontWeight.w800.
Center(
          child: Column(
            mainAxisAlignment: MainAxisAlignment.center,
            children: [
              Text(
                'Original String - ${myString}',
                style: TextStyle(fontWeight: FontWeight.w800, fontSize: 20),
              ),
              Text(
                'Capitalized String - ${capitalizedString}',
                style: TextStyle(fontWeight: FontWeight.w800, fontSize: 20),
              )
            ],
          ),
        ),
We are using the center widget, further, we use the Column widget as a child, and then using the text widget we show the strings.
Code Example
Dart
import 'package:flutter/material.dart';
void main() {
runApp(RunMyApp());
}
class RunMyApp extends StatelessWidget {
RunMyApp({super.key});
@override
Widget build(BuildContext context) {
String myString = "hello world";
String capitalizedString = myString.capitalize();
return MaterialApp(
debugShowCheckedModeBanner: false,
theme: ThemeData(primarySwatch: Colors.green),
home: Scaffold(
appBar: AppBar(
title: Text('Capitalized the First letter of the string'),
),
body: Center(
child: Column(
mainAxisAlignment: MainAxisAlignment.center,
children: [
Text(
'Original String - ${myString}',
style: TextStyle(fontWeight: FontWeight.w800, fontSize: 20),
),
Text(
'Capitalized String - ${capitalizedString}',
style: TextStyle(fontWeight: FontWeight.w800, fontSize: 20),
)
],
),
),
),
);
}
}
extension StringExtensions on String {
String capitalize() {
return "${this[0].toUpperCase()}${this.substring(1)}";
}
}
|
Output
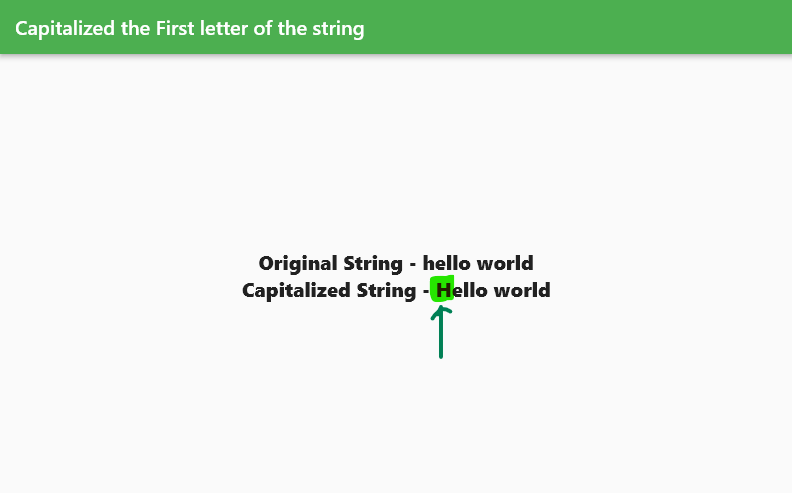
Green Highlighted capitalize letter
Summarize
In this code, we first define an extension method called capitalize() on the String class. This method capitalizes the first letter of the string by converting the first character to uppercase using the toUpperCase() method, and then concatenating it with the rest of the string using the substring() method.
Share your thoughts in the comments
Please Login to comment...