Spring Boot is a famous Java framework for building stand-alone applications. Now if we are going to build web applications using Spring Boot then it may not be useful to build stand-alone applications as we need to deploy the application on the web. Spring Boot by default packages the application in a jar ( Java ARchive) file but to deploy the application using an external server, we need a WAR ( Web ARchive) file. Apache Tomcat is a runtime environment for Java-based web applications and can be used to deploy Spring Boot Projects. In this article, we will be discussing how we can deploy a Spring Boot Project using a Tomcat server.
What is Spring Boot?
Spring Boot, developed by Pivotal Software is an open-sourced Java framework used for application development using Java and Kotlin. This framework is designed to simplify the process of creating industry-grade applications with ease of development by reducing boilerplate code and easy configuration through Spring Starters. Spring Boot also comes with an embedded HTTP server, to allow applications to be deployed as stand-alone applications.
What is Tomcat?
Apache Tomcat is an open-sourced implementation of Jakarta Servlet, Java Server Pages (JSP), Java-based, and Jakarta Expression Language (EL) technologies with Web socket technologies. Tomcat works as a servlet container and provides a runtime environment for Java-based web applications. It manages the execution of servlets and JSP pages. Tomcat can be defined as a bridge between the application and the web server, handling HTTP requests and responses.
Steps to deploy Spring Boot Project using Tomcat
Step 1: Create Spring Boot Project
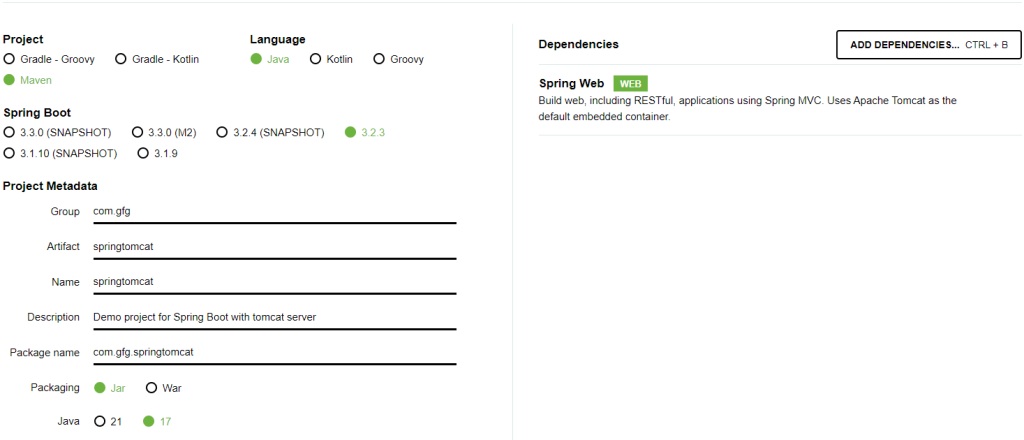
To create a Spring Boot project, go to start.spring.io and choose the following configurations,
Project: Maven
Language: Java
Spring Boot: 3.2.3
Packaging: Jar
Java: 17
Dependency: Spring Web
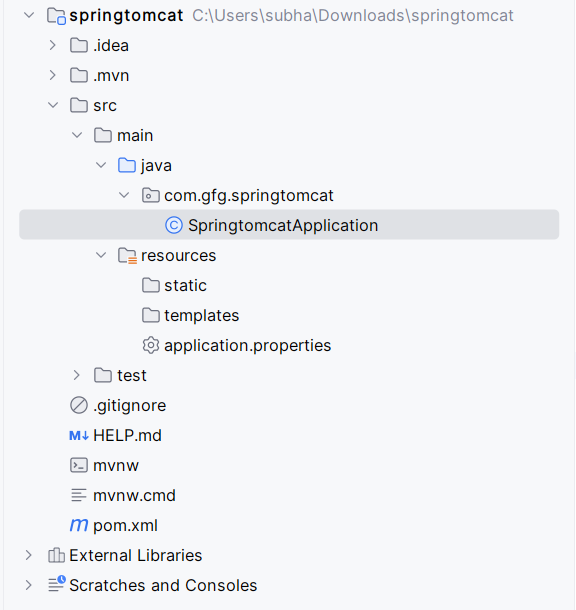
Give proper name to your project and write description if you want. Once done, click on Generate and the project will be downloaded in your computer. Unzip the project and open it with any of the IDE and wait for few seconds for auto configuration, and then go ahead and explore the project.
For dependencies, check the pom.xml file below.pom.xml
<?xml version="1.0" encoding="UTF-8"?>
<project xmlns="http://maven.apache.org/POM/4.0.0" xmlns:xsi="http://www.w3.org/2001/XMLSchema-instance"
    xsi:schemaLocation="http://maven.apache.org/POM/4.0.0 https://maven.apache.org/xsd/maven-4.0.0.xsd">
    <modelVersion>4.0.0</modelVersion>
    <parent>
        <groupId>org.springframework.boot</groupId>
        <artifactId>spring-boot-starter-parent</artifactId>
        <version>3.2.3</version>
        <relativePath/> <!-- lookup parent from repository -->
    </parent>
    <groupId>com.gfg</groupId>
    <artifactId>springtomcat</artifactId>
    <version>0.0.1-SNAPSHOT</version>
    <name>springtomcat</name>
    <description>Demo project for Spring Boot with tomcat server</description>
    <properties>
        <java.version>17</java.version>
    </properties>
    <dependencies>
        <dependency>
            <groupId>org.springframework.boot</groupId>
            <artifactId>spring-boot-starter-web</artifactId>
        </dependency>

        <dependency>
            <groupId>org.springframework.boot</groupId>
            <artifactId>spring-boot-starter-test</artifactId>
            <scope>test</scope>
        </dependency>
    </dependencies>

    <build>
        <plugins>
            <plugin>
                <groupId>org.springframework.boot</groupId>
                <artifactId>spring-boot-maven-plugin</artifactId>
            </plugin>
        </plugins>
    </build>

</project>
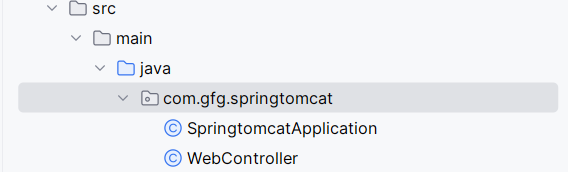
Step 2: Create a Controller
Now to display anything in webpage we need to create a controller which will return some message. So quickly create a controller in the com.gfg.springtomcat package.
WebController.java
package com.gfg.springtomcat;

import org.springframework.web.bind.annotation.GetMapping;
import org.springframework.web.bind.annotation.RequestMapping;
import org.springframework.web.bind.annotation.RestController;

@RestController
@RequestMapping
public class WebController {
    @GetMapping("/")
    public String getMessage()
    {
        return "Spring Boot Application running on Tomcat server!!";
    }
}
Step 3: Run using embedded Tomcat Server
Spring Boot comes with an embedded Tomcat server to run stand alone java application. Let’s run our application using embedded Tomcat and see the result and later on we will run this application on External Tomcat server and match the output.
Go to SpringTomcatApplication.java and run the application.
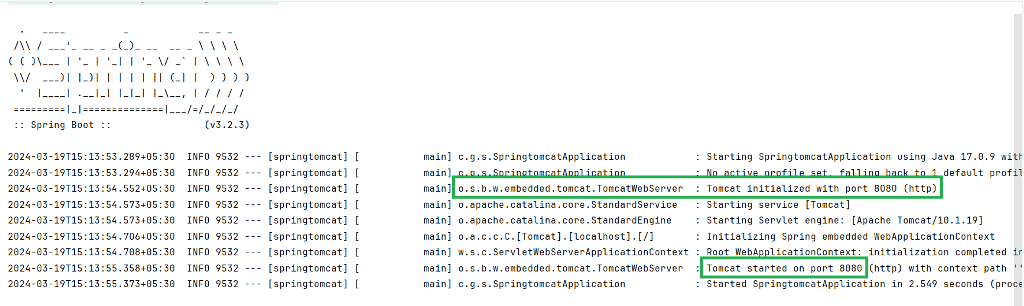
As you can see from the console output, The embedded Tomcat server has been initialized and application is running on Port no 8080.Let’s go to localhost:8080 and check the output.

Step 4: Change packaging to WAR
As we have discussed earlier to deploy Spring Application on Tomcat we need a WAR packaging. You can choose the packaging as WAR during project creation. If you have selected WAR then you can skip this step. This step is necessary for those who has a Spring Boot Application with Jar packaging and now want to deploy the application on external server or want to create a CI/CD pipeline for the project.
- Define packaging as WAR in pom.xml

<packaging>war</packaging>
- As we are going to use the embedded Tomcat server, let’s change the scope of the embedded Tomcat server. To do that, add the following dependency of tomcat and change the Scope as provided.
        <dependency>
            <groupId>org.springframework.boot</groupId>
            <artifactId>spring-boot-starter-tomcat</artifactId>
            <scope>provided</scope>
        </dependency>
Here is the Complete pom.xml file after the changes,
pom.xml
<?xml version="1.0" encoding="UTF-8"?>
<project xmlns="http://maven.apache.org/POM/4.0.0" xmlns:xsi="http://www.w3.org/2001/XMLSchema-instance"
    xsi:schemaLocation="http://maven.apache.org/POM/4.0.0 https://maven.apache.org/xsd/maven-4.0.0.xsd">
    <modelVersion>4.0.0</modelVersion>
    <parent>
        <groupId>org.springframework.boot</groupId>
        <artifactId>spring-boot-starter-parent</artifactId>
        <version>3.2.3</version>
        <relativePath/> <!-- lookup parent from repository -->
    </parent>
    <packaging>war</packaging>
    <groupId>com.gfg</groupId>
    <artifactId>springtomcat</artifactId>
    <version>0.0.1-SNAPSHOT</version>
    <name>springtomcat</name>
    <description>Demo project for Spring Boot with tomcat server</description>
    <properties>
        <java.version>17</java.version>
    </properties>
    <dependencies>
        <dependency>
            <groupId>org.springframework.boot</groupId>
            <artifactId>spring-boot-starter-web</artifactId>
        </dependency>

        <dependency>
            <groupId>org.springframework.boot</groupId>
            <artifactId>spring-boot-starter-test</artifactId>
            <scope>test</scope>
        </dependency>

        <dependency>
            <groupId>org.springframework.boot</groupId>
            <artifactId>spring-boot-starter-tomcat</artifactId>
            <scope>provided</scope>
        </dependency>

    </dependencies>

    <build>
          <finalName>${artifactId}</finalName>
        <plugins>
            <plugin>
                <groupId>org.springframework.boot</groupId>
                <artifactId>spring-boot-maven-plugin</artifactId>
            </plugin>
        </plugins>
    </build>

</project>
Step 5: Change SpringTomcatApplication.java
Go the SpringTomcatApplication.java file which contains the main() method and make the following changes.
package com.gfg.springtomcat;

import org.springframework.boot.SpringApplication;
import org.springframework.boot.autoconfigure.SpringBootApplication;
import org.springframework.boot.builder.SpringApplicationBuilder;
import org.springframework.boot.web.servlet.support.SpringBootServletInitializer;

@SpringBootApplication
public class SpringtomcatApplication extends SpringBootServletInitializer {

    public static void main(String[] args) {
        SpringApplication.run(SpringtomcatApplication.class, args);
    }

    @Override
    protected SpringApplicationBuilder configure(SpringApplicationBuilder builder) {
        return builder.sources(SpringtomcatApplication.class);
    }
}
Here we have extended the SpringBootServletInitializer class which is necessary to run a WAR application. This will bind the application context to the server. We have also override the SpringApplicationBuilder configure to define the class with main() method as the source class.
Step 6: Generate WAR build
Now to generate the WAR build, first delete the target folder in the Project. Now click on the maven logo on the right corner and enlarge the Lifecycle section.
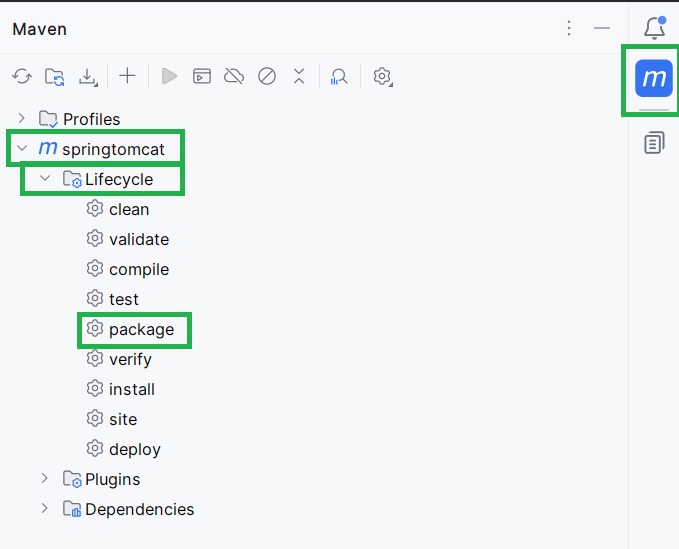
Now click on the Package option to create a new WAR packaging of the application.
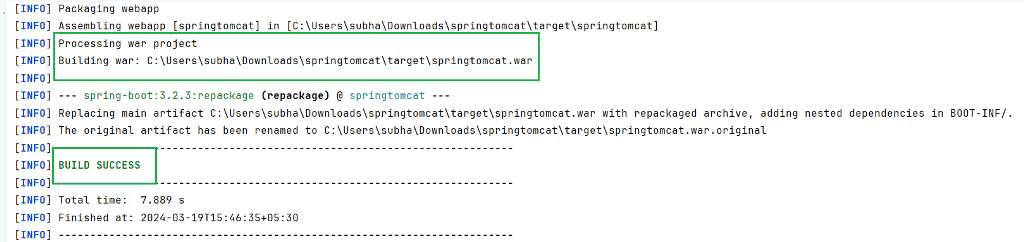
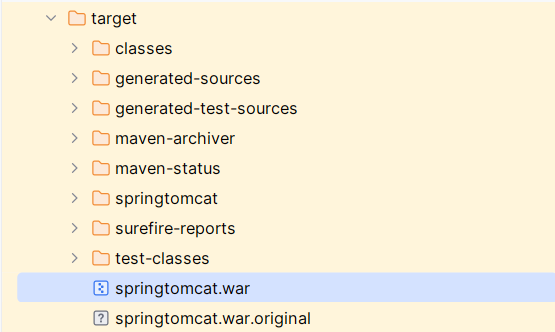
As you can see from the console output that the WAR build is successful. To check the war file, go to the newly created target folder, there you should see a new .war file with the name same as your project.
Till now we have successfully package the Spring Application for deployment.
Step 7: Configure Tomcat server
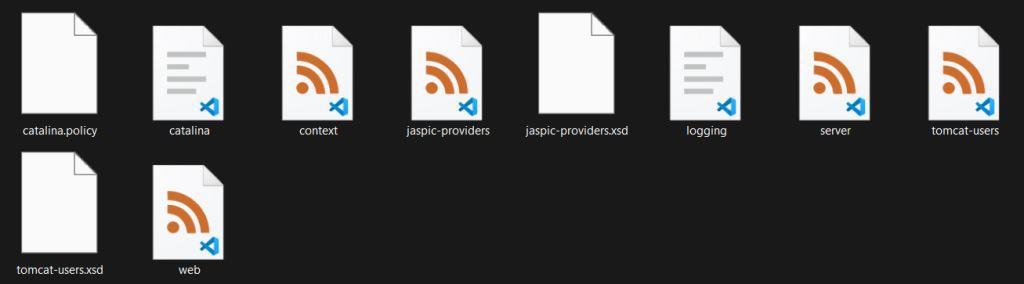
a) Download Tomcat: Download the latest Apache Tomcat from the link given. It should download a zip file in your computer. Unzip the file and go to,
apache-tomcat-10.1.19-windows-x64\apache-tomcat-10.1.19\conf
In the conf folder you will find the following files,
b) Configure Port NO. : By default Tomcat is configured to run on port no 8080, but it may not be available if other applications are using this port, to be safe, let’s change the Port to 8085. Open the server.xml file and use the following configuration for connector.
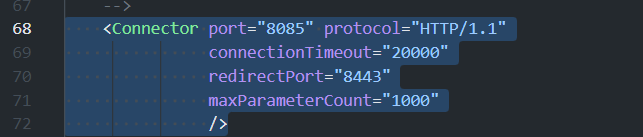
    <Connector port="8085" protocol="HTTP/1.1"
               connectionTimeout="20000"
               redirectPort="8443"
               maxParameterCount="1000"
               />
c) Add user : To add a user, add the following line to the tomact-users.xml file. Here I am defining username and password both as admin. The role is selected as manager-gui to get access to Tomcat server’s GUI page.
<user username="admin" password="admin" roles="manager-gui"/>
d) Start Tomcat server : Go to the bin folder and look for the startup.bat file. Click on the file to open it in Windows terminal.
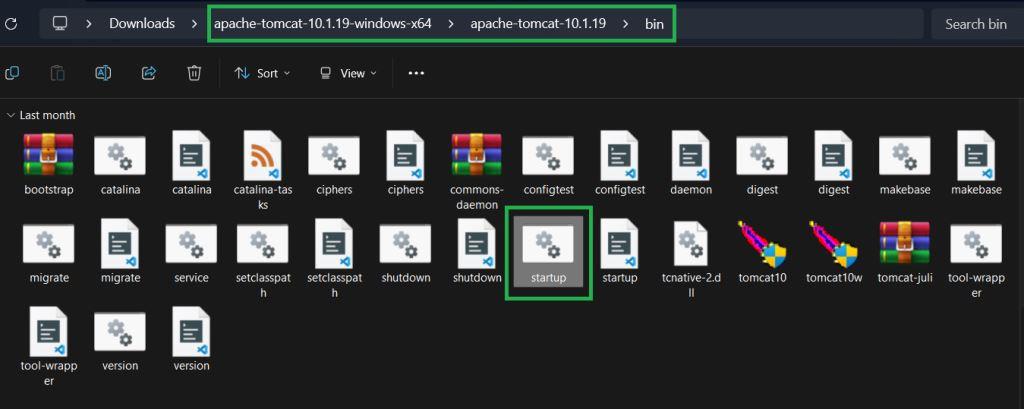
Once you click on it, the windows script will start running automatically and start the Tomcat server on the defined port.

Let’s go to Port no 8085 on the web browser to check if Tomcat is running successfully or not.
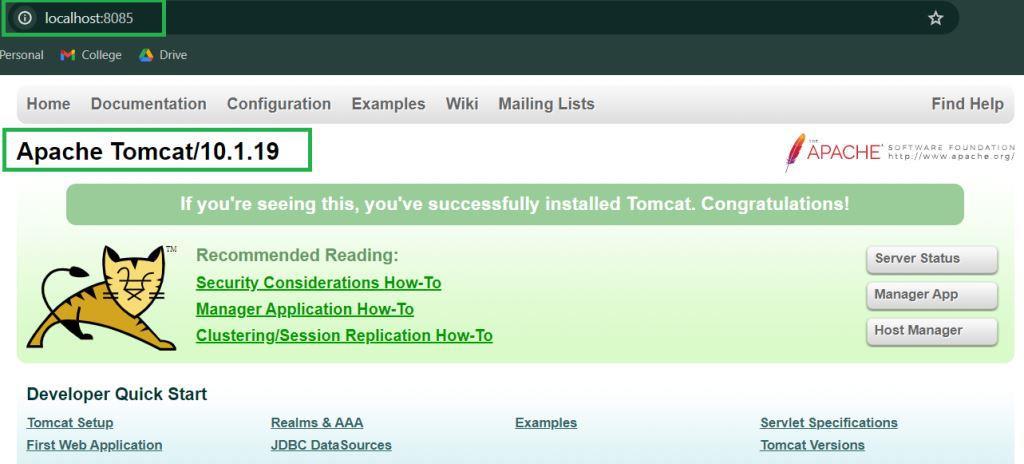
You can see that Tomcat is running successfully on Port No. 8085. You can also check out the article on How to Install Apache Tomcat on Windows for more detailed explanation.
Step 8. Deploy Spring Application
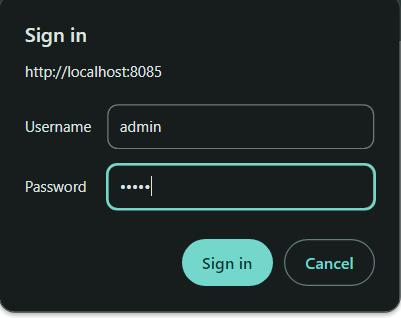
Once you get the server running, Click on the Manager app button and log in with the username and password we have created.
This will open the Manager App for Tomcat server where you can see all the details of currently running applications in a GUI. To deploy our Spring application, scroll down to the War file to deploy section and upload the war file we have created.

Now click on Deploy and wait for few moments and you should be able to see the spring project in the applications list.

This means we have successfully deployed the application using Tomcat.
Step 9. Check output
Once the application is deployed, you can access it on your web browser, but now the path will different from the previous deployment using embedded Tomcat. The Path will look like the following,
localhost:8085/springtomcat
This is because the application is now accessible through Tomcat server which is running on Port 8085. Now, let’s try to access the controller we have created with the mapping as “/“. Go to the web browser and use the following path,
localhost:8085/springtomcat/
Output:

As you can see we are the getting desired output which is same as the previous deployment on the specified path.
Conclusion
Now you can use external Tomcat server to deploy your Spring projects. You have also learned how we can change the packaging of a Spring Application from JAR to WAR. The WAR packaging is necessary to deploy web applications and can be used if we want to streamline the development process with CI/CD pipeline. Now you can move forward and build industry grade Spring Boot applications and deploy them using DevOps technologies.
Spring Boot Project Deployment Using Tomcat – FAQ’s
How can I deploy a Spring Boot application on Tomcat server?
To deploy a spring application you should create a WAR packaging of your application and then deploy with using the Manager App GUI provided in Tomcat. Follow the steps mentioned in the article for a clear understanding.
Is it necessary to install Tomcat to run Spring Boot Application?
No, It is not necessary to install Tomcat server in your system to Run stand alone spring boot application, as Spring Boot comes with an embedded Tomcat server.
Can I deploy Jar file using Tomcat?
You can run jar files using the embedded Tomcat in the Spring Application for a stand alone application. However to run the application on an external Tomcat server, you have to change the packaging to War.
How to Run the external tomcat server?
To run a external Tomcat server, download the latest version of Tomcat and unzip it. Go to the bin folder and run the Startup.bat file for windows machine and Startup.sh for Linux Operating Systems.
Share your thoughts in the comments
Please Login to comment...