How to automate live data to your website with Python
Last Updated :
11 Sep, 2023
Automating the process of fetching and displaying live data ensures that your website remains up-to-date with the latest information from a data source. We will cover the concepts related to this topic, provide examples with proper output screenshots, and outline the necessary steps to achieve automation.
Fetch Live Weather Data Using Flask
Before we dive into the implementation, let’s understand a few important concepts:
- Data Source: The data source refers to the provider or service that offers real-time data. It can be an API (Application Programming Interface), a database, a streaming service, or any other source that provides live data.
- Python Libraries: We will utilize various Python libraries to fetch and process live data. Common libraries for handling web requests and APIs include
requests and urllib. Data manipulation and analysis pandas can be quite useful.
- Data Parsing: After fetching the data, we need to parse and extract relevant information from it. Python provides built-in capabilities for parsing JSON or XML data using libraries such as
json or xml.etree.ElementTree.
- Website Content Updates: To update the website content with live data, we can employ web frameworks or template engines. Popular frameworks like Flask or Django enable us to dynamically generate web pages. For static websites, we can use a templating engine like Jinja2 to render data into HTML templates.
- Automation: To ensure regular updates, we need to automate the process. This involves scheduling or triggering our Python script at regular intervals using tools like cron jobs on Unix-like systems or task schedulers on Windows. Alternatively, we can deploy the script on cloud platforms like AWS Lambda or Heroku.
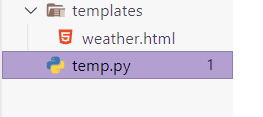
File Structure

Stepwise Implementation
Step 1: Install the necessary libraries
pip install requests flask
Step 2: Create a new Python file
Named it as temp.py and open it in a code editor.
Step 3: Import the required libraries
At first, we will import the libraries that are required for the project to run.
Python3
import requests
import json
from flask import Flask, render_template
|
Step 4: Initialize a Flask application
Thode code creates a Flask application object named app in the current Python module. The __name__ variable is a built-in special variable that evaluates the name of the current module.
Step 5: Fetch weather data from the OpenWeatherMap API
The function first constructs the URL for the API request. The URL includes the API key, the city name, and the version of the API. The function then makes a request.get() request to the API. The requests.get() function returns a Response object, which contains the response from the API.
Python3
def fetch_weather_data():
api_key = "12716febf904087b78b5f0e9ab5d4ad3"
city = "Noida"
url = f"http://api.openweathermap.org/data/2.5/weather?q={city
}&appid={api_key}"
response = requests.get(url)
print(response)
if response.status_code == 200:
data = json.loads(response.text)
return data
else:
return None
|
Step 6: Route to render weather data on the website
The routes first fetch the weather data using the fetch_weather_data() function. If the weather data is successfully fetched, the route then gets the temperature and description from the weather data. The temperature and description are then passed to the render_template() function, which renders the weather.html template.
Python3
@app.route("/")
def render_weather():
weather_data = fetch_weather_data()
if weather_data:
temperature = weather_data["main"]["temp"]
description = weather_data["weather"][0]["description"]
return render_template("weather.html",
temperature=temperature,
description=description)
else:
return "Failed to fetch weather data."
|
Step 7: Run the Flask application
The code if __name__ == “__main__”: app.run() is a conditional statement that checks if the current module is being run as the main program. If the current module is being run as the main program, the app.run() function is called to start the Flask development server.
Python3
if __name__ == "__main__":
app.run()
|
Step 8: Create a new HTML template file named templates/weather.html and open it in a code editor
Step 9: Add the following HTML code to the weather.html template
HTML
<!DOCTYPE html>
<html>
<head>
<title>Weather Update</title>
</head>
<body>
<h1>Current Weather</h1>
<p>Temperature: {{ temperature }} K</p>
<p>Description: {{ description }}</p>
</body>
</html>
|
Code:
Python3
import requests
import json
from flask import Flask, render_template
app = Flask(__name__)
def fetch_weather_data():
api_key = "YOUR_API_KEY"
city = "London"
url = f"http://api.openweathermap.org/data/2.5/weather?q={city
}&appid={api_key}"
response = requests.get(url)
if response.status_code == 200:
data = json.loads(response.text)
return data
else:
return None
@app.route("/")
def render_weather():
weather_data = fetch_weather_data()
if weather_data:
temperature = weather_data["main"]["temp"]
description = weather_data["weather"][0]["description"]
return render_template("weather.html",
temperature=temperature,
description=description)
else:
return "Failed to fetch weather data."
if __name__ == "__main__":
app.run()
|
Output :
.png)
Explanation
In this example, we fetch weather data for a specific city (London in this case) from the OpenWeatherMap API. We create a Flask application and define a route that renders the weather data on the website. The fetched data, including temperature and weather description, is then passed to the weather.html template for rendering.
Ensure you replace "YOUR_API_KEY" it with your actual OpenWeatherMap API key in the code.
NOTE: Sometimes it may take a couple of hours to get the key activated.
Share your thoughts in the comments
Please Login to comment...