How to Add User to Sudoers in Ubuntu
Last Updated :
17 Jan, 2024
Sudo is a command line tool in a Unix-based system that allows a regular user to run a command as the superuser or another user. Only the super user is allowed to modify the majority of the System-wide settings and configurations. It is not advisable to run any Linux machine as a super user, so always create a normal user for day-to-day usage. To use the super user privileges we don’t need to log in as root users every time, just provide the sudo rights to a normal user to portray the normal user as a root user. It is often done with the help of Sudo group or sudoers file in Linux systems.
In this article, we will discuss how to add a normal user to the sudoers list so that the normal user can use the Sudo command to perform privileged operations.
How to Add User to Sudoers in Ubuntu?
In this section, we will see how we can add users to Sudoers in the Ubuntu environment. We have five different methods which are listed below.
Method 1: Using the usermod command
In this method, we will use the usermod command, usermod is a system management command found in every major Linux distribution to modify the information of a user account. Here, we are going to modify the newly created user account by adding the user account to a group called sudo. For this command to work, the given user account should exist in the system, if not create an account with the command (sudo adduser username}.
Command:
sudo usermod -a -G sudo username
Where,
- –a: is used to append the group to the user, if the append flag is not passed it will replace the group passed with the existing groups.
- -G: groups to add the specified user.
Output:
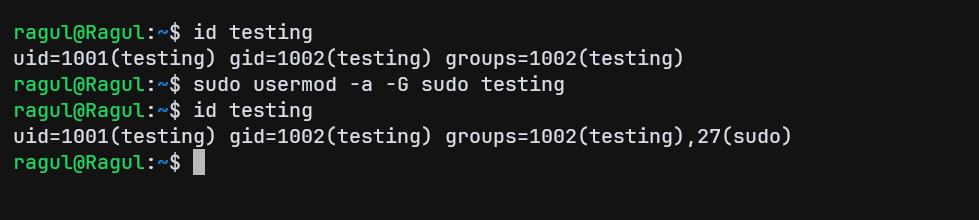
Using usermod Command
In the above image, we can verify whether the user is added to the sudo group with the id command.
Method 2: Using the useradd command
In this approach, we will use the useradd command, useradd command is a system management command used to create or update the default new user Information of the user account. It is the command commonly used to create a new user in Linux systems. To use this command the user should not exist in the system, as it can’t update the existing user rather it can update the defaults of the new user.
Command:
sudo useradd -G sudo username
Where,
- -G: groups to add for the specified user.
Output:
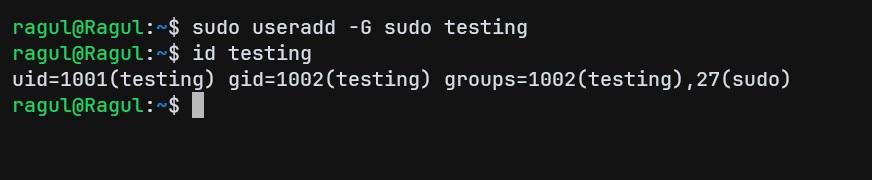
Using useradd Command
In the above image, we can verify whether the user is added to the sudo group with the id command.
Method 3: Using adduser command
In this approach, we will use the adduser command, The adduser command is a wrapper around the basic system management commands like useradd and usermod, … and is commonly found in Debian-based systems like Ubuntu. This command can add a new user and also able to update a user account Information with the provided data. To add the user to the sudo group, the user should exist in the system.
Command:
sudo adduser username sudo
Output:
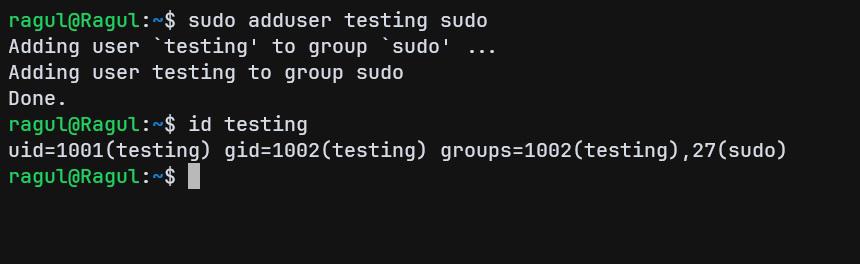
Using adduser Command
In the above image, we can verify whether the user is added to the sudo group with the id command.
Method 4: Using gpasswd command
In this approach, we will use the gpasswd command, gpasswd is a user command to administer the group functionality like adding a member to the group, removing a member, etc. For this command, the user should exist in the system, and pass the user name along with the group to add the user to the command.
Command:
sudo gpasswd -a username sudo
Where,
- -a: The option is to add the user to the mentioned group.
Output:
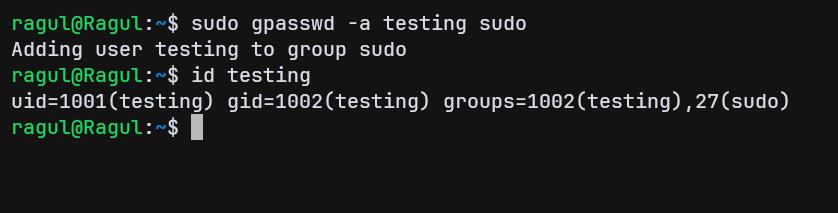
Using gpasswd Command
In the above image, we can verify whether the user is added to the sudo group with the id command.
Method 5: using visudo command
visudo is a special command used to edit the sudoers file. visudo edits the “/etc/sudoers” to provide a user sudo privilege. It also checks the syntax for the sudoers file, it is the preferred way of editing the sudoers file as any syntax error may result in losing sudo access to the system. By default, ubuntu uses nano to open the sudoers file, you can change that with update-alternatives.
Note: Never edit the /etc/sudoers file directly as you may lose sudo access if anything goes wrong like a Syntax error.
Step 1: Run the visudo command to open the /etc/sudoers file for editing in the terminal
sudo visudo
Step 2: Add the below line to add the user as a privileged user in the sudoers file.
username ALL=(ALL:ALL) ALL
- The first ALL states the user can run sudo from any host.
- The (ALL:ALL) states the user can run the command as any user and any group.
- The third ALL states every command can be executed.

Using visudo
Step 3: Switch to the user which given the privilege of sudo using the su command. Make sure you pass the “-“ to completely switch into the user like PATH variables and user privileges.
su - username
Step 4: Run sudo whoami to check whether that user has the privilege to use the sudo command.
sudo whoami

Verifying
In the above image we can see that after switching to our new user, we have run a sudo whoami. The output says we are root as we have used sudo, we are performing whoami from the place of the root user, that’s why it says the username root.
Conclusion
In conclusion, sudo is an important command that needs to be handled with care to maintain the security of your system. Make sure you only allow trusted users to be a part of sudoers in your system for better security and reliability. To conclude we have seen different approaches to add users to the sudoers list in the Ubuntu system with examples.
Share your thoughts in the comments
Please Login to comment...