How to Add Date in Google Sheets
Last Updated :
05 Jan, 2024
How to Add Date Automatically in Google Sheets – Quick Steps
- Open Google Sheets
- Enter Date >> Select Cell
- Drag Down
- Realese when Date entered
Google Sheets is a web-based spreadsheet offered by Google Docs Editor suite. Google Sheets provides you with many features such as real-time collaboration in projects with your friends, you can build a content calendar in Google Sheets. Putting a date on your Google Sheets is a good way to organize your work and it can be done in some simple and easy steps. So, in this article, we will explore how we can put date automatically to a Google sheet.
.webp)
How to Autofill Date in Google Sheets
Step 1: Open Google Sheets and Select a Document
Open your Google Sheets on your desktop and select a new spreadsheet or you can also select an existing one.
.webp)
Select a Document
Step 2: Enter Date
After opening your Google sheet enter your desired date on a particular location and place your cursor on the corner of the cell in which the date has been entered.
.webp)
Enter Date
Step 3: Select and Scroll down the Cell
Now in the cell in which you have entered the date select it and scroll down till your desired cell you want to enter the date.
.webp)
Select and Scroll down
How to Automatically Enter the Current Date on Google Sheets
Autofill Days in a Column in Google Sheets
Open your Google Sheet in which you want to autofill days and enter the day’s formula in a cell which is “=ARRAYFORMULA(SEQUENCE(10,1, TODAY(),1))” and press enter.
.webp)
Enter Column Formula
Autofill Weeks in a Column on Google Sheets
Open Google Sheets and enter the weeks formula “=ARRAYFORMULA(SEQUENCE(10, 1, DATE(YEAR(TODAY()), MONTH(TODAY()), 1) + (ROW(A1:A10)-1)*7))” and press enter to autofill the weeks in a column.
.webp)
Enter Weeks formula
Autofill Months in a Column on Google Sheets
Enter the Month Formula “=ARRAYFORMULA(EOMONTH(DATE(YEAR(TODAY()), ROW(A1:A12), 1), 0))” and press Enter.
.webp)
Enter Month Formula
How to Autofill Weekdays Only on Google Sheets
Step 1: Open Google Sheets and Select a Document
Open your Google Sheets on your desktop and select a new spreadsheet or you can also select an existing one.
Select a Document
Step 2: Enter WeekDays Formula
Enter the weekday formula and press Enter.
.webp)
Enter weekdays Formula
How to Enter Date Using Functions for Automatic Date Entry
Step 1: Open Google Sheets and Select a Document
Open your Google Sheets on your desktop and select a new spreadsheet or you can also select an existing one.
Select a Document
Step 2: Enter “=Today()”
After selecting a particular cell enter the formula “=Today()” in the cell and press enter.
.webp)
Enter =Today()
Step 3: Date Entered Automatically
Now your date has been entered automatically in the cell.
.webp)
Date Entered Automatically
How to Create a Date Formula in Google Sheets
Finding Specific Date
To find a specific date click on any of your cell and type the formula “=DATE(2023, 12, 25) // This will create the date December 25, 2023“.
.webp)
Enter Specific Date Formula
Adding Subtracting Between Dates
Select any of you cells and enter the difference formula to find the difference between dates “=DATE(2023, 12, 25) + 7 // This will result in January 1, 2024 (7 days after December 25, 2023),
=DATE(2023, 12, 25) – 3 // This will result in December 22, 2023 (3 days before December 25, 2023)“.
.webp)
Enter Subtracting Formula
How to Add Date Automatically in Google Sheets on Mobile Devices
Step 1: Open the Google Sheets App
To open Google Sheet App on your phone locate the icon and give it a click.

Click on the Google Sheet Icon to open the App
Step 2: Select your Google Sheet
After opening the Google Sheet app on your mobile click on the desired Google sheet in which you want to enter the date.

Select your Google Sheet
Step 3: Enter the Date, Select the Date and Click Copy
After opening your desired sheet enter a date in a particular cell and then select it to view some additional options from the options select copytoo copy the date first.
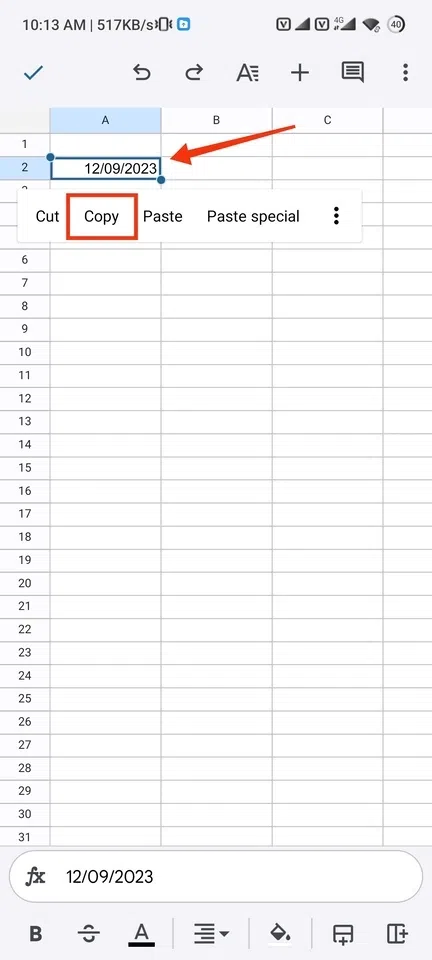
Enter Date >> Select Date >> Click Copy
Step 4: Drag it Down and Click Paste
When you have selected the date drag it till you want to enter the date and then click on the Paste button to paste the copied date.
.webp)
Drag it to Down >> Click Paste
Step 5: Date Copied
When you will leave dragging the date it will stop copying and will be entered automatically in the cells and you don’t have to write the date one by one in the cells.
.webp)
Date Copied
Shortcuts of Entering Date Automatically
1. For Windows click “Ctrl + ;” button to enter the current date automatically.
2. For Mac click “Command + ;” button to enter date in your google sheets.
3. To enter current in Windows press “Ctrl + Shift + ; “ to on your keyboard.
4. To enter the current time in Mac press “Command + Shift + ; ” on your keyboard.
Conclusion
Entering the date automatically in Google Sheets is a good way, it saves your time by writing the date manually and it can be done in some easy and simple steps given above. All you have to do is open Google Sheets on your Desktop and click on your desired sheet to open and edit it then enter the date in a particular cell. After writing the date select it and drag that particular cell till when you want to enter a date. On the other hand, in mobile, the process is the same just you have to copy the date and then you have to drag and click on Paste to paste it.
FAQs
How do I automate the current date in Google Sheets
By using the =Today() function you can automate the date in Google Sheets.
How do you auto increment dates in Google Sheets?
Using Dragging you can auto increment the dates, all you have to do is enter the initial date and drag it by selecting the corner of the initial date’s cell.
How do I autofill dates in Google Sheets without dragging?
You can autofill dates without dragging by entering the Array Formula with Sequence function such as “=ARRAYFORMULA(A1 + SEQUENCE(30, 1))“.
How do I create a date formula in Google Sheets?
Using “=Date” function you can create the date formula such as “=DATE(2023, 12, 31) // Creates the date December 31, 2023″
Share your thoughts in the comments
Please Login to comment...