Arduino is an important device used in electronics engineering for creating mini-projects or for integrating large projects. Arduino itself consists of various components that can be programmed according to the project requirements using some assembly languages like C/C++.
Arduino is the first choice of many professionals due to the ease with which it can be programmed and how it allows interactive features for user experience. Arduino is programmed to include both hardware and software components which account for its use in different fields like designing, sensing, and testing.
Since Arduino is an open-source platform, it is used globally by users all across the globe. Let us study what is an Arduino, what functionalities it has and how can we use it in daily life.
What is Arduino?
The Arduino is one of the most popular and widely used Arduino boards. It’s based on the ATmega328P microcontroller and offers a good balance of features, performance, and affordability, making it suitable for a wide range of projects, from simple to moderately complex.
Most electronic devices involve circuit-making using hardware components. The purpose of introducing Arduino was to make an easy-to-use device that can offer the feature of programming along with circuit making. Therefore, Arduino is a programmable device that is used mostly by artists, designers, engineers, hobbyists, and anyone who wants to explore programming in electronics.
The Arduino uses its components to gather information from the surroundings and generate a precise output accordingly. The information is gathered using some components like sensors, and input pins, and an output is generated depending on the programming done. This output can range from illuminating an LED to turning the motors on.
Arduinos are great devices that can be used for creating interactive projects. They can either be used alone to create basic projects or they can be integrated with Arduino, Raspberry Pis, NodeMCU, or nearly anything else using some programming in their software to create some advanced level of projects. It is good to know the specifications of different Arduino so that you can select the right Arduino for your project.
Arduino Hardware
Let us look at the hardware components of Arduino :
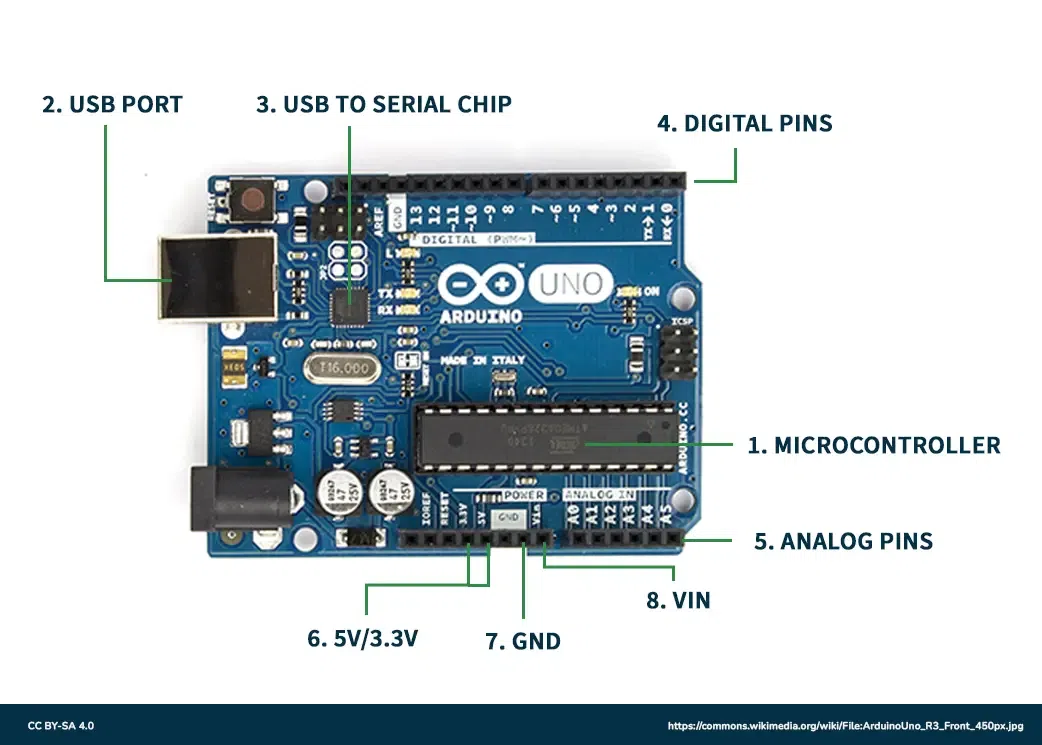
Arduino hardware
- Microcontroller: The Microcontroller controls the execution of all the programs and codes uploaded on Arduino. The microcontroller is equipped with components that can perform different functions.
- USB port: This port is used to establish a connection between the computer and the Arduino board.
- USB to Serial chip: The USB to Serial port is used for adding data from the computer to the microcontroller. This is how the code is uploaded from the computer to the Arduino board.
- Digital pins: These pins are used for turning the LEDs on and off by using digital logic (‘0’ and ‘1’).
- Analog pins: These pins are used for taking analog input.
- 5V / 3.3V pins: These pins are used for supplying power to devices.
- GND: This pin is used for setting a reference level.
Basic Operation
Most of the Arduino can perform a single task using the help of a microcontroller. These tasks can be performed in a cycle as defined by the variables. This basic task can be from blinking an LED to rotating a motor. This is how the loop in the setup will be defined
- Set the sensor to read the input.
- Program the Arduino to turn on the light.
- Verify all the conditions.
Depending on all the delays introduced, the program takes around microseconds to execute.
Circuit Basics
Consider this basic LED circuit
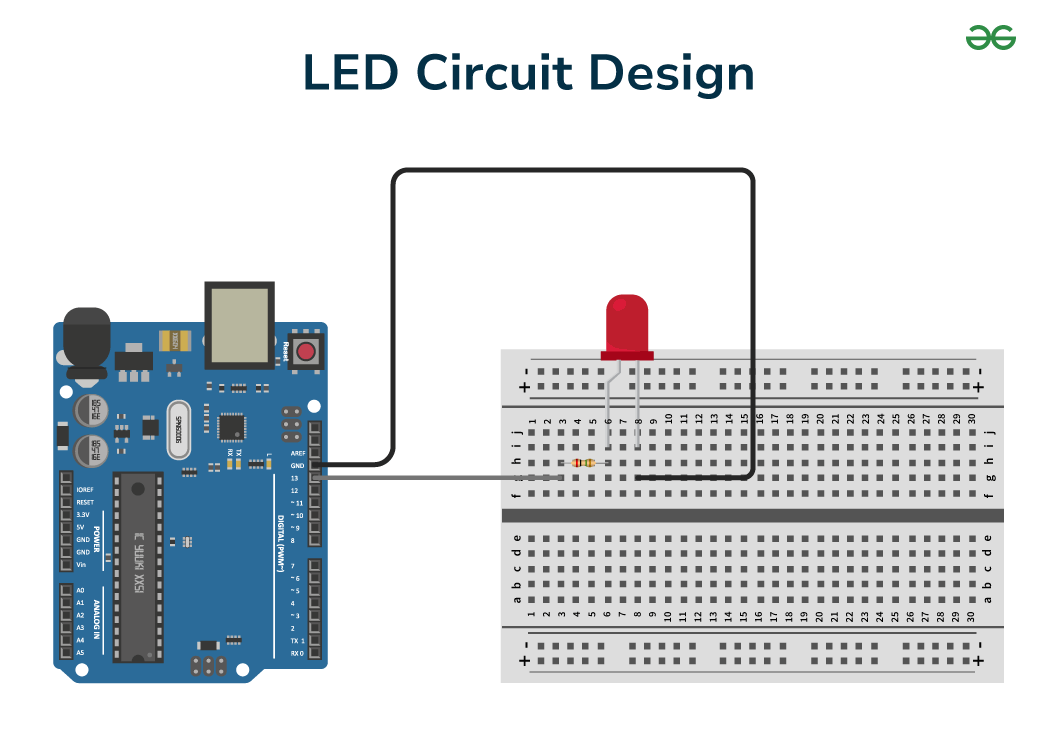
LED Circuit Design
Consider the circuit shown above, the LED is connected to pins on the Arduino using some resistors to limit the amount of current flowing through the LED. The reference level is set using the ground pin.
During the high or the ‘ON’ state, the circuit connections will be complete, and current will flow through the circuit components as programmed in the microcontroller. In this state, the LED will glow. When the circuit is turned ‘OFF’, the pins are set to low and the LED becomes dim due to no current flow.
Electronic Signals
Let us study the two types of signals:
Analog Signal: Analog signals are the ones that can have any value in a given range of values. This range can vary from 0V to 5V. To take the input from the input pins, the analog pins are used that can have a range of 0-255 with an 8-bit resolution. This is how we can read a large input value in an Arduino board.
Digital Signal: Unlike analog signals, digital signals can only take a set of two values, high(‘1’) and low(‘0’). The advantage of these signals is that they can be used to turn the Arduino on or off. Although they can take only two values, we can use these values to generate a sequence known as the binary sequence which is a collection of zeroes and ones which can be sent easily for communication.
Sensors And Actuators
Let us discuss about sensors and actuators :
Sensors
The term ‘sensor’ is self-explanatory and indicates a device that can sense any physical quantity and convert it to a form that can be measured like a signal. Sensors can be categorized into different forms depending on the type of quantity they measure. For example, the temperature sensor is a device that measures temperature.
The most common example of a sensor is an analog sensor that can be used for measuring a continuous range of values generally from 0-5V. Another type of sensor are digital sensors that sense inputs and then generate an output in digital bits. Certain libraries have been designed to read this digital sequence generated by the sensor for measuring purposes.
This line of code is used for reading the value.
sensorValue = sensor.read();
Actuators
Contrary to sensors, actuators are used to change a physical state based on something they sense. Actuators perform the task of using the signal to actuate something like causing mechanical movement when an input is sensed or turning a light bulb on when voltage is received.
Let us see how digitalWrite() and analogWrite().
digitalWrite(LED, HIGH); //turn on an LED
digitalWrite(LED, LOW); //turn off an LED
analogWrite(motor, 255); //set a motor to receive 255 bits
Arduino API
Arduino API refers to “Arduino Programming Language” which is generally written. Let us see what the “Arduino Programming Language” consists of
- Functions: Functions are blocks of code that are assigned to perform a specific task. This can include functions that can be created to ‘read’ and ‘write’ the data from a pin.
- Variables: This includes Arduino datatypes and terms defined to be used later like int, boolean, and array.
- Structure: All the components in the code form the whole structure. This can include the sketch parts i.e. the loop(), setup(), the control statements like if, else, while, for, and various comparators like as ==, !=, >.
The Arduino API simplifies the task of writing the code due to the additional libraries that control the hardware part of Arduino.
Libraries
Libraries are useful for controlling the hardware and software part of Arduino without the need to write the already written code. Libraries are contributed by different developers and need to be imported into your module.
By including a library, you don’t have to write complex code like reading a specific sensor, controlling a motor, or adding wi-fi. By simply including the free open-source libraries, you can access these functions.
The line of code used for adding a library:
#include <Library.h>
General Commands
Let us see a list of commands that are used in almost every project.
setup()
It is used to configure the program.
void setup() {
//Programs like including libraries
}
loop()
It includes the programs that will run when the board is in an “ON” state.
void loop() {
//main program here
}
delay()
This is used to add a pause in the function for a certain millisecond as required. The code snippet shows the use of the delay function.
void loop() {
digitalWrite(LED, HIGH); //turn on an LED
delay(1000); //paused for 1 second(1000 milliseconds)
digitalWrite(LED, LOW); //the LED is turned off
}
millis()
Not used very often but this function can allow you to run multiple functions consecutively without putting anything to a halt. It uses intervals to store the time since the last operation or function was running. Here is a code snippet.
// Record the time of the first event
unsigned long firstEventTime = 0;
// Record the time of the second event
unsigned long secondEventTime = 0;
// Set the interval for the first event to occur
const long firstEventInterval = 5000;
// Set the interval for the second event to occur
const long secondEventInterval = 1000;
void setup() {
// Any necessary setup can be done here
}
void loop() {
// Record the current time since the program started
unsigned long currentTime = millis();
// Check if it’s time for the first event
if (currentTime – firstEventTime >= firstEventInterval) {
// Update the time of the first event
firstEventTime = millis();
// Execute code for the first event every 5 seconds
}
// Check if it’s time for the second event
if (currentTime – secondEventTime >= secondEventInterval) {
// Update the time of the second event
secondEventTime = millis();
// Execute code for the second event every 1 second
}
}
Example Sketch
Sketch is the whole project you created in your IDE. Note that when you save your project, it is saved with the extension of .ino. Let us see a sample sketch to turn on the LED.
int sensor in = A1; //analog pin at A1
int ledPin = 5; //digital pin at pin 5
int sensorValue;
//configurations the sketch
void setup() {
Serial.begin(9600); //initialize serial communication
pinMode(ledPin, OUTPUT); //define output pin
}
void loop() {
sensorValue = analogRead(sensorPin);
Serial.print(“Sensor value is: “); //print a message
Serial.println(sensorValue); //print the value to the serial monitor
//conditional statements
if(sensorValue < 100) {
digitalWrite(ledPin, HIGH); //turn on the LED on pin 5.
}
else{
digitalWrite(ledPin, LOW);
}
}
Why choose Arduino?
We need to know the reason for selecting Arduino over other devices so let us study some advantages of Arduino.
- Arduino is the best choice for starting your programming journey in electronics. Its easy-to-use interface allows users to build simple projects on their own.
- There is no need for experience or hands-on experience in electronics before starting work on Arduino. Anyone with a genuine interest in Arduino can begin learning through simple tutorials and some guidance. These tutorials are available free of cost for creating some beginner-level and advanced projects.
- Arduinos offer a wide range of options. You can use Arduino alone to create some projects or you can add some extra features by integrating it with other devices like Raspberry Pie.
- Arduino is an open-source tool that can be accessed from different locations and platforms. Due to the inexpensive nature of Arduinos, they can be used on different microcontrollers like Atmel’s ATMEGA 16U2 microcontrollers.
- Depending on the need of your project, you can avail of any Arduino that satisfies the needs. These Arduino are available in different designs that offer different size ranges, power, and specifications.
What Can You Do With an Arduino?
Arduino finds its applications in various fields due to their ability to perform different things. Let us see some of its applications:
- Arduinos are used in 3D printing where they perform the task of selecting how the printing will be performed.
- Arduinos are used for creating basic designs by makers, designers, hackers, and creators across the globe to create some great projects. Some of the projects are Laser Turret Midi Controller, Retro Gaming With an OLED Display, and Traffic Light Controller.
- Arduinos are used by college students to understand programmable electronics and to explore their interest in programming.
- Arduinos are used in the field of robotics for programming robots and adding basic features like sensing and responding to environmental conditions.
- Arduino is used in IoT(Internet of Things) since it can collect information using sensors. The collected data is then processed and transmitted for developing various smart devices.
Structure of Arduino
Different Arduino are designed to serve different purposes but some basic components are needed in every Arduino. Note that Arduino Uno is the most used board and is the most common choice for different users. Let us study the internal structure of the Arduino Uno model.
- Processor: 16 Mhz ATmega16U2
- Flash memory: 32KB
- Ram: 2KB
- Voltage Needed: 5V
- Input Voltage: 7-12V
- Analog input pins: 6
- Number of digital I/O: 14 with 6 of them being PWM pins
Components of Arduino
Let’s study the basic components of Arduino:
Breadboard: Breadboards are used to provide a base for setting up the connecting components together. If you look at a breadboard, is a plastic block made up of holes that are left for making connections using wires. The internal of the breadboard consists of different connections that are hidden. They are generally used for smaller circuits
LEDs(Light Emitting Diode): LEDs are small devices that illuminate when a small voltage is supplied to them. These LEDs come in a variety of colors ranging from red to green. These LEDs can be used for testing minimum voltages since they don’t burn for a long period.
Photo Resistor: Many Arduinos contain a photoresistor that is used for measuring changes in light using Arduino.
Tactile Switch: This switch resembles a button that is used to open or close a circuit like any other switch. When the button is turned on, the voltage of Arduino increases from 0V to +5V. This voltage change acts as a trigger for the Arduino and an Arduino detects this change momentarily since the switch is then turned off when the button is released.
Microcontroller: An Arduino consists of a microcontroller that controls the whole functioning of the Arduino by generating an apt output corresponding to the input code. Depending on the type of Arduino board you are using, you can select a microcontroller that fits well.
Resistors: Resistors are used to resist the flowing electricity. Resistors are often bought to set a limit to the current flowing in the circuit thereby protecting the components of the circuit from getting burnt due to excessive current.
Jumper Wires: Jumper wires are thin wires covered with a plastic covering for insulation. These wires are used for connecting different components in the breadboard.
Setting Up Your Arduino
This is an essential step since it allows your computer to communicate with Arduino. Make sure you have a tested and working Arduino board before connecting it to your computer. Any duplicate Arduino will need some modifications in the installation process. Let us see how to connect the Arduino to the computer for the execution of the code.
Installing the Arduino Software Package
To install the Arduino software, you need to visit the official website and download the latest version that is valid for your computer. Here is a list of steps to be followed for installing Arduino Integrated Development Environment (IDE).
Windows Setup
- Plug in your board to the computer and you will see a driver installation setup box on the screen. You can grant access to connect the Arduino to the computer and case it fails :
- Go to the Start Menu and select Control Panel.
- Go to System and Security > System. After this open up the device manager.
- If you carefully observe the ports, there will be an open port associated with the connected Arduino named Arduino UNO (COMxx).
- Right-click on the name (Arduino UNO (COMxx) in this case) and select Update Driver Software.
- Search for Driver software by selecting Browse my computer.
- Search for the Uno’s driver file, which will be named ArduinoUNO.inf, located in the Drivers folder of the Arduino Software download.
Mac OS
- Use a zipping software to extract the contents of the .zip file associated with the installed Arduino software
- Open the Arduino software by clicking on the extracted application.
- You don’t need to install any additional drivers for the Arduino UNO in MAC OS and it will run fine.
Installing the Arduino Software on Package Ubuntu/Linux
Installation on Ubuntu/Linux is a bit different since it involves dealing with some commands. Here are the steps.
- Install gcc-avr and avr-libc using this command:
sudo apt-get install gcc-avr avr-libc
- Install and configure openjdk-6-jre, you can skip this step if it is already present :
sudo apt-get install OpenJDK-6-jre
sudo update-alternatives –config java
- Select the correct JRE corresponding to the Arduino.
- Visit the official website and download the Arduino Software suitable for Linux. You can use these commands.
tar xzvf arduino-x.x.x-linux64.tgz
cd arduino-1.0.1
./arduino
Running the Arduino Software
Since our software has been installed, it is our time to check whether the setup is correct and that our Arduino is working well. To do this, we will use the “Blink” sample application
Once the Arduino application has been installed on your device, open the software for the associated Arduino. Then follow these steps:
- Connect your Arduino board to your computer using some connecting cable.
- The software icon will appear at the location where you have installed the Arduino application. Double-click it to open the interface.
- Follow the order File > Examples > Basics > Blink
- When you open the application, the screen will show the code written for your Arduino. Now you have to get this code on the Arduino
- To upload code on Arduino select Tools-> Board and then choose the required Arduino model like Arduino Uno.
- After this, you need to specify the serial port from which the board will take data. Go to Tools-> Serial Port and then select the port. Windows users can select port COM3 or similar, and Mac or Linux users can select /dev/tty.usbmodem.
- Carefully look at the left portion of the screen and you will see the Upload button, click on it.
- After a brief period you will observe receiving(RX) and transmitting(RX) LEDs on the Arduino illuminating with a “Done uploading” message on the screen.
- If this doesn’t appear, there must be some error so follow the steps carefully again.
Conclusion
We have seen how Arduino is a very useful and budget-friendly device that can be used for making basic projects. The ability of Arduino to provide a programming interface and allow features like the detection of data from the environment makes it a great choice for designers, and artists. Despite the versatilities offered, there are certain restrictions associated with Arduino, and developments are being made in the Arduino design. Readers are advised to try some basic projects to enhance their understanding of the subject.
Getting Started With Arduino – FAQs
What are some different Arduino boards that can be used?
Arduino Uno is the most popular used board. Some other boards are Arduino Mega or Arduino Nano.
What are some basic projects that can be created using Arduino?
Arduinos can be used to make different projects like Ultrasonic sensors, Laser Turret Midi controllers, Retro Gaming, and Traffic Light controllers.
Does Arduino have the ability to connect to the internet?
Yes, with the help of networking modules, an Arduino can be connected to the internet. Some of the modules are Ethernet shields, Wi-Fi modules, or GSM/GPRS shields.
Share your thoughts in the comments
Please Login to comment...