Arduino – Temperature Sensor
Last Updated :
26 Apr, 2024
Sensors are widely used for sensing different quantities and quantifying them. One such example of a sensor is the temperature sensor which uses Arduino for displaying this temperature. The main feature of this sensor is that it can display the detected temperature on a Celsius scale.
In this article, we will study how to design this Temperature Sensor using the Arduino board and programming software. We will study the specifications needed for this sensor, and the methods and circuit diagrams used for designing this sensor. In addition to this, we will see the Arduino code written on IDE that will result in a sensor.
What is a Temperature Sensor?
Similar to any other sensor, the Arduino Temperature Sensor is used to sense the temperature and quantify the temperature measured in a measurable quantity which is voltage in this case. Therefore, we can define the Arduino Temperature Sensor as a device that produces a voltage proportional to temperature change in the environment. The three pins in an Arduino temperature are used for setting the reference level, setting up 5V, and measuring the variable voltage.
Arduino is used for creating this sensor since it needs to be programmed to convert the measured temperature value to an appropriate voltage. This is what a temperature sensor looks like :

Temperature sensor
Technical Specifications
Before getting started with the sensor, we need to mention some specifications of the sensor that can ensure proper working conditions for the sensor.
- The Arduino board should predict output in a common unit meaning the scale should be calibrated in a Celsius scale.
- The Arduino board must have an accuracy range of 0.5°C to ensure minimum error and maximize accuracy.
- It is preferred that the temperature sensor can accurately be predicted in the −55°C to 150°C range.
- The scale over which the temperature sensor operates must be linear and the scale factor should be around 10 mV/°C
Components of Arduino Temperature Sensor
Apparatus refers to the components that are needed for the project. The components required for designing a temperature sensor using Arduino include.
- One Breadboard
- Arduino Uno R3 (Generally this model is only preferred_
- One LM35 sensor
- Some wires for making connections.
These devices are easily available at nearby electronics shops.
Working Principle of Arduino Temperature Sensor
The idea behind temperature detection is to use a simple formula which is given by
ADC Value = sample * 1024 / reference voltage (+5v)
The temperature sensor LM35 sensor is used for detecting the temperature and sending this value to the Arduino. The Analog Digital Converter (ADC) is used to convert input analog values into a digital approximation using the formula provided above. When a +5 voltage is provided at the input, the digital approximation will be equal to
ADC Value = input voltage * 1024/4 so ADC Value = input voltage * 205
Temperature Sensor with its Circuit Diagram
Let us see the construction of Arduino – Temperature Sensor. Here is a circuit diagram of the sensor. We can refer to it for making connections. Note that the temperature sensor has three pins.
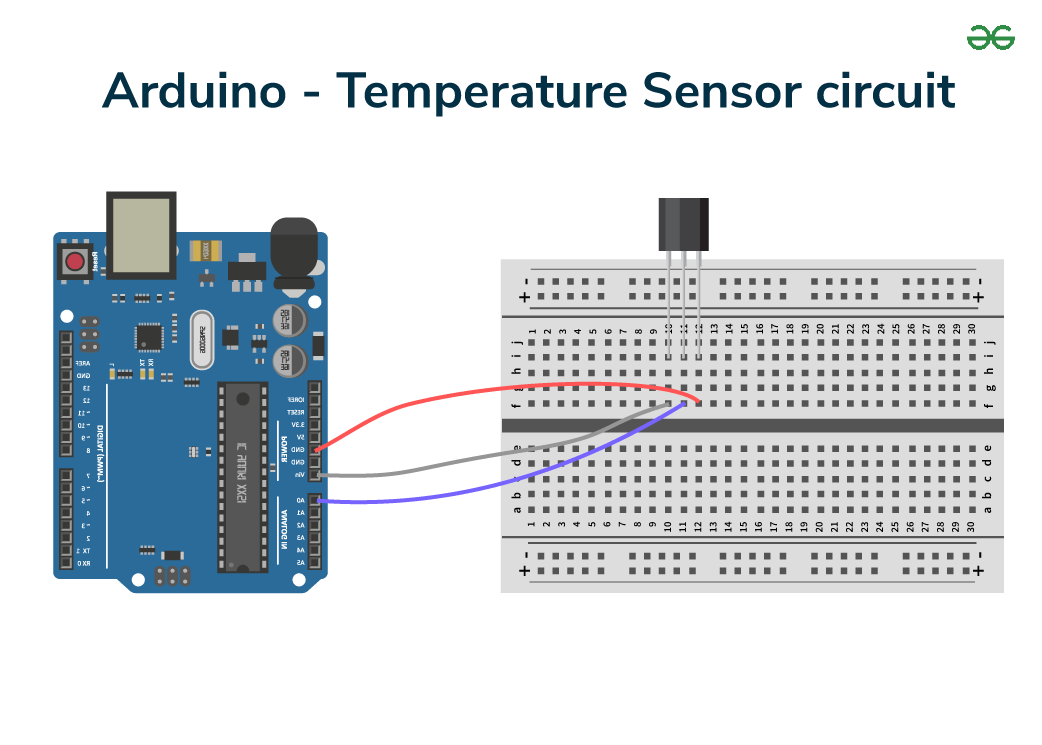
Arduino – Temperature Sensor circuit
- Pin 1(DC voltage): This pin is used for setting up the DC voltage pin to 5V on the Arduino UNO board.
- Pin 2(Analog voltage output): This pin is responsible for generating the output of the measured temperature.
- Pin 3(GND): This pin is used to set the ground level on Arduino using some reference voltage.
Connection of Arduino Temperature Sensor
.jpg)
Circuit connections of sensor
Note that the LM35 sensor has three terminals namely Vs, Vout, and GND. Each terminal has its significance and needs to be used carefully. These terminals are connected as follows:
- Connect a wire to supply Vs with 5V, the connection must be made to the appropriate pin on Arduino.
- Make a ground-to-ground connection from GND to GND on Arduino to set a reference level.
- Connect the Vout to Analog zero on the Arduino board. This will give the output on the serial port.
Pseudocode
Here is the pseudocode to understand the working of the sensor
Define some constants like temp and the pin that will be used for setting temperature.
Set up the environment in the setup() function at serial 9600.
Use the analogRead() function to read the input temperature from the sensor.
Convert the input value to the Celsius scale using the formula shown above.
Display the temperature at the output port using the print function and halt the program for a certain duration using the halt() function.
Code
C
float temp;
int tempPin = 0;

void setup() {
   Serial.begin(9600);
}

void loop() {
   temp = analogRead(tempPin);
   // read analog volt from sensor and save to variable temp
   temp = temp * 0.48828125;
   // convert the analog volt to its temperature equivalent
   Serial.print("TEMPERATURE = ");
   Serial.print(temp); // display temperature value
   Serial.print("*C");
   Serial.println();
   delay(1000); // update sensor reading each one second
}
Advantages of Arduino Temperature Sensor
Let us study some advantages of Arduino – Temperature Sensor
- Arduino temperature Sensor is easy to design and easy to understand due to the basic libraries and code lines used in it.
- The Arduino temperature Sensor can accurately predict the temperature value up to 0.50 C values.
- The Arduino temperature Sensor works in real-time and can show values in real-time by detecting any fluctuations in surroundings.
- The circuit components required for Arduino temperature sensors are cheap and cost-friendly.
- The Arduino temperature Sensor is a beginner-level project and has no prerequisites which make it the most common choice for projects.
Disadvantages of Arduino Temperature Sensor
Let us study some disadvantages of Arduino – Temperature Sensor
- Although, Arduino temperature Sensors can predict temperature ranges it is not possible to integrate them into professional projects due to the limitations of Arduino.
- The Arduino can detect errors up to 0.50 range but these can lead to inaccurate results in devices that are temperature sensitive.
- The range over which this sensor can predict temperature is limited therefore, it can’t be used over a wide temperature range.
- As compared to other devices like microcontrollers or microprocessors, the Arduino has comparatively low processing power.
- An Arduino takes some time to determine and provide reading, this response time can be large enough if the readings change continuously.
Applications of Arduino Temperature Sensor
Let us study some applications of Arduino – Temperature Sensor
- Sometimes, local weather reports use Arduino-based sensors to predict the temperature and weather fluctuations in a local region.
- Arduino-based sensors can be put to use for science activities like temperature detection for greenhouse gas models.
- Devices that respond to weather conditions like ventilators, heaters, and air conditioners can be automated using Arduino-based sensors.
- Clinics and other medical places can use the Arduino-based sensor to measure patients’ temperature and even tell the temperature of units that store medicines.
- Since aquatic life is possible only at a certain temperature range, Arduino-based sensors are installed in aquariums to measure this temperature.
Conclusion
Once you have uploaded this code on Arduino, the sensor will begin working. The Arduino will successfully display the temperature on the Arduino. It will appear on the serial port monitor. The sensor will work accurately and will update with fluctuations in temperature. You can make further modifications to improve the project according to your needs by incorporating some advanced boards.
Arduino – Temperature Sensor – FAQs
What are the other units in which temperature can be measured using the sensor?
The temperature can be measured in Kelvin, Fahrenheit, or Celsius scale using different formulas.
What are some functions used from common libraries for sensing purposes?
Functions like Environment. begin() and the methods Environment.readTemperature() & Environment.readHumidity() are used for the sensing purpose in the Arduino.
What is the LM35 sensor and its use in Arduino board?
LM35 sensor is an analog temperature sensor that operates on high voltage. It is generally used to produce output temperature on a Celsius scale.
Share your thoughts in the comments
Please Login to comment...