Facial expression detection using Deepface module in Python
Last Updated :
03 Jan, 2023
In this article, we are going to detect the facial expression of an already existing image using OpenCV, Deepface, and matplotlib modules in python.
Module Needed
- OpenCV: OpenCV is an open-source library in python which is used for computer vision, machine learning, and image processing.
- Matplotlib: Matplotlib is a comprehensive library for creating static, animated, and interactive visualizations in Python.
- Deepface: Deepface was built by an artificial intelligence researchers group at Facebook. It is a framework in python for facial recognition and attributes analysis. Deepface’s core library components are used in Keras and TensorFlow.
pip install deepface
This is the most basic expression detection technique and there are several ways in which we can detect facial expression.
Stepwise Implementation
Step 1: Importing the required module.
Python3
import cv2
import matplotlib.pyplot as plt
from deepface import DeepFace
|
Step 2: Copy the path of the picture of which expression detection is to be done, read the image using “imread()” method in cv2 providing the path within the bracket. imread() reads the image from the file and stores it in an array. Then use imshow() method of matplotlib. imshow() method converts data into image. Now plot the image using show method in order to ensure that the image has been correctly imported.
Python3
img = cv2.imread('img1.jpg')
plt.imshow(img[:, :, : : -1])
plt.show()
|
Output:
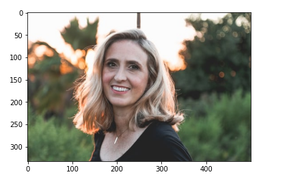
Output image
Step 3: Create a result variable that will store the result. Use Deepface analyze() method, Deepface analyze() method contains strong facial attribute analysis features such as age, gender, facial expressions. Facial expressions include anger, fear, neutral, sad, disgust, happy, and surprise. Print the result. The result shows the facial expressions percentage of the person.
Python3
result = DeepFace.analyze(img,
actions = ['emotion'])
print(result)
|
Output:

The result shows that person is 96% happy.
Below is the complete implementation:
Python3
import cv2
import matplotlib.pyplot as plt
from deepface import DeepFace
img = cv2.imread('img.jpg')
plt.imshow(img[:,:,::-1])
plt.show()
result = DeepFace.analyze(img,actions=['emotion'])
print(result)
|
Output:
Share your thoughts in the comments
Please Login to comment...