Eye blink detection with OpenCV, Python, and dlib
Last Updated :
03 Jan, 2023
In this article, we are going to see how to detect eye blink using OpenCV, Python, and dlib. This is a fairly simple task and it requires you to have a basic understanding of OpenCV and how to implement face landmark detection programs using OpenCV and dlib, since we’ll be using that as the base for today’s project.
Stepwise Implementation
Step 1: Installing all required packages
So we’ll install all our dependencies in this step. We’re going to use OpenCV for computer vision, dlib library for facial recognition, and also the imutils package to use some functions that will help us convert the landmarks to NumPy array and make it easy for us to use, so let’s install these first.
pip install opencv-python numpy dlib imutils
Step 2: Initialize and read from the webcam
Python3
import cv2
cam = cv2.VideoCapture(0)
while True:
_, frame = cam.read()
cv2.imshow('Camera Feed', frame)
if cv2.waitKey(1) & 0xFF == ord('q'):
break
cam.release()
|
Step 3: Facial Landmark Detection using dlib
Note: The facial landmark detector included in the dlib library is an implementation of the One Millisecond Face Alignment with an Ensemble of Regression Trees paper by Kazemi and Sullivan (2014).
Facial landmarks are the key attributes of a face in an image like eyes, eyebrows, nose, mouth, and Jaw. Since Steps 1 – 3 is not the primary focus of this article so we won’t go in-depth, but instead, I’ll write comments on the code for easy understanding.
Here is the code basic code for facial landmark detection, that we’ll be using later for eye blink detection.
Python3
import cv2
import dlib
import imutils
from scipy.spatial import distance as dist
from imutils import face_utils
cam = cv2.VideoCapture('assets/Video.mp4')
detector = dlib.get_frontal_face_detector()
landmark_predict = dlib.shape_predictor(
'Model/shape_predictor_68_face_landmarks.dat')
while 1:
if cam.get(cv2.CAP_PROP_POS_FRAMES) == cam.get(
cv2.CAP_PROP_FRAME_COUNT):
cam.set(cv2.CAP_PROP_POS_FRAMES, 0)
else:
_, frame = cam.read()
frame = imutils.resize(frame, width=640)
img_gray = cv2.cvtColor(frame, cv2.COLOR_BGR2GRAY)
faces = detector(img_gray)
for face in faces:
cv2.rectangle(frame, face[0], face[1],
(200, 0, 0), 1)
cv2.imshow("Video", frame)
if cv2.waitKey(5) & 0xFF == ord('q'):
break
cam.release()
cv2.destroyAllWindows()
|
Now the question arises, how are we going to use these landmarks for eye detection.
Eye Landmarks
We saw that we can extract any facial structure from the 68 Facial Landmarks that we detected. So, we’ll extract the landmarks of the eyes i.e 6 (x,y) coordinates for each eye, for any given face in an image. And then we’ll calculate the EAR for these landmarks.
Eye Aspect Ratio (EAR)
This method is very simple, efficient, and doesn’t require anything like image processing. Basically, this ratio gives us a certain relation between the horizontal and vertical measurements of the eye. This is the equation to calculate the EAR using the six parameters of the eye :
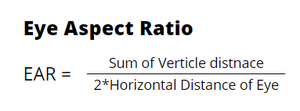
image created by the author using canvas
We can use the given function to calculate the EAR :
Python3
def calculate_EAR(eye):
y1 = dist.euclidean(eye[1], eye[5])
y2 = dist.euclidean(eye[2], eye[4])
x1 = dist.euclidean(eye[0], eye[3])
EAR = (y1+y2) / x1
return EAR
|
What’s so magical about this EAR?
This is the most important part, when you calculate the EAR of an eye, it remains constant when the eye is open but it suddenly drops when the eye is blinked. Below, I have shown a graph to show it’s working:
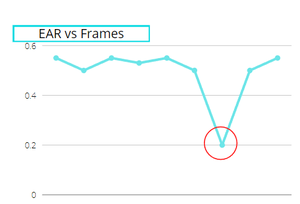
. ~image by the author using canvas
As you can see in the image the overall value of EAR was constant throughout except at one point i.e when the eye is blinked, making it one of the most simple and most efficient ways of detecting an eye blink.
Since we have two EAR for each eye respectively we’ll take the average of both the EAR for the right eye and the EAR for the left eye and then check if it is lower than a certain threshold ( we’ll create a variable to set its value) and this threshold might vary a bit, for me it worked with 0.4 or 0.5 but in some cases, it works with 0.25 or 0.3 as well. It depends on the FPS of your video or webcam.
Next: We’ll keep the count of the frames when the EAR is lower than the threshold and if the count is 3 (or 5 depending on the fps) frames then we’ll consider a blink detected.
Below is the full implementation
Python3
import cv2
import dlib
import imutils
from scipy.spatial import distance as dist
from imutils import face_utils
cam = cv2.VideoCapture('assets/my_blink.mp4')
def calculate_EAR(eye):
y1 = dist.euclidean(eye[1], eye[5])
y2 = dist.euclidean(eye[2], eye[4])
x1 = dist.euclidean(eye[0], eye[3])
EAR = (y1+y2) / x1
return EAR
blink_thresh = 0.45
succ_frame = 2
count_frame = 0
(L_start, L_end) = face_utils.FACIAL_LANDMARKS_IDXS["left_eye"]
(R_start, R_end) = face_utils.FACIAL_LANDMARKS_IDXS['right_eye']
detector = dlib.get_frontal_face_detector()
landmark_predict = dlib.shape_predictor(
'Model/shape_predictor_68_face_landmarks.dat')
while 1:
if cam.get(cv2.CAP_PROP_POS_FRAMES) == cam.get(
cv2.CAP_PROP_FRAME_COUNT):
cam.set(cv2.CAP_PROP_POS_FRAMES, 0)
else:
_, frame = cam.read()
frame = imutils.resize(frame, width=640)
img_gray = cv2.cvtColor(frame, cv2.COLOR_BGR2GRAY)
faces = detector(img_gray)
for face in faces:
shape = landmark_predict(img_gray, face)
shape = face_utils.shape_to_np(shape)
lefteye = shape[L_start: L_end]
righteye = shape[R_start:R_end]
left_EAR = calculate_EAR(lefteye)
right_EAR = calculate_EAR(righteye)
avg = (left_EAR+right_EAR)/2
if avg < blink_thresh:
count_frame += 1
else:
if count_frame >= succ_frame:
cv2.putText(frame, 'Blink Detected', (30, 30),
cv2.FONT_HERSHEY_DUPLEX, 1, (0, 200, 0), 1)
else:
count_frame = 0
cv2.imshow("Video", frame)
if cv2.waitKey(5) & 0xFF == ord('q'):
break
cam.release()
cv2.destroyAllWindows()
|
Output:
If you’re using a different video or if you’re using a webcam you’re FPS is going to be different, so might wanna trying changing the values of the variables we defined, although they work fine in most cases.
Share your thoughts in the comments
Please Login to comment...